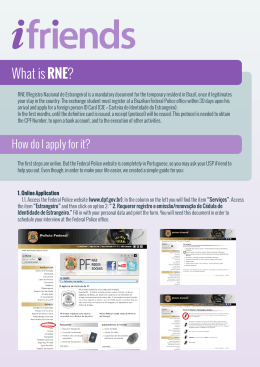
GUIDEBOOK FOR INTERNATIONAL STUDENTS DOCUMENTS RNE CPF DIPLOMA 1 DOCUMENTS 1. RNE – Registro de estrangeiro (Foreigner registration) a. Why do you need it and how to get it All foreigners who establish residency in Brazil are required to register with the Federal Police within 30 days from the date of entry into the country. In order to do it, you have to apply online and schedule an appointment to present your documents. Fill out the application here. The instructions on how to fill it out and schedule an appointment are below. Tab “Dados pessoais” You’ll be asked to inform “Unidade da Polícia Federal” from a drop down menu. Choose “SP”. Then, choose “DELEMIG/SP – SAO PAULO”. List your personal information, as follows: your full name for “Nome atual completo”, your father’s name at “Nome do pai completo”, your mother’s name at “Nome da mãe completo”; choose your gender from a drop down menu: MASCULINO for males or FEMININO for females; your date of birth at “Data de nascimento” in dd/mm/yyyy format; choose your marital status from a drop down menu: SOLTEIRO for single, CASADO for married, VIÚVO for widow/widower, SEPARADO JUDICIALMENTE for legally separated, DIVORCIADO for divorced, or OUTROS for other options; choose the country you were born in from a drop down menu at “País de nascimento”; the city you were born in at “Cidade de nascimento”; choose your nationality from a drop down menu at “País de nacionalidade”. In “Ocupação principal”, click the magnifying glass and choose “ESTUDANTE” from the list. Inform your email and click “Próxima” to move on. Tab “Entrada no País” On the next page, “Local de entrada” is where you’ll be asked to inform your port of entry (e.g. if you fly into Guarulhos Airport, you’ll choose “SP” from the first drop down menu and “GUARULHOS” from the next); “Data de entrada” is your arrival date, “Meio de transporte” is the mode of transport by which you arrived in Brazil: AVIÃO for airplane, NAVIO for ship, ÔNIBUS for bus and OTHERS for other options; “Tipo documento de viagem” asks for the kind of document you used to get into Brazil: from a drop down, choose PASSAPORTE if it was your passport, inform the passport number in “Número doc de viagem” and choose the country that issued your passport from the drop down menu at “País expedidor doc. viagem”. Click “Próxima” to go on to the next page. Tab “Endereço Residencial” On the next page, you’ll have to provide an address in Brazil: in “Endereço”, inform your street name and number; in “Distrito/Bairro”, inform your district; in “Cidade”, first choose “SP” from the first drop down menu and the city from the second; “CEP” is the postal code and “DDD – Telefone” is a telephone number, with the area code 11 in the first space. If you don’t have a landline, you can enter the International office number: 11-33567220. Inform your mobile number and click “Próxima”. Tab “Endereço Comercial” The next page is where you list the information about the university. In “Estabelecimento Comercial/Estudantil”, enter UFABC. Then inform Av. Dos Estados, 5001 for “Endereço” and Bangu for “Bairro”. Choose “SP” and “Santo André” from the drop down menus. Click “Próxima” one last time. Tab “Termo Responsabilidade” The last page is where you establish the truth of all information provided by ticking the box and copying the CAPTCHA text. Finally, click “Salvar”. Print out the form and keep it in hand. Scheduling an appointment – “Agendamento” The next step in scheduling your appointment at Superintendência Regional de São Paulo on this page. You’ll have to inform the “Código de Solicitação” on the top left of the application form you have just printed, the CAPTCHA text and click “Prosseguir”. Choose your preferred date and time. Click “Salvar” and print out the page. Make sure you keep this appointment and arrive there early. Issuing the GRU Then, you have to issue a document called “GRU”, which is what you’ll take to the bank to pay for the registration fees. They can be issued here. You’ll have to do this twice. Twice, you’ll enter your full name (“Nome”), street address and number (“Endereço”), district (“Bairro”), city (“Cidade”), country (“País”), your email and your mother’s name (“Nome da mãe”). In “Unidade Arrecadadora”, choose “SP (027-2) SUPERINTENDENCIA REGIONAL NO ESTADO DE SAO PAULO”. 2 On the first time, click on the magnifying lens next to “Código da Receita STN” and choose “REGISTRO DE ESTRANGEIROS/RESTABELECIMENTO DE REGISTROS”. It will automatically fill the information for “Valor total R$:” with 64,58. Click “Gerar guia” and it will open up a window that you have to print. On the second time, click on the magnifying lens next to “Código da Receita STN” and choose “CARTEIRA DE ESTRANGEIRO DE PRIMEIRA VIA”. It will automatically fill the information for “Valor total R$:” with 124,23. . Click “Gerar guia” again and print the new window. Pay both registration fees at any bank and keep the payment slips. b. How to get there and what to take with you The Federal Police headquarters is located at Rua Hugo D'Antola, 95 - Lapa de Baixo. Assuming you’re setting off from Santo André, you can take the train from Estação Prefeito Celso Daniel – Santo André, which is quite close to the university. You have to board CPTM Line 10 Turquesa towards Brás. When you get to Brás, you have to switch trains and board Metrô Line 3 Vermelha towards Palmeiras-Barra Funda. Once you get there, you have to switch to CPTM Line 7 Rubi and get off at Lapa station. Take the exit at Rua Engenheiro Fox and walk towards Rua Hugo D’antola, until you see a sign that says “Departamento de Polícia Federal”. The trip should take you about 2 hours. You should take all following documents: Your passport, with copies of all used pages; Visa and original visa request form; 2 (two) portraits, size 3 cm x 4 cm, against a white background; The payment slips; Some form of proof of address. The proof of address can be a household bill, but you’re going to have to take a declaration from the person whose name is on the bill, stating you live with them. Ask the person to authenticate their signature on the document. The Police are going to put a stamp on your passport, with a protocol number confirming you have registered with them. The actual identification card, called CIE – Cédula de Identidade de Estrangeiro – will get ready in about 60 days, and you’ll have to go back there to get it. 2. CPF – Cadastro de Pessoa Física The individual taxpayer registration can be obtained before you even come to Brazil, but we recommend you do it as soon as you get your RNE. It is a number that represents a person at the Brazilian Tax authority (Receita Federal), and you need it to open a bank account and to make all kinds of purchases. The registration form can be found here (in English). You first have to select your country from a drop down menu. As you’re already in Brazil, select “Others”. Click Send to go to the next page. First, select Registration. Then, fill out your full name, your gender, your date of birth, your mother’s full name, your address (in Brazil), your nationality, your phone number if you have one and your email. Leave date of exit black. Click Submit. You’ll see a pop up window, which you’ll have to print and take to a post office (called “Correios”). Make sure you take your documents (Passport, RNE) with you. It costs R$5,70. They’ll give you a receipt, which you’ll take to Receita Federal, along with your other documents. Before you go, you can check out the status of your request here. There are two Receita Federal offices in ABC: CAC Santo André, located at Avenida José Caballero, 35 – Vila Bastos and CAC São Bernardo do Campo, located at Rua Marechal Deodoro, 480 – Centro. 3. Diploma validation for graduate students In order to obtain a graduate degree in Brazil, you’ll have university. Brazilian universities are able to validate diplomas of International graduate students at UFABC have to request enrollment. It’s important to check out whether UFABC can validate your Provost Office for Undergraduate education website. Here’s what you’ll need to present at the university: to validate your undergraduate diploma with a Brazilian programs that they offer. their diploma validation on their second quadmester of diploma – you’ll find the list of programs we offer on the A letter to the Rector soliciting your validation (in Portuguese), the template for which can be found at this page, under “Modelo de requerimento de revalidação de diploma de graduação estrangeiro”; Diploma: original, authenticated by the Brazilian Embassy or Consulate in the country where it was issued, a certified translation of the diploma in Portuguese, plus a copy of the diploma after it’s been authenticated and of the translation; 3 Academic transcript: original, authenticated by the Brazilian Embassy or Consulate in the country where it was issued, a certified translation of the transcript in Portuguese, plus a copy of the transcript after it’s been authenticated and of the translation; Course syllabus and curriculum of all courses in the transcript: authenticated by the Brazilian Embassy or Consulate in the country where it was issued, plus a copy of the document after it’s been authenticated; Declaration issued by the Brazilian Embassy or Consulate or other competent authority as to the regularity of the institution of education that issued the diploma, in the latter case authenticated by the Brazilian Embassy or Consulate, a certified translation of the declaration in Portuguese, plus a copy of the declaration after it’s been authenticated; Secondary school diploma: original, plus a copy; RNE: original, plus a copy; Marriage certificate: original, in case you got married and changed your name since the diploma has been issued, plus a copy; Pay the validation fee for R$ 1300 (thirteen hundred reais), which you can issue at this page. Instructions on issuing the GRU: In the field “Unidade Gestora UG”, insert the number 154503. Then, you’ll be able to choose “FUNDACAO UNIVERSIDADE FEDERAL DO ABC” from the drop down next to “Gestão”. In “Código de Recolhimento”, select “28927-2 - Taxa de Registro de Diploma” from the drop down menu and click “Avançar”. On the next page, you’ll fill in the information marked in red. In “Número de Referência”, insert “99.402”, which is the code for undergraduate diploma validation. In “Competência (mm/aaaa)”, insert the current month in mm/yyyy format. As for “Vencimento (dd/mm/aaaa)”, insert the last day of the current month in dd/mm/yyyy format. In “CNPJ ou CPF do contribuinte”, put your CPF number and in “Nome do Contribuinte/Recolhedor”, put your full name. “(=) Valor Principal” is where you’ll insert the cost of the service, and that’s “1,300.00”. Insert the same amount for “(=) Valor total”. Click “Emitir GRU” and it’ll open in a new window. Print it and take it to a Banco do Brasil agency for payment. Please note that the fee is non-refundable, so make sure the university can validate your diploma. The whole process should take up to 90 days. You’ll be notified via email of the results. After it’s been validated, you’ll have to register it. Registering your validated diploma costs R$ 150 and you have to follow the same steps to issue the GRU, except this time you’ll insert code “99.401” and “150,00” in “(=) Valor Principal” and “(=) Valor Total”. FOR FURTHER INFORMATION, YOU CAN CONTACT THE INTERNATIONAL AFFAIRS OFFICE AT [email protected] http://ri.ufabc.edu.br 4
Baixar