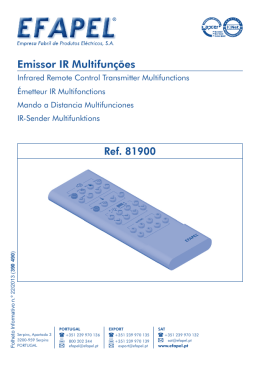
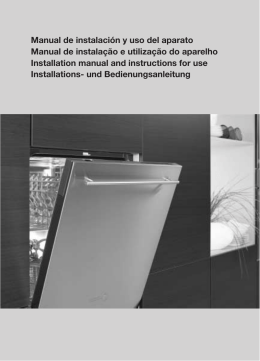
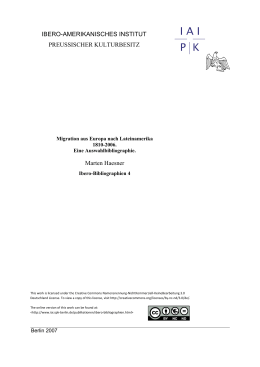
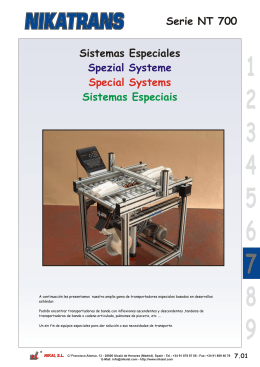
INTERRUPTOR HORARIO
ASTRONÓMICO UNIVERSAL
ASTRO LOG
INSTRUCCIONES DE EMPLEO
Programa de
vaciones ó festivos
Estado de circuito C2
Estado circuito C1
Indicador de canal
permanente
Indicador día
de la semana
Horario
verano
Hora actual
Formato de hora
12 horas
Horario
invierno
Fecha actual
Escala de tiempo
para cronograma
0
3
6
9 12 15 18
21 24
ON
OFF
Incrementar o ascender
por menú
Accionamiento manual C2
Decrementar o descender
por menú
1
2
3
4
5
6
7
Accionamiento manual C1
C2
C1
C
C1
OK
C2
Validar opción de pantalla
MENU
Retroceder
Acceder al menú
DESCRIPCIÓN
El ASTRO LOG es un interruptor horario diseñado para controlar las cargas
luminosas en función de las horas de ortos (amanecer) y ocasos (anochecer).
Dispone de un programa que ajusta automáticamente, cada día, el horario de
encendido (ocaso) y apagado (orto), sin necesidad de mantenimiento.
Su pequeño tamaño de tan solo 2 módulos, lo hacen ideal para su instalación en
cuadros con poco espacio disponible. El aparato dispone de 2 circuitos
independientes que pueden ser programados de forma astronómica o con horarios
fijos.
INSTALACIÓN
ATENCIÓN: La instalación y el montaje de los aparatos eléctricos debe ser
realizada por un instalador autorizado.
ANTES DE PROCEDER A LA INSTALACIÓN DESCONECTAR LA
ALIMENTACIÓN.
El aparato está internamente protegido contra las interferencias por un circuito de
seguridad. No obstante, algunos campos especialmente fuertes pueden llegar a
alterar su funcionamiento. Las interferencias pueden evitarse si se tienen en
cuenta las siguientes reglas de instalación:
- El aparato no debe instalarse próximo a cargas inductivas
(motores, transformadores, contactores, etc. )
- Conviene prever una línea separada para la alimentación
(si es preciso provista de un filtro de red).
- Las cargas inductivas tienen que estar provistas de supresores de
interferencias (varistor, filtro RC).
Si el interruptor horario se usa en combinación con otros dispositivos en una
instalación, es necesario comprobar que el conjunto así constituido no genera
perturbaciones parásitas.
MONTAJE: Independiente en armario de distribución, provisto de perfil simétrico
de 35mm., de acuerdo a la norma EN 60715 (Rail DIN)
CONEXIÓN: Según esquema de conexiones
C2
C1
4
5
6
L
1
2
3
N
PUESTA EN SERVICIO E INSTALACIÓN
En todos los apartados de programación se cumplen las siguientes reglas:
- Los datos a modificar se identifican porque parpadean.
- Cada pulsación de las teclas ∆ y ∇ incrementa o decrementa el dato que
parpadea. Si se mantiene pulsada la velocidad de incremento/decremento
pasa a ser de 5 unidades por segundo.
- Después que el último dato se confirma con OK o si no se pulsa ninguna
tecla durante más de 1 minuto el aparato vuelve al funcionamiento normal:
la pantalla muestra la hora actual, la fecha y el estado de los circuitos C1 y
C2.
RESET. PUESTA A CERO
Al pulsar las cuatro teclas simultáneamente durante más de 3 segundos se borra
toda la programación existente y se entra en el menú IDIOMA.
SELECCIÓN DE IDIOMA
Pulsando “OK” entramos en el menú IDIOMA y con las teclas ∆ y ∇ elegimos el
idioma deseado y validamos con la tecla “OK “. Automáticamente se entra en la
programación de FECHA AÑO.
PUESTA EN HORA
Pulsando “OK “entramos en MENU PROGRAMA y con las teclas ∆ y ∇,
seleccionamos MENU FECHA, validando con “OK “ entramos en FECHA AÑO,
en pantalla aparecen parpadeando los dígitos del año, con las teclas ∆ y ∇ se
cambia el valor del año, con la tecla “OK “ validamos el dato. De igual modo
introducimos los datos de MES, DÍA, DÍA DE LA SEMANA, HORA Y MINUTOS, al
validar con la tecla “OK“ entramos en ZONA LATITUD. Introducimos el dato de
nuestra latitud según nuestra posición geográfica y pulsamos OK. A continuación
introducimos la hora de orto (amanecer) de nuestra posición validamos con OK y
procedemos de igual forma para el ocaso (anochecer). La hora de orto y ocaso
puede ser visualizada desde el modo normal pulsando “C”, mostrando la pantalla
AST y la hora de orto y ocaso del día actual.
CAMBIO DE ZONA GEOGRÁFICA
Si una vez programado el aparato deseamos cambiar la latitud, la hora de orto u
ocaso entramos de nuevo en MENU ZONA y procedemos a cambiar los
parámetros necesarios.
PROGRAMACIÓN
En modo normal pulsar la tecla OK y se accede a MENU PROGRAMA, pulsando
nuevamente OK aparece en pantalla PROGRAMA ENTRAR. Pulsamos OK y se
muestra en pantalla PROGRAMA PROG 01, si deseamos programar una
maniobra en este programa pulsamos OK y aparece en pantalla PROG 01
ENTRAR, volvemos a pulsar OK y elegimos el circuito y la maniobra que
deseamos realizar entre: C1 ON, C1 OFF, C2 ON y C2 OFF. Validamos la
selección con OK y seleccionamos el tipo de la maniobra, que puede ser: Hora
fija, Astronómica a la hora del Orto o Astronómica a la hora del ocaso.
MANIOBRA DE HORA FIJA
Si hemos seleccionado hora fija pulsamos OK e introducimos los datos de hora y
minutos, día o días de la semana en los que deseamos, aceptando o no, día a día,
en los que deseamos que se realice la maniobra y validamos con OK. Si al validar
el último día de la semana con la tecla OK mantenemos esta pulsada
seleccionamos esta maniobra como festivo, aparece en pantalla la palabra
FESTIVOS y el símbolo “ “ y al validar con OK, la pantalla nos muestra
PROGRAMA PROG 02.
MANIOBRA ASTRONÓMICA
Una vez elegido el circuito y la maniobra entre C1 ON, C1 OFF, C2 ON y C2 OFF,
nos aparece el tipo de maniobra a escoger. Seleccionamos la maniobra
astronómica de orto u ocaso que queremos realizar y nos aparece en pantalla la
posibilidad de corregir la hora de orto u ocaso seleccionada. Si estamos de
acuerdo en que se realice en la indicada en pantalla, dejamos la corrección a cero
y validamos hora y minutos con OK. Si deseamos corregirla en más o en menos,
introducimos el tiempo de corrección en hora y minutos (hasta ± 9 horas 59
minutos), mostrándose en pantalla automáticamente la hora en la que se realizará
la maniobra., validamos con OK y a continuación seleccionamos el día o días de la
semana que deseamos que se realice esta maniobra.
Si al validar el último día de la semana con la tecla OK mantenemos esta tecla
pulsada seleccionamos esta maniobra como festivo, aparece en pantalla la
palabra FESTIVOS y el símbolo “
“.
ATENCIÓN: Si programamos alguna maniobra en FESTIVO, el programa
VACACIONES no puede utilizarse y es eliminado del menú quedando como
periodo FESTIVO.
Si programamos maniobras, en un mismo circuito, astronómicas (orto – ocaso) y
de hora fija tenemos que tener en cuenta que pueden solaparse ya que las
maniobras astronómicas se adelantan o atrasan durante el año, pudiéndose
producir maniobras inadecuadas.
Por ejemplo: Queremos encender un escaparate al anochecer (maniobra
Astronómica) y que se apague a las 21:30 horas (maniobra Hora fija). Como la
maniobra astronómica de encendido se va adelantando durante el verano, llegará
un momento que anochece más tarde de las 21:30 horas y, por tanto, el
encendido se hace después de la hora programada como apagado, no
realizándose ningún apagado y permaneciendo encendido hasta una nueva orden
contraria.
Esta situación se puede solucionar poniendo en serie los dos circuitos o
programando otra maniobra más de apagado de seguridad posterior a la hora del
ocaso.
PRIORIDAD
En caso de que 2 maniobras contrarias coincidan en el mismo momento el
ASTRO LOG, siempre realizará la maniobra de OFF.
VISUALIZACIÓN DE LAS MANIOBRAS PROGRAMADAS
Pulsamos OK para entrar en MENU PROGRAMA, pulsamos nuevamente OK y la
pantalla cambia a PROGRAMA ENTRAR y al pulsar de nuevo OK entramos en
PROGRAMA PROG 1, pulsando sucesivamente las teclas ∆ y ∇ podemos ir
viendo todos los programas del 1 al 22).
CRONOGRAMA
Desde el modo normal pulsando 2 veces “C” aparece en pantalla C1 y su estado y
el cronograma de las maniobras programadas en ese circuito, para visualizar el
estado del circuito C2 pulsamos una vez mas “C”.
MODIFICAR O BORRAR MANIOBRAS
Pulsamos OK para entrar en el MENU PROGRAMAS, nuevamente pulsamos OK
y la pantalla cambia a PROGRAMA ENTRAR, aceptamos con OK y nos aparece
PROGRAMA PROG 1, con las teclas ∆ y ∇ seleccionamos el programa a
modificar o borrar y validamos con OK, apareciendo en pantalla el programa
seleccionado y PROG X ENTRAR, si deseamos modificarlo aceptamos con OK y
procedemos como en el apartado Programación. Si lo que queremos es borrar la
maniobra, con ∆ y ∇ seleccionamos BORRAR y validamos con OK.
BORRADO DE TODAS LAS MANIOBRAS
Entramos en MENU PROGRAMA pulsando OK, pulsándola de nuevo accedemos
a PROGRAMA ENTRAR, con las teclas ∆ y ∇ seleccionamos PROGRAMA
BORRAR, validamos con OK y aparece BORRAR TODO: NO, con ∆ y ∇
seleccionamos BORRAR TODO: SI y aceptamos con OK.
ACCIONAMIENTO MANUAL
Se puede activar o desactivar temporalmente el canal 1 ó 2 desde el modo
normal. Pulsando ∇ para C1 y ∆ para C2.
ACCIONAMIENTO MANUAL PERMANENTE
Entramos en MENU PERMANENT. Validando con OK, aparece en pantalla
PERMANENT C1: SI, con ∆ y ∇ seleccionamos: C1: SI,
C1: NO, C2: SI ó C2: NO, según el canal que queramos activar o desactivar de
modo permanente. El canal seleccionado queda permanentemente en la posición
en la que este hasta que, del mismo modo, se modifique su estado.
Estando activado el accionamiento permanente es posible cambiar su estado (de
ON a OFF o viceversa) con la tecla de accionamiento manual ( C1) (
C2)
correspondiente al circuito deseado sin desactivar por ello el estado permanente.
En estado permanente no se realiza ninguna de las maniobras programadas.
Cuando un circuito está en estado permanente aparece en pantalla el símbolo
correspondiente (
).
PROGRAMACIÓN AVANZADA (FUNCIONES ESPECIALES) EXTRAS
CAMBIO DE HORARIO (ESTACIÓN) (ADELANTO RETRASO DE HORA)
Para entrar al MENU pulsar la tecla “OK “, con las teclas ∆ y ∇ buscamos la
opción EXTRAS. Validamos con “OK “y aparece en pantalla EXTRAS ESTACION,
pulsamos de nuevo “OK “y la pantalla muestra ESTACION: AUTO, con las teclas
∆ y ∇ seleccionamos entre las tres opciones posibles: AUTO, MANUAL y
DESACT. y validamos la opción escogida con “ OK “ .
(Si existiese una o varias maniobras programadas coincidentes en el periodo de
cambio horario estas se duplicaran o no se realizaran dependiendo del cual sea el
cambio horario).
AUTO (realiza automáticamente el cambio de horario el último domingo de marzo
y el último domingo de octubre a las 2:00 h y a las 3:00 h respectivamente).
Esta opción no permite cambios. Al elegir esta opción aparece en pantalla
ESTACION AUTO.
MANUAL (Permite elegir el día y hora para realizar el cambio de horario)
Al elegir esta opción aparece en pantalla EST I Æ V, el mes y la fecha del cambio
de invierno a verano, parpadeando la fecha correspondiente al mes con las teclas
∆ y ∇ programamos el mes en el que deseamos que se realice el cambio
Validamos con “OK “y parpadea la cifra correspondiente al día, seleccionamos del
mismo modo el día, la hora y los minutos y volvemos a validar con OK. Aparece
en pantalla EST V–I (verano – invierno) y del mismo modo programamos la fecha
y hora del cambio.
DESACTIVADO (DESACT) (no realiza el cambio de horario)
Si seleccionamos esta opción y validamos con “OK “no se realizará el cambio
horario y volvemos al MENU EXTRAS.
PROGRAMACIÓN DEL PERIODO FESTIVOS
Este menú solo aparece en pantalla si hemos programado alguna maniobra en
MENU PROGRAMACIÓN como FESTIVOS.
Solo puede ser programado un periodo FESTIVOS. Entramos en MENU EXTRAS
FESTIVOS y la pantalla nos muestra FESTIVOS DESACT, esta opción nos
permite desactivar el programa de vacaciones.
Si deseamos introducir un programa de festivos pulsamos ∆ y ∇ y aparece en
pantalla FESTIVOS EDITAR, validamos con OK y programamos el INICIO por
el siguiente orden: mes, día, hora y minuto. A continuación programamos el FIN
del periodo de festivos de la misma forma y en el mismo orden.
En este periodo el aparato solo realizará las maniobras programadas como
festivos. Durante el periodo FESTIVO aparecerá el símbolo (
).
PROGRAMA DE VACACIONES
Entramos en MENU EXTRAS VACACIONES y la pantalla nos muestra
VACACIONES DESACT, esta opción nos permite desactivar el programa de
vacaciones. Si deseamos introducir un programa de vacaciones pulsamos ∆ y ∇
y aparece en pantalla VACACIONES EDITAR, validamos con OK y programamos
el INICIO por el siguiente orden: mes, día, hora y minuto. A continuación
programamos el FIN del periodo de vacaciones de la misma forma y en el mismo
orden. En este periodo el aparato no realizará ninguna maniobra y aparece en
pantalla el símbolo (
).
ATENCIÓN: Si programamos alguna maniobra en FESTIVO, el programa
VACACIONES no puede utilizarse y es eliminado del menú quedando como
periodo FESTIVO.
CONTADOR
Entramos en MENU EXTRAS CONTADOR nos aparece en pantalla CONTADOR
C1 y las horas en las que el canal C1 ha estado activado (Posición ON) con las
teclas ∆ y ∇ nos aparece el contador del canal C2. Los contadores solo
incrementaran horas cuando el equipo tenga alimentación.
Para poner a cero la lectura de los contadores basta con ponernos en el contador
que deseamos borrar y pulsar OK, nos aparece en pantalla BORRAR C1 o
BORRAR C2, según proceda y seleccionamos “SI” con las teclas ∆ y ∇ validando
con OK.
MODO 12H – 24H
Entramos en MENU EXTRAS 12H – 24H pulsamos OK y con las teclas ∆ y ∇
seleccionamos el modo en el que queremos visualizar la hora. Validamos la
selección con OK.
CONTRASTE
Entramos en el MENU EXTRAS CONTRASTE, pulsamos OK y aparece en
pantalla CONTRASTE y un número del 0 al 9 correspondientes al contraste de la
pantalla. Con las teclas ∆ y ∇ seleccionamos el grado de contraste deseado y
validamos con OK.
CARACTERISTICAS TECNICAS
Alimentación
Tipos de maniobras.
Precisión de maniobra:
Precisión de marcha:
Reserva de marcha:
Temperatura de funcionamiento:
Tipo de protección:
Clase de protección:
Situación de contaminación:
ON OFF ASTRONÓMICA
Al segundo
± 1s/ día a 23 ºC
4 años sin alimentación (Pila
de Litio)
De –10 ºC a +45 ºC
IP 20 según EN 60529
II en montaje correcto
2
DIMENSIONES
65
35
88
60
45
Si necesita más información sobre los Ortos y Ocasos de la zona a instalar el
aparato puede recabarla en las siguientes paginas:
www.mfom.es/ign/home/astronomia/publico/efemerides/salidasypuestasdesol.html
www.sunrisesunset.com
www.worldtime.org
Según indicación en el
aparato.
2x16 (10) A/250 V~
Poder de ruptura:
Cargas máximas recomendadas (N.A.):
Lámparas incandescentes
Fluorescentes sin compensar
Fluorescentes compensados
Halógenas baja tensión
Halógenas (230 V.)
Lámparas bajo consumo
3000 W
1200 VA
1200 VA 150 μF
1000 VA
2500 W
10X23 VA
Contacto:
Consumo propio:
Tipo de acción:
Espacios de Memoria:
AgSnO2 conmutado
6 VA (1 W aprox)
Tipo 1B, 1S, 1T y 1U.
22
02/11.2011
A016.26.52569
ORBIS TECNOLOGÍA ELÉCTRICA S.A.
Lérida, 61
E-28020 MADRID
Tel.: + 34 91 567 22 77
Fax + 34 91 571 40 06
E-mail: [email protected]
http://www.orbis.es
DIGITAL TIME SWITCH
ASTRO LOG
OPERATING INSTRUCTIONS
Programm of
holidays and festivity
State of circuit C2
State of circuit C1
Circuit permanent
override indication
Day of the week
indication
Summer
time
Current time
AM/PM Mode
Winter time
Time scale for
chronogram
Current date
0
3
6
9 12 15 18 21 24
ON
OFF
Increment or move up in
menu
Decrement or move
down in menu
1
2
3
4
5
6
7
Circuit C2 override
Circuit C1 override
C2
C1
C
C1
OK
MENU
C2
Move back in menu
Confirms the selection
Starts menu
DESCRIPTION
ASTRO LOG is a time switch designed to control lighting based on sunrises and
sunsets hours. Includes a programme which automatically adjusts, every day, the
turning on (sunset) and off (sunrise) of lights, without the need of maintenance.
The reduced size of the time switch, only two mudules, makes it ideal for
installation in control panels with limited space availability. The device includes two
independent circuits that can be programmed with astronomic or with fixed times.
INSTALLATION
ATTENTION: Electrical devices must be installed and assembled by authorized
installer.
DISCONECT THE MAINS SUPPLY BEFORE INSTALLING THE DEVICE.
VERY IMPORTANT: This time switch is protected internally against interference by
a safety device. However, particularly strong electromagnetic fields may alter its
operation. Such interference can be avoided by adhering to the following
recommendations during installation:
- The device should not be installed near inductive loads (motors,
transformers, contactors, etc)
- A separate power line is recommended (equipped with a network filter if
necessary)
- Inductive loads should be equipped with interference suppressors (varistor,
RC filter)
If the time switch is to be used in combination with other devices in an installation,
it is necessary to verify that no parasitic disturbances will be caused by the group.
MOUNTING: In cabinets provided with 35 mm simetric rail in accordance with EN 60715.
CONNECTION:
Connect according with the following schema:
4
5
6
L
1
2
3
N
STARTING UP AND INSTALLATION
In all the programming subclauses, the following rules applies:
- The data to be modified is identified by blinking.
- Pressing keys ∆ and ∇, the data is incremented or decremented. Keeping
the key pressed, the ratio of increment/decrement is five units per second.
- After last data has been confirmed by pressing key OK, if no other key is
pressed for 1 minute, the programm returns to normal working mode: the
display shows the current time, date and the state of circuits C1 and C2.
RESET
By pressing at the same time the four keys during 3 seconds, the device loose all
data and goes to menu LANGUAGE.
LANGUAGE SELECTION
Press OK to enter MENU LANGUAJE and with keys ∆ and ∇ select the desired
language and validate with key “OK”. The device enters to program DATE YEAR.
CLOCK SETTING
For clock setting, press key “OK” to access to MENU PROGRAM and with keys ∆
and ∇ select MENU DATE, validate with “OK” it enters in DATE YEAR, display
shows blinking the digits of the year, update the year by pressing keys ∆ and ∇
and validate it with key “OK”. The same operation should be made to update
MONTH, DAY, DAY OF THE WEEK, HOUR, MINUTE and, then validates with
“OK” and the it enters to ZONE LATITUDE. Introduce the data of the latitude where
the time switch is installed according with the geographic situation and press OK.
Then introduce the time for sunrise of the installation situation (DAWN), and
validate with OK, then in the same way with the time for sunset (DUSK). The time
for sunrise and sunset can be displayed in normal mode by pressing key “C”, then
the display shows AST and the time for sunrise and sunset of the current day.
CHANGING THE GEOGRAPHIC AREA
If the latitude or the time of sunrise or sunset has to be changed, enter MENU
ZONE and proceed with the needed changes in parameters.
PROGRAMMING
In normal mode, press key OK and enter in MENU PROGRAM; pressing again
OK, the display shows PROGRAM ENTER. Press OK and it shows PROGRAM
PROG: 01, if it is intended to programm a switching in this position then press OK
and it shows PROG: 01 ENTER, then press again OK and select the circuit:
C1:ON, C1:OFF, C2:ON and C2:OFF. Validate the selection with OK and then
select the type of switching we want to programm: fixed time, Astronomic for
sunrise time or Astronomic for sunset time.
FIXED TIME SWITCHING
If the switching selection is a fixed time, press OK and programm the hour,
minutes, day or days of the week by validating or not, day by day, when it is
intended to execute the switching and validate with OK. If, when validating the last
day of the week, the key OK is kept pressed, the programmed switching is
considered as festivity; the display shows HOLIDAYS and the symbol “
“, and
after validating with OK, it shows PROGRAM PROG:02.
ASTRONOMIC TIME SWITCHING
After having selected the circuit and the type of switching (C1:ON, C1:OFF, C2:ON
or C2:OFF), then select the desired astronomic switching sunrise or sunset, and
here it is possible to correct the time for sunrise or sunset (offset). If we agree with
the data shown in display, maintain the correction to zero and validate hour and
minutes with OK. If we want to correct it (more or less time), programm the
correction time (up to ± 9 hours 59 minutes), then the display shows the time when
the astronomic switching will be executed, validate with OK and then select the day
or the days of the week the switching has to be executed. If, when validating the
last day of the week, the key OK is kept pressed, the programmed swithing is
considered as festivity; the display shows HOLIDAYS and the symbol “
“.
IMPORTANT: If any switching is programmed as FESTIVITY, then the
programm HOLIDAYS cannot be used and it is removed from menu
remaining as FESTIVITY period.
If several switching are programmed in the same circuit, astronomic (sunrise –
sunset) and fixed times, please observe that they can overlap as the astronomic
switching times move during the year, being possible to produce inappropiate
switchings.
For instance: We want to switch on a shop window when sunset (astronomic
switching) and switch it off at 21:30 hours (fixed time switching). As the switch on
astronomic switching moves on during Summer, then there will be a day when
sunset is later than 21:30, and then the switch on is executed later than the
switching programmed for switch off, then this off is not executed and the circuit
remains on until the next off programmed switching.
This situation can be avoided by conecting in series the two circuits or by
programming an aditional security off switching at a time later than sunset time.
PRIORITY
If two oposite switchings has to be executed at the same moment, ASTRO LOG
always execute the OFF switching.
VIEWING PROGRAMMED SWITCHINGS
Press OK to enter MENU PROGRAM, then press again OK and display shows
PROGRAM ENTER and by pressing again OK, enter in PROGRAMM PROG:01,
then by pressing keys ∆ and ∇ the programs 1 to 22 can be viewed.
CHRONOGRAM
From normal mode and by pressing two times the key “C” you can see in display
the state of circuit C1 and its programmed switching in the chronogram. To view
the state of circuit C2, press again key “C”.
EDITING OR DELETING SWITCHINGS
Press OK to enter MENU PROGRAM, then press again OK and display shows
PROGRAM ENTER and by pressing again OK, enter in PROGRAMM PROG:01,
then by pressing keys ∆ and ∇ select program to edit or delete and validate with
OK. Then display shows the selected programm and PROG:xx ENTER, if we want
to edit then acept by pressing OK and proceed as in subclause PROGRAMMING.
If you want to delete it, select ERASE with keys ∆ and ∇ and validate with OK.
DELETING ALL THE SWITCHINGS
Press OK to enter MENU PROGRAM, then press again OK and display shows
PROGRAM ENTER, with keys ∆ and ∇ select PROGRAM ERASE, validate with
OK and then it appears ERASE ALL: NO, with ∆ and ∇ select ERASE ALL:YES
and acept with OK.
MANUAL OVERRIDE
In normal mode, pressing key ∆, circuit C1 is activated or deactivated. The same
for circuit C2 by using key ∇.
PERMANENT OVERRIDE
Enter in MENU PERMANENT. Validate with OK and the display shows
PERMANENT C1:YES, with keys ∆ and ∇ select: C1: YES, C1:NO, C2:YES or
C2:NO, according with the circuit intented to activate or deactivate in a permanent
way. The selected circuit remains in the selected position as far as it is changed in
the same way.
If the permanent override is active, it is possible to change its state (from ON to
OFF or vice versa) with the manual activation key ( C1) (
C2), corresponding
to the circuit but maintaning the permanent state. In this permanent state, no
programed switching is executed. If a circuit is in permanent override state, it is
indicated with the corresponding symbol “
“.
ADVANCED PROGRAMMING (SPECIAL FUNCTIONS) EXTRAS
WINTER / SUMMER OFFICIAL TIME CHANGE
Enter in MENU with key OK, use keys ∆ and ∇ to select EXTRAS. Validate with
OK and display shows EXTRAS SEASON, press again OK and it is shown
SEASON:ON, with keys ∆ and ∇ it is possible to select three options: AUTO,
MANUAL and NOT USE; validate always with OK.
AUTO: (The clock is automatically changed on the last Sunday in March and the
last Sunday in October at 2:00 h and at 3:00 h respectively). This option does not
allow any change.
MANUAL: (Allows to choose the date and time for the time change). When
selecting this option display shows SEA W-S, the month and the time for Winter to
Summer change, using keys ∆ and ∇ it is possible to change the month for the
automatic change, validate with OK and change, in the same way, the day, hour
and minutes, finally validate with OK. Then it appears SEA S-W and proceed in the
same way.
DEACTIVATED (NOT USE): (No time change will be made)
If this option is selected, no automatic time change will be executed. If there is any
switching programmed at the exact time of the time change period, these will be
duplicated or not executed, depending the type of time change.
PROGRAMMING FESTIVITY PERIODS
This menu only appears if any switching has been programmed in MENU
PROGRAMMING as FESTIVITY. Only one period of FESTIVITY can be
programmed. Enter in MENU EXTRAS HOLIDAYS and display shows HOLIDAYS
NOT USE, this option allows to deactivate the holidays programm.
To enter a festivity programm, use keys ∆ and ∇ to show in display HOLIDAYS
EDIT, validate with OK and programm the BEGIN as follows: month, day, hour and
minute. Then programm END of the period of festivity in the same way.
During this period, the device will execute the switchnig programmed as festivity,
and display shows the symbol “
“.
HOLIDAY PROGRAM
Enter in MENU EXTRAS HOLIDAYS and the display shows HOLIDAYS NOT USE,
this option allows to deactivate the holidays programm. To enter a holiday
programm press ∆ and ∇ and display shows HOLIDAYS EDIT, validate with OK
and programm the BEGIN as follows: month, day, hour and minute. Then
programm END of the period of holidays in the same way.
During this period, the device will not execute any programmed switching, and
display shows the symbol “
“.
IMPORTANT: If any switching is programmed as FESTIVITY, then the
programm HOLIDAYS cannot be used and it is removed from menu
remaining as FESTIVITY period.
COUNTER
Enter in MENU EXTRAS COUNTER, then it appears COUNTER C1: and the
number of hours that circuit C1 has been activated (position ON); using keys ∆
and ∇ we can see the counter of circuit C2. Counters only increment the hours if
connected to power supply.
To reset the counters, just press OK when the display shows the counter to see
ERASE C1 or ERASE C2, and select YES with keys ∆ and ∇ and then validate
with OK.
MODE 12H – 24H.
Enter in MENU EXTRAS 12H – 24H, press OK and select the mode to display the
time. Validate with OK.
DISPLAY CONTRAST
Enter in MENU EXTRAS CONTRAST, press OK and the display shows
CONTRAST and a number from 0 to 9. Select the desired contrast level by using
keys ∆ and ∇ and validate with OK.
TECHINCAL FEATURES
Power supply
Switching capacity:
Maximum recommended loads (N.O):
Incandescent lamps:
Fluorescent lamps
Low voltage halogen lamps
Halogens (230 V)
Low-consumption lamps
Downlights
Leds
Contact type and material
Power consumption:
Action type:
Memory spaces:
Type of switchings:
Switching accuracy:
Operating accuracy:
Power reserve:
Operating temperature:
Protection category:
Protection class:
Pollution situation:
Sealable cover
DIMENSIONS
65
35
60
88
45
If you need more information regarding sunrise and sunset times, you can visit the
following websites.
Only for Spain:
http://www.mfom.es/ign/home/astronomia/publico/efemerides/salidasypuestasdesol.html
International:
www.sunrisesunset.com
www.worldtime.org
As indicated on the device
2 x 16 (10) A / 250 V~
3000 W
1200 VA
2000 VA
3000 W
600 VA
400 VA
600 VA
Changeover AgSnO2
6 VA 1 circuit (aprox. 1 W)
1B, 1S, 1T and 1U
22
ON
OFF
ASTRONOMIC
Better than 1 second
± 1 s/ day at 23 ºC
4 years (Lithium battery)
at 23 ºC
- 10 ºC to + 45 ºC
IP 20 according to EN 60529
II when mounted as intended
2
02/11.2011
A016.26.52842
ORBIS TECNOLOGÍA ELÉCTRICA, S.A.
Lérida, 61
E-28020 MADRID
Tel.: + 34 91 567 22 77
Fax + 34 91 571 40 06
E-mail: [email protected]
http://www.orbis.es
MISE EN SERVICE ET INSTALLATION
Dans tous les paragraphes de programmation, les règles suivantes sont
respectées:
INTERRUPTEUR HORAIRE ASTRONOMIQUE UNIVERSEL
ASTRO LOG
INSTRUCTIONS D’UTILISATION
Programme de
vacances ou jours fériés
Etat du circuit C2
Etat circuit C1
Indicateur de canal
permanent
Indicateur
de la semaine
jour
Heure
d’été
Heure
actuelle
Format de l’heure
12 heures
Heur
d’hiver
Date actuelle
Echelle de temps
pour chronogramme
0
3
6
9 12 15 18 21 24
Réduire ou descendre
par le menu
ON
OFF
Augmenter ou remonter
par le menu
Actionnement manuelC1
1
2
3
4
5
6
7
Actionnement manuelC2
C2
C1
C
C1
OK
C2
MENU
Retour
Valider l’option de l’écran
Accéder au menu
DESCRIPTION
L’ASTRO LOG est un interrupteur horaire conçu pour contrôler les charges
lumineuses en fonction des heures de lever (lever du jour) et de couchers (tombée
de la nuit). Il dispose d’un programme qui règle automatiquement, chaque jour,
l’heure de démarrage (lever) et d’arrêt (coucher), sans besoin de maintenance.
Sa petite taille de seulement 2 modules le rend idéal pour une installation dans des
cadres avec peu d’espace disponible. L’appareil dispose de 2 circuits
indépendants pouvant être programmés de manière astronomique ou avec des
horaires fixes.
INSTALLATION
ATTENTION: L’installation et le montage des appareils électriques doivent être
réalisés par un installateur agréé.
AVANT DE PROCEDER A L’INSTALLATION, COUPER L’ALIMENTATION.
L’appareil est équipé d’une protection interne contre les interférences qui consiste
en un circuit de sécurité. Cependant, certains champs particulièrement puissants
peuvent altérer son fonctionnement. Les interférences peuvent être évitées si les
règles d’installation suivantes sont prises en compte :
- L’appareil ne doit pas être installé à proximité de charges inductives
(moteurs, transformateurs, contacteurs, etc.)
- Il convient de disposer d’une ligne séparée pour l’alimentation
(si cela est nécessaire, se munir d’un filtre de réseau).
- Les charges inductives doivent être équipées de suppresseurs
d’interférences (varistor, filtre RC).
Si l’interrupteur horaire est utilisé avec d’autres dispositifs dans une installation, il
est nécessaire de vérifier que l’ensemble constitué ne génère pas de perturbations
parasites.
MONTAGE: Indépendant dans une armoire de distribution pourvu d’un profil
symétrique de 35mm, conformément à la norme EN 50022 (Rail DIN)
BRANCHEMENT: Selon le schéma de branchements.
4
5
6
L
1
2
3
N
- Les données à modifier sont identifiées car elles clignotent.
- Chaque pression des touches ∆ et ∇ augmente ou réduit la donnée qui
clignote. Si la touche est appuyée sans relâche, la vitesse
d’augmentation/réduction passe à 5 unités par seconde.
- Une fois que la dernière données est confirmée par OK ou si aucune
touche n’est appuyée pendant plus d’1 minute, l’appareil revient en
fonctionnement normal : l’écran affiche l’heure actuelle, la date et l’état des
circuits C1 et C2.
RESET. REMISE A ZERO
La pression simultanée des quatre touches pendant plus de 3 secondes supprime
toute la programmation existante et permet d’accéder au menu IDIOMA.
SELECTION DE LANGUE
En appuyant sur “OK”, entrer dans le menu IDIOMA et avec les touches ∆ et ∇ ,
choisir la langue souhaitée ; valider à l’aide de la touche “OK“. L’écran affiche
directement la programmation de DATE ANNEE.
REGLAGE DE L’HEURE
En appuyant sur “OK“, entrer dans le MENU PROGRAMA et avec les touches
∆ et ∇, sélectionner le MENU FECHA; valider avec “OK“. Entrer dans FECHA
AÑO. Les chiffres de l’année clignotent à l’écran. Avec les touches ∆ et ∇, changer
la valeur de l’année et valider avec la touche “OK“. Saisir les données de MOIS,
JOUR, JOUR DE LA SEMAINE, HEURE ET MINUTES de la même façon; en
validant avec la touche “OK“, entrer dans la ZONA LATITUD. Saisir la latitude en
fonction de la position géographique et appuyer sur OK. Ensuite, saisir l’heure de
lever (lever du jour) de la position et valider avec OK. Procéder de la même
manière pour le coucher (tombée de la nuit). L’heure de lever et de coucher peut
être visualisée en mode normal en appuyant sur “C”; l’écran AST s’affiche avec
l’heure de lever et de coucher du jour actuel.
CHANGEMENT DE ZONE GEOGRAPHIQUE
Une fois l’appareil programmé, pour changer la latitude, l’heure de lever ou de
coucher, entrer à nouveau dans le MENU ZONA et procéder au changement des
paramètres nécessaires.
PROGRAMMATION
En mode normal, appuyer sur la touche OK et accéder au MENU PROGRAMA, En
appuyant à nouveau sur la touche OK, l’écran PROGRAMA ENTRAR s’affiche.
Appuyer sur OK pour afficher PROGRAMME PROG 1 pour programmer une
manœuvre dans ce programme et appuyer sur OK pour faire apparaître PROG 01
ENTRAR. Ensuite, appuyer à nouveau sur OK et choisir le circuit et la manœuvre
à réaliser: C1 ON, C1 OFF, C2 ON et C2 OFF. Valider la sélection avec OK et
sélectionner le type de la manœuvre qui peut être: Heure fixe, Astronomique à
l’heure du lever ou Astronomique à l’heure du coucher.
MANŒUVRE À HEURE FIXE
En cas de sélection d’heure fixe, appuyer sur OK et saisir les données d’heure et
de minutes, le ou les jours de la semaine de son choix, en acceptant ou non, jour
après jour, les jours où la manœuvre doit être réalisée. Valider avec OK. Lors de la
validation du dernier jour de la semaine, en appuyant sans relâche sur la touche
OK, sélectionner cette manœuvre comme jour férié ; le mot FESTIVOS et le
symbole “
“ apparaissent à l’écran et à la validation avec la touche OK, l’écran
affiche PROGRAMA PROG 2.
MANŒUVRE ASTRONOMIQUE
Une fois le circuit et la manœuvre sélectionnés parmi C1 ON, C1 OFF, C2 ON et
C2 OFF, le type de manœuvre à choisir s’affiche. Sélectionner la manœuvre
astronomique de lever ou de coucher souhaitée et l’écran affiche la possibilité de
corriger l’heure de lever ou de coucher sélectionnée. Pour confirmer ce qu’indique
l’écran, laisser la correction à zéro et valider l’heure et les minutes avec la touche
OK. Pour augmenter ou réduire l’heure, saisir l’heure de correction en heure et en
minutes (jusqu’à ± 9 heures 59 minutes); l’écran affiche automatiquement l’heure à
laquelle la manœuvre sera réalisée. Valider avec la touche OK et sélectionner
ensuite le ou les jours de la semaine où cette manœuvre doit être réalisée.
Lors de la validation du dernier jour de la semaine, en appuyant sans relâche sur
la touche OK, sélectionner cette manœuvre comme jour férié; le mot FESTIVOS
le symbole “
“ apparaissent à l’écran.
ATTENTION: En cas de programmation d’une manœuvre en FESTIVO, le
programme VACACIONES ne peut être utilisé et est supprimé du menu en
laissant la période FESTIVO.
En cas de programmation de manœuvres, sur un même circuit, astronomiques
(lever – coucher) et à heure fixe, il convient de tenir compte du fait qu’elles
peuvent se chevaucher puisque les manœuvres astronomiques avancent et
reculent pendant l’année, ce qui entraînerait de mauvaises manœuvres.
Par exemple: Pour allumer une devanture à la tombée de la nuit (manœuvre
astronomique) et l’éteindre à 21h30 (manœuvre Heure Fixe). Comme la
manœuvre astronomique de démarrage est en avant l’été, à un moment, la nuit
tombera plus tard qu’à 21h30 et, par conséquent, le démarrage se fera après
l’heure programmée pour l‘arrêt. L’appareil ne s’éteindra pas jusqu’à nouvel ordre.
Cette situation peut être résolue en mettant en série les deux circuits ou en
programmant une autre manœuvre d’arrêt de sécurité après l’heure du lever.
PRIORITE
Si 2 manœuvres contraires coïncident au même moment, l’ASTRO LOG réalisera
toujours la manœuvre OFF.
VISUALISATION DES MANŒUVRES PROGRAMMEES
Appuyer sur OK pour accéder au MENU PROGRAMA, appuyer à nouveau sur OK
pour que l’écran affiche PROGRAMA ENTRAR puis appuyer sur OK à nouveau
pour accéder à PROGRAMA PROG 1; en appuyant successivement sur les
touches ∆ et ∇, il est possible d’accéder à tous les programmes de 1 à 22).
CHRONOGRAMME
A partir du mode normal, appuyer 2 fois sur “C” pour faire apparaître C1 à l’écran
ainsi que son état et le chronogramme des manœuvres programmées dans ce
circuit; pour visualiser l’état du circuit C2, appuyer à nouveau sur “C”.
MODIFIER OU SUPPRIMER DES MANŒUVRES
Appuyer sur OK pour accéder au MENU PROGRAMA, appuyer à nouveau sur OK
et l’écran revient à PROGRAMA ENTRAR. Accepter avec la touche OK et
PROGRAMME PROG 1 apparaît. A l’aide des touches ∆ et ∇, sélectionner le
programme à modifier ou à supprimer et valider avec OK; le programme
sélectionné s’affiche et PROG X ENTRAR. Pour le modifier, appuyer sur OK et
procéder comme dans le paragraphe Programmation. Pour supprimer la
manœuvre, sélectionner BORRAR à l’aide des touches ∆ et ∇ puis valider avec la
touche OK.
SUPPRESSION DE TOUTES LES MANŒUVRES
Entrer dans le MENU PROGRAMA en appuyant sur OK. Appuyer à nouveau sur
OK pour accéder à PROGRAMA ENTRAR. A l’aide des touches ∆ et ∇,
sélectionner le PROGRAMME SUPPRIMER, puis valider avec la touche OK.
BORRAR TODO:NO apparaît. Sélectionner BORRAR TODO:SI à l’aide des
touches ∆ et ∇, et confirmer avec OK.
ACTIONNEMENT MANUEL
Il st possible d’activer ou de désactiver momentanément le canal 1 ou 2 à partir du
mode normal en appuyant sur ∇ pour C1 et ∆ pour C2.
ACTIONNEMENT MANUEL PERMANENT
Entrer dans MENU PERMANENTE. En validant avec la touche OK, l’écran
PERMANENTE C1: SI apparaît; à l’aide des touches ∆ et ∇, sélectionner: C1: SI,
C1: NO, C2: SI ou C2: NO, selon le canal qu’il faut activer ou désactiver de façon
permanente. Le canal sélectionné reste en permanence dans la position dans
laquelle il se trouve jusqu’à ce que son état soit modifié de la même manière.
Si l’actionnement permanent est activé, il est possible de changer son état (de ON
à OFF ou vice-versa) à l’aide de la touche d’actionnement manuel (
C1)
(
C2) correspondant au circuit souhaité sans désactiver l’état permanent.
En état permanent, aucune des manœuvres programmées n’est réalisée.
Lorsqu’un circuit est en état permanent, le symbole correspondant (
) s’affiche
à l’écran.
PROGRAMMATION AVANCEE (FONCTIONS SPECIALES) EXTRAS
CHANGEMENT D’HORAIRE (STATION) AVANCEMENT RETARDEMENT DE
L’HEURE)
Pour entrer dans le MENU, appuyer sur la touche “OK“; à l’aide des touches
∆ et ∇, rechercher l’option EXTRAS. Valider avec “OK“ et EXTRAS ESTACION
apparaît à l’écran; appuyer à nouveau sur “OK“ et l’écran affiche ESTACION:
AUTO. A l’aide des touches ∆ et ∇, sélectionner l’option parmi les options
possibles: AUTO, MANUAL et DESACT. et valider l’option choisie avec “OK“ .
(Si une ou plusieurs manœuvres sont déjà programmées et qu’elles coïncident
avec la période de changement d’horaire, celles-ci seront dupliquées ou ne seront
pas réalisées, selon le changement d’horaire).
AUTO (réalise automatiquement le changement d’horaire le dernier dimanche de
mars et le dernier dimanche d’octobre à 2h et 3h respectivement).
Cette option ne permet pas les changements. En choisissant cette option, l’écran
affiche ESTACION AUTO.
MANUAL (Permet de choisir le jour et l’heure pour réaliser le changement d’horaire)
En choisissant cette option, l’écran affiche EST I Æ V, le mois et la date du
changement d’hiver et d’été. La date correspondant au mois clignote. Pour
programmer le mois de changement, utiliser les touches ∆ et ∇ et valider avec
“OK“. Le chiffre correspondant au jour clignote. Sélectionner de la même manière
le jour, l’heure et les minutes et retourner en validant avec OK. L’écran affiche EST
V–I (été - hiver) et programmer de la même manière la date et l’heure du
changement.
DESACTIVE (DESACT) (le changement d’horaire n’est pas réalisé)
En choisissant cette option et en validant avec OK, le changement horaire, ne sera
pas réalisé et revenir dans le MENU EXTRAS.
PROGRAMMATION DES JOURS FERIES
Ce menu n’apparaît qu’après programmation d’une manœuvre dans le MENU
PROGRAMACION comme FESTIVOS.
Il n’est possible de programmer qu’une période de FESTIVOS. Entrer dans le
MENU EXTRAS FESTIVOS et l’écran affiche JOURS FERIES DESACT; cette
option permet de désactiver le programme de vacances.
Pour saisir un programme de jours fériés, appuyer sur ∆ et ∇ et l’écran affiche
FESTIVOS EDITAR. Valider avec la touche OK et programmer le DEBUT dans
l’ordre suivant: mois, jour, heure et minute. Ensuite programmer la FIN de la
période de jours fériés de la même manière et dans le même ordre.
Pendant cette période, l’appareil ne réalisera que les manœuvres programmées
pour les jours fériés. Pendant la période FESTIVOS, le symbole (
) apparaîtra.
PROGRAMME DE VACANCES
Entrer dans le MENU EXTRAS VACACIONES et l’écran affiche VACACIONES
DESACT.; cette option permet de désactiver le programme de vacances. Pour
saisir un programme de vacances, appuyer sur les touches ∆ et ∇ et l’écran
affiche VACACIONES EDITAR. Valider avec la touche OK et programmer le
DEBUT dans l’ordre suivant: mois, jour, heure et minute. Ensuite programmer la
FIN de la période de jours fériés de la même manière et dans le même ordre.
Pendant cette période, l’appareil ne réalisera aucune manœuvre et le symbole
suivant s’affichera (
).
ATTENTION: En cas de programmation d’une manœuvre pendant un JOUR
FERIE, le programme VACACIONES ne peut être utilisé et est supprimé du
menu comme période de FESTIVOS.
COMPTEUR
Entrer dans le MENU EXTRAS CONTADOR. L’écran affiche CONTADOR C1 et
les heures auxquelles le canal C1 a été activé (Position ON). Grâce aux touches
∆ et ∇, le compteur du canal C2 apparaît. Les compteurs augmentent les heures
lorsque l’équipement est branché.
Pour remettre à zéro la lecture des compteurs, il suffit de se placer sur le compteur
à supprimer et d’appuyer sur OK. L’écran affiche BORRAR C1 ou BORRAR C2.
Selon le choix, sélectionner “SI” à l’aide des touches ∆ et ∇ et valider avec OK.
MODE 12H – 24H
Entrer dans le MENU EXTRAS 12H – 24H, appuyer sur OK et à l’aide des touches
∆ et ∇, sélectionner le mode de visualisation de l’heure. Valider la sélection avec la
touche OK.
CONTRASTE
Entrer dans le MENU EXTRAS CONTRASTE, appuyer sur OK et l’écran affiche
CONTRASTE et un chiffre de 0 à 9 correspondant au contraste de l’écran. A l’aide
des touches ∆ et ∇, sélectionner le degré de contraste souhaité et valider avec la
touche OK.
CARACTERISTIQUES TECHNIQUES
Alimentation
Puissance de rupture:
Charges maximales recommandées (N.O):
Lampes incandescentes
Fluorescentes
Halogènes basse tension
Halogènes (230 V)
Lampes faible consommation
Downlights
Lamp Led
Contact:
Consommation propre:
Type d’action:
Espaces de mémoire:
Types de manœuvres:
Précision de manœuvre:
Précision de marche:
Réserve de marche:
Température de fonctionnement:
Type de protection:
Classe de protection:
Situation de contamination:
Selon indications de
l’appareil.
2 x 16 (10) A/250 V~
3000 W
1200 VA
2000 VA
3000 W
600 VA
400 VA
600 VA
AgSnO2 commuté
6 VA (1 W environ)
Type1B, 1S, 1T y 1U.
22
ON OFF ASTRONOMIQUE
A la seconde
± 1s/ jour à 23 ºC
4 ans sans alimentation (Pile
au lithium)
De –10 ºC à +45 ºC
IP 20 selon EN 60529
II en montage correct
2
DIMENSIONS
65
35
88
60
45
Pour plus de renseignements sur les Levers et les Couchers de la zone qui va
accueillir l’appareil, se reporter aux pages suivantes:
www.mfom.es/ign/home/astronomia/publico/efemerides/salidasypuestasdesol.html
www.sunrisesunset.com
www.worldtime.org
02/11.2011
A016.26.52911
ORBIS TECNOLOGÍA ELÉCTRICA S.A.
Lérida, 61
E-28020 MADRID
Tel.: + 34 91 567 22 77
Fax + 34 91 571 40 06
E-mail: [email protected]
http://www.orbis.es
ELEKTRONISCHE ZEITSCHALTUHR MIT AUTOMATISCHER
SONNENZEITANPASSUNG ASTRO LOG
BENUTZUNGSANWEISUNGEN
RESET: RÜCKSTELLUNG AUF NULL
Nach 3 Sekunden langem gleichzeitigen Betätigen der 4 Tasten des Geräts wird
die gesamte Programmierung gelöscht und erscheint das Menü IDIOMA.
Ferien- oder
Feiertageprogramm
Zustand Kanal C2
Zustand Kanal C1
Anzeige Permanentschaltung
Kanal
Wochentagsanzeige
Aktuelle Uhrzeit Sommerzeit
Uhrzeitformat 12 Std.
Winterzeit
Aktuelles Datum
Zeitskala für
Zeitdiagramm
0
3
6
9 12 15 18 21 24
ON
OFF
Je nach Menü Wert steigern
oder nach oben gehen
Je nach Menü Wert senken
oder nach unten gehen
1
2
3
4
5
6
7
Handbetrieb C2
Handbetrieb C1
C2
C1
C
C1
OK
C2
MENU
Zurückgehen
Wert im Fensterübernehmen
Menü aufrufen
BESCHREIBUNG
Der ASTRO LOG ist ein Zeitschalter zur Steuerung nichtinduktiver Lasten in
Funktion der Sonnenauf- und -untergangszeit. Das eingebaute Programm passt
die Ein- und Ausschaltzeit Tag für Tag ohne die Notwendigkeit weiterer
Einstellungen automatisch an die Sonnenzeit an.
Seine geringe Größe von nur 2 Standard-Schaltkastenmodulen machen die
Installation auch in Schaltkästen geringer Größe einfach. Das Gerät verfügt über 2
unabhängige Schaltkreise oder Kanäle, die frei nach Wunsch auf astronomische
oder feste Uhrzeiten programmiert werden können.
INSTALLATION
ACHTUNG: Die Installation von elektrischen Geräten sollte nur von einem
zugelassenen Elektriker ausgeführt werden.
VOR BEGINN DER INSTALLATION IST UNBEDINGT DIE
STROMVERSORGUNG ZU UNGERBRECHEN.
Das Gerät ist durch eine interne Schutzschaltung gegen Interferenzen geschützt.
Besonders starke elektromagnetische Felder könnten jedoch trotzdem seine
Funktion stören. Derartige Interferenzen können durch folgende Regeln verhindert
werden:
- Das Gerät nicht in unmittelbarer Nähe von induktiven Lasten wie Motoren,
Trafos, Schaltschütze, etc. installieren
- Die Stromversorgung möglichst über eine unabhängige Leitung
herbeiführen (falls nötig über einem Netzfilter).
- Die vorhandenen Induktiven Lasten mit Entstörgliedern wie Varistoren,
RC-Gliedern, etc. entstören.
Falls der Zeitschalter in einer Anlage in Verbindung mit anderen Geräten benutzt
wird, ist zu prüfen, ob durch die Kombination dieser Geräte keine Störungen
verursacht werden.
MONTAGE: Selbständig in einem Verteilerkasten mit symmetrischem 25 mmMontageprofil nach Norm EN 50022 (DIN-Schiene)
ANSCHLUSS:
Siehe Anschlussschema
4
1
5
2
6
3
INBETRIEBNAHME UND INSTALLATION
Für alle unsere programmierbaren Geräte gelten die folgenden Regeln:
- Die Daten, die geändert werden können, blinken.
- Mit Druck auf die Tasten ∆ bzw. ∇ werden die blinkenden Daten erhöht
oder verringert. Bei gedrückt Halten der Tasten geht die Wertänderungsgeschwindigkeit nach einem Moment auf 5 Einheiten pro Sekunde über.
- Nach Bestätigen der Eingabe mit OK oder Nichtbetätigen der Tasten für 1
Minute schaltet das Gerät wieder auf Normalbetrieb: Das Display zeigt die
aktuelle Uhrzeit, das Datum und den Schaltzustand der Schaltkreise C1
und C2.
L
N
AUSWAHL DER SPRACHE
Durch Betätigen von OK wird das Menü SPRACHE geöffnet, mit den Tasten ∆
und ∇ die gewünschte Sprache gewählt und mit erneutem Betätigen von “OK “
bestätigt. Daraufhin erscheint automatische die Programmierung des DATUM
JAHR.
EINSTELLUNG DER UHRZEIT
Durch Betätigen von OK wird das MENU PROGRAMM geöffnet, mit den Tasten ∆
und ∇ des MENU DATUM gewählt und nach Bestätigung mit OK erscheint
blinkend die Jahreszahl. Nach Einstellen dieser mit den Tasten ∆ und ∇ ist die
neue Angabe mit OK zu übernehmen. Ähnlich erfolgt die Eingabe der Daten
MONAT, TAG, WOCHENTAG, STUNDE und MINUTE. Nach Bestätigen der
Minuten mit OK erscheint die Angabe des Breitengrads (ZONE BREITE), welcher
aus der mitgelieferten Weltkarte und Tabelle zu entnehmen ist. Wieder mit OK
bestätigen und daraufhin die Zeit des Sonnenaufgangs für die jeweilige
geographische Lage eingeben. OK betätigen. Nun ist zum Abschluss noch die
entsprechende Sonnenuntergangszeit einzugeben. Die Sonnenauf- und untergangszeit kann jederzeit im Normalbetrieb des Geräts durch Betätigen der
Taste "C" eingesehen werden. Das Display zeigt dann zusätzlich zu diesen Zeiten
für den jeweiligen Tag die Angabe AST.
ÄNDERUNG DER GEOGRAPHISCHEN ZONE
Der Breitengrad und die Sonnenzeiten können jederzeit durch erneutes Aufrufen
des MENU ZONE auf die oben beschriebene Art geändert werden.
PROGRAMMIERUNG
Im Normalbetrieb die Taste OK drücken. Das MENU PROGRAMM erscheint.
Wieder mit OK erscheint PROGRAMM EINLASS. Mit einem dritten OK erscheint
PROGRAMM PROG 1. Zum Ändern einer Schalteinstellung in diesem Programm
wieder OK betätigen, es erscheint PROG 01 EINLASS und mit einem weiteren OK
ist nun der Schaltkreis und die gewünschte Schalteinstellung zu wählen: C1 ON,
C1 OFF, C2 ON oder C2 OFF. Die getroffene Auswahl mit OK betätigen, worauf
die Schaltart zwischen Festzeit, Sonnenauf- und Sonnenuntergang zu wählen ist.
ZU FESTEN ZEITEN SCHALTEN
Wurde Festzeit gewählt, auf OK drücken und die Uhrzeit eingeben, sowie durch
Markieren der einzelnen Tage, an denen der Schaltvorgang geschehen soll, den
oder die gewünschten Wochentage festlegen. Zum Abschluss wieder mit OK
bestätigen. Wenn beim Bestätigen des letzten Wochentags die Taste OK gedrückt
gehalten wird, wird dieser Tag als Feiertag programmiert und auf dem Display
erscheint die Angabe FEIERTAGE und das Symbol "
". Nach Übernahme mit
OK zeigt das Display nun PROGRAMM PROG 2.
NACH SONNENZEIT SCHALTEN
Nach Auswahl des Schaltkreises und der Schalteinstellung zwischen C1 ON, C1
OFF, C2 ON bzw. C2 OFF erscheint die Auswahl der Schaltart. Hier nun die
gewünschte Schaltart zwischen Sonnenauf- oder -untergang wählen, woraufhin die
Möglichkeit geboten wird, die entsprechenden Auf- oder Unterganszeiten zu
ändern. Ist die Zeit gut, kann die Korrektur auf Null bleiben und können Stunden
und Minuten mit OK bestätigt werden. Soll die Zeit nach früher oder später
korrigiert werden, einfach die gewünschte Zeitabweichung in Stunden und Minuten
(bis zu ± 9 Stunden 59 Minuten) eingeben. Das Display zeigt nun die sich täglich
anpassende Schaltzeit an. Mit OK bestätigen und dann wie oben für die Festzeit
den oder die Wochentage auswählen, an denen die Schaltung aktiv sein soll.
Wenn beim Bestätigen des letzten Wochentags die Taste OK gedrückt gehalten
wird, wird dieser Tag als Feiertag programmiert und auf dem Display erscheint die
Angabe FERIEN und das Symbol "
".
ACHTUNG: Wenn für einen Schaltvorgang die Funktion FERIEN aktiviert
wird, kann die Funktion FERIEN nicht benutzt werden sondern wird aus dem
Menü entfernt und für die Feiertage benutzt.
Wenn für einen einzigen Schaltkreis sowohl eine astronomische als auch eine
feste Zeit programmiert werden soll, ist darauf zu achten, dass sich diese Zeiten
durch die sich im Jahresverlauf ändernde astronomische Zeit eventuell
überschneiden können, was zu unerwünschten Schaltzuständen führen könnte.
Zum Beispiel: Ein Schaufenster soll mit Beginn der Abenddämmerung
(astronomische Schaltung) ein- und um 21:30 Uhr (Festzeit-Schaltung) wieder
ausgeschaltet werden. Da der astronomische Schaltvorgang im Sommer immer
später stattfindet, kann es dazu kommen, dass eines Tages die Einschaltzeit
später als die Ausschaltzeit zu liegen kommt, und daher das Licht nicht mehr
automatisch ausgeschaltet werden würde.
Eine solche Situation kann durch Serienschaltung der beiden Schaltkreise, d.h.,
die Programmierung einer zusätzlichen Ausschaltzeit, die mit Sicherheit später als
die längste Sonnenuntergangszeit liegt, vermieden werden.
VORRANG
Falls 2 gegensätzliche Schaltbefehle auf den gleichen Augenblick fallen, führt der
ASTRO LOG immer den AUSSCHALTVORGANG durch.
ANSICHT DER PROGRAMMIERTEN SCHALTVORGÄNGE
Mit OK das MENU PROGRAMA aufrufen, mit einem weiteren OK erscheint
PROGRAMM EINLASS und mit einem dritten OK erscheint PROGRAMM PROG
1. Nun können durch mehrmaliges Betätigen von ∆ bzw. ∇ die Programme von 1
bis 22 eingesehen werden.
ZEITDIAGRAMM
Durch zweimaliges Betätigen von “C” während des Normalbetriebs erscheint C1
auf dem Display, zusammen mit dem für diesen Schaltkreis programmierten
Zeitdiagramm. Zur Ansicht des Zustands des Schaltkreises C2 ist "C" ein weiteres
Mal zu betätigen.
SCHALTVORGÄNGE ÄNDERN ODER LÖSCHEN
Mit OK das MENU PROGRAMM aufrufen, mit einem weiteren OK erscheint
PROGRAMM EINLASS und mit einem dritten OK erscheint PROGRAMM
PROG 1. Nun mit den Tasten ∆ bzw. ∇ das zu ändernde oder löschende
Programm auswählen. Dieses erscheint nun zusammen mit der Angabe PROG X
EINLASS auf dem Display. Soll es geändert werden, ist es mit OK zu öffnen und
kann dann wie im Abschnitt Programmierung beschrieben bearbeitet werden. Soll
es gelöscht werden, mit ∆ bzw. ∇ auf LOSCH gehen und mit OK bestätigen.
LÖSCHEN ALLER SCHALTVORGÄNGE
Eingang mit OK in MENU PROGRAMM, dann PROGRAMM EINLASS, mit ∆ bzw
∇ Wahl von PROGRAMM LOSCH, dann mit OK bestätigen. LOSCH ALLE: NEIN
erscheint. Mit ∆ bzw. ∇ wählen: LOSCH ALLE: JA und mit OK akzeptieren.
HANDBETRIEB
Die Schaltkreise 1 bzw. 2 können im Normalbetrieb bis zum nächsten
automatischen Schaltvorgang von Hand ein- oder ausgeschaltet werden. Dazu ∇
für C1 und ∆ für C2 betätigen.
PERMANENTER HANDBETRIEB
Das MENU PERMANENT aufsuchen. Mit OK bestätigen. Das Display zeigt
PERMANENT C1: JA. Mit ∆ bzw. ∇ wählen zwischen: C1: JA,
C1: NEIN, C2: JA oder C2: NEIN, je nachdem, welcher Schaltkreis ständig aktiviert
oder deaktiviert werden soll. Dieser bleibt dann so lange im gewählten
Schaltzustand, bis dieser auf ähnliche Weise wieder geändert wird.
Bei Permanenteinstellung des Geräts kann der Schaltzustand (von ON zu OFF
oder umgekehrt) durch Betätigen der Handbetriebstasten ( C1) bzw. (
C2) für
den jeweiligen Schaltkreis geändert werden, ohne dadurch die Einstellung auf
Permanentschaltung zu deaktivieren.
Im Permanent-Schaltzustand wird keiner der programmierten Vorgänge
ausgeführt. Währen die Schaltung auf Permanent steht, erscheint auf dem Display
das entsprechende Symbol (
).
ERWEITERTE PROGRAMMIERUNG (SONDERFUNKTIONEN): EXTRAS
SOMMERZEIT (JAHRESZ) (UHR VOR-/NACHSTELLEN)
Das MENÜ mit OK aufsuchen. Mit den Tasten ∆ bzw. ∇ die Option EXTRAS
suchen. Mit OK bestätigen. Das Display zeigt JAHRESZ: AUTO. Mit den Tasten ∆
bzw. ∇ eine der drei Optionen AUTO, V. HAND bzw. DESAKT. wählen und die
Auswahl mit OK bestätigen.
(Falls eine oder mehrere Schaltvorgänge programmiert sind, die in den
Zeitwechselbereich fallen, werden diese je nach Art des Zeitwechsels doppelt oder
nicht ausgeführt.)
AUTO (Führt den Zeitwechsel automatisch am letzten Märzsonntag und am letzten
Oktobersonntag um 2:00 Uhr bzw. 3:00 Uhr durch). Diese Zeiten liegen fest und
nach Aktivieren dieser Option erscheint die Anzeige JAHRESZ AUTO.
V. HAND (Auswahl des Tages und der Uhrzeit des Zeitwechsels)
Bei Anwahl dieser Option zeigt das Display JAH SÆW, den Monat und das Datum
für den Wechsel zur Sommerzeit, wobei das entsprechende Datum im Monat
blinkt. Mit ∆ bzw. ∇ zunächst den Monat des Zeitwechsels programmieren und
mit OK bestätigen. Daraufhin blinkt die Zahl für den Tag, der nun ausgewählt
werden kann. Ähnlich nun noch die Stunden und die Minuten einstellen und alles
mit OK übernehmen. Das Display zeigt dann JAH WÆS (Sommer-Winter) an, so
dass zum Abschluss auch der gewünschte Winterzeitwechsel programmiert
werden kann.
DESAKTIVIERT (DESAKT) (ohne Saisonzeitwechsel)
Nach Auswahl dieser Option und Bestätigen mit OK wird kein Saisonzeitwechsel
durchgeführt und die Anzeige springt zurück auf MENU EXTRAS.
PROGRAMMIERUNG VON FEIERTAGZEITRÄUMEN
Dieses Menü erscheint nur dann auf dem Display, wenn mindestens ein
Schaltvorgang im MENU PROGRAMM als FERIEN programmiert wurde. Es kann
nur ein einziger Feiertagzeitraum programmiert werden. Dazu das MENU EXTRAS
- FERIEN und dort die Option FERIEN DESAKT aufrufen, mit welcher das
Ferienprogramm deaktiviert werden kann.
Soll nun ein Feiertagszeitraum eingegeben werden, die Tasten ∆ bzw. ∇ betätigen,
worauf FERIEN MODIFIZ. erscheint. Mit OK bestätigen oder den BEGIN in
folgender Reihenfolge programmieren: Monat, Tag, Stunde und Minuten. Dann
ähnlich das END des Feiertagzeitraums bestimmen.
In diesem Zeitraum führt das Gerät nur die für die Feiertage programmierten
Schaltvorgänge aus.
Während der programmierten Feiertagszeit wird das Symbol
angezeigt.
FERIENPROGRAMM
Nach Eingang in das MENU EXTRAS FERIEN zeigt die Anzeige FERIEN
DESAKT. an. Mit dieser Option kann das Ferienprogramm deaktiviert werden. Zur
Eingabe eines Ferienprogramms ∆ bzw. ∇ betätigen, worauf FERIEN MODIFIZ
angezeigt wird. Mit OK bestätigen und den BEGIN in folgender Reihenfolge
programmieren: Monat, Tag, Stunde und Minuten. Dann auf ähnliche Weise das
END des Ferienzeitraums bestimmen. In diesem Zeitraum führt das Gerät keine
Schaltvorgänge aus und erscheint das Symbol
.
ACHTUNG: Wenn ein Schaltvorgang auf FERIENTAG eingestellt wird, kann
das Ferienprogramm nicht benutzt werden und wird im Menü auch nicht
mehr als solches sondern als Feiertagprogramm angezeigt.
ZÄHLER
Nach Aufrufen des MENU EXTRAS ZAHLER zeigt das Display ZAHLER C1 an
sowie die Anzahl der Stunden, die der Kanal C1 aktiviert war (Stellung ON). Durch
Betätigen von Taste ∆ bzw. ∇ erscheint der Zähler für den Kanal C2. Die Zähler
zählen nur weiter, wenn das Gerät mit Strom versorgt ist..
Zum Zurücksetzen der Zähler auf Null reicht es, den betreffenden Zähler
aufzurufen und auf OK zu drücken. Die Anzeige LOSCH C1 oder LOSCH C2
erscheint. Nun mit den Tasten ∆ bzw. ∇ JA wählen und mit OK bestätigen.
12- ODER 24-STUNDEN-ANZEIGE
Nach Aufruf von MENU EXTRAS 12H – 24H die Taste OK betätigen und mit ∆
bzw. ∇ den gewünschten Zeitanzeigemodus auswählen sowie mit OK bestätigen.
KONTRAST
Nach Aufruf von MENU EXTRAS KONTRAST und Betätigen von OK erscheint die
Anzeige KONTRAST und eine Nummer von 0 bis 9 für den zur Zeit eingestellten
Kontrastwert. Mit den Tasten ∆ bzw. ∇ kann jetzt der gewünschte Wert eingestellt
und mit OK übernommen werden.
TECHNISCHE DATEN
Netzspannung:
Trennleistung:
Empfohlene Höchstlasten (N.O):
Glühlampen
Leuchtstofflampen
Niederspannungs-Halogenlampen
Halogenlampen (230 V.)
Energiesparlampen
Downlight
LED Lampe
Kontakt:
Eigenverbrauch:
Bernessungsstosspannung:
Wirkungsweise:
Programmspeicher:
Schaltarten:
Schaltgenauigkeit::
Zeitgenauigkeit:
Betriebsreserve:
Betriebstemperatur:
Temperatur für die Kugeldruckprüfung:
Schutzart:
Schutzklasse:
Verschmutzungsgrad der RS-Umgebung:
Software Klasse und Struktur:
Plombierbare Abdeckung
Siehe Typenschild
2 x 16 (10) A/250 V~
3000 W
1200 VA
2000 VA
3000 W
600 VA
400 VA
600 VA
AgSnO2 Umschalter
6 VA (ca. 1 W)
2,5 kV
Type 1.B.T.U.S.
22
EIN AUS SONNENZEIT
Auf die Sekunde
± 1 Sek./Tag bei 23 ºC
4 Jahre ohne
Stromversorgung
(Lithium-Batterie)
Von –10 ºC bis +45 ºC
+ 100 ºC
IP 20 nach EN 60529
II bei korrekter Montage
2
Software Klasse A
ABMESSUNGEN
65
35
88
60
45
Für weitere Information, insbesondere über die Sonnenauf- und -untergangszeiten
im Installationsgebiet des Gerätes, schauen Sie bitte in folgende Webseiten:
www.mfom.es/ign/home/astronomia/publico/efemerides/salidasypuestasdesol.html
www.sunrisesunset.com
www.worldtime.org
02/11.2011
A016.26.52912
ORBIS TECNOLOGÍA ELÉCTRICA S.A.
Lérida, 61
E-28020 MADRID
Tel.: + 34 91 567 22 77
Fax + 34 91 571 40 06
E-mail: [email protected]
http://www.orbis.es
INTERRUPTOR HORÁRIO ASTRONÓMICO UNIVERSAL
ASTRO LOG
INSTRUÇÕES DE UTILIZAÇÃO
Programa de
férias ou feriados
Estado circuito C2
Estado circuito C1
Indicador de canal
permanente
Indicador dia
da semana
Horário
Verão
Hora actual
Formato de hora
12 horas
Horário
Inverno
Data actual
Escala de tempo
para cronograma
0
3
6
9 12 15 18 21 24
ON
OFF
Aumentar ou subir
pelo menu
Diminuir ou descer
pelo menu
1
2
3
4
5
6
7
Accionamento manual C2
Accionamento manual C1
C2
C1
C
C1
OK
C2
MENU
Validar opção de visor
Aceder ao menu
Retroceder
DESCRIÇÃO
O ASTRO LOG é um interruptor horário concebido para controlar as cargas
luminosas em função das horas de ortos (amanhecer) e ocasos (anoitecer).
Dispõe de um programa que ajusta automaticamente, todos os dias, o horário de
ligar (ocaso) e desligar (orto), sem necessidade de manutenção.
O seu tamanho reduzido, de apenas 2 módulos, torna-o ideal para a instalação em
quadros com pouco espaço disponível. O aparelho dispõe de 2 circuitos
independentes, que podem ser programados de forma astronómica ou com
horários fixos.
INSTALAÇÃO
ATENÇÃO: A instalação e a montagem de aparelhos eléctricos devem ser
executadas por um instalador autorizado.
ANTES DE PROCEDER À INSTALAÇÃO, DESLIGAR A ALIMENTAÇÃO.
O aparelho está internamente protegido contra interferências por um circuito de
segurança. No entanto, alguns campos electromagnéticos especialmente fortes
podem conseguir alterar o seu funcionamento. As interferências podem ser
evitadas se forem tidas em consideração as seguintes regras de instalação:
- O aparelho não deve ser instalado nas proximidades de cargas indutivas
(motores, transformadores, contactores, etc. )
- Convém prever uma linha em separado para a alimentação
(se necessário, protegida com um filtro de rede).
- As cargas indutivas têm que estar protegidas com supressores de
interferências (varistor, filtro RC).
Se o interruptor horário for utilizado em combinação com outros dispositivos numa
instalação, é necessário confirmar que o conjunto assim constituído não cria
perturbações parasitas.
MONTAGEM: Independente, em armário de distribuição, equipado com perfil
simétrico de 35mm., de acordo com a norma EN 60715 (Rail DIN)
LIGAÇÃO: Conforme esquema de ligações
4
5
6
L
1
2
3
N
ENTRADA EM FUNCIONAMENTO E INSTALAÇÃO
Em todas as secções de programação são cumpridas as seguintes regras:
- Os dados a modificar identificam-se porque estão intermitentes.
- Cada pressão nas teclas ∆ e ∇ aumenta ou diminui o dado intermitente.
Se se mantiver esta tecla premida, a velocidade de avanço/recuo passa a
ser de 5 unidades por segundo.
- Depois de confirmado o ultimo dado com OK , se não se pressionar
nenhuma tecla durante mais de 1 minuto, o aparelho volta ao
funcionamento normal: o visor apresenta a hora actual, a data e o estado
dos circuitos 1 e 2.
RESET. COLOCAÇÃO A ZERO
Ao premir as quatro teclas simultaneamente durante mais de 3 segundos, toda a
programação existente é eliminada e entra-se no menu IDIOMA.
SELECÇÃO DE IDIOMA
Premindo “OK”, entra-se no menu IDIOMA e, com as teclas ∆ e ∇ , escolhe-se o
idioma desejado, e confirma-se com a tecla “OK “. Automaticamente, entra-se na
programação de DATA ANO.
ACERTO DA HORA
Premindo “OK “, entra-se em MENU PROGRAMA e, com as teclas ∆ e ∇,
selecciona-se MENU DATA, confirmando com “OK “. Entra-se em DATA ANO.No
visor aparecem intermitentes os dígitos do ano. Com as teclas ∆ e∇, altera-se o
valor do ano e com a tecla “OK “ confirma-se o dado. Do mesmo modo,
introduzem-se os dados de MES, DIA, DIA DA SEMANA, HORA e MINUTOS. Ao
confirmar com a tecla “OK“, entra-se em ZONA LATITUDE. Introduz-se o dado da
nossa latitude conforme a nossa posição geográfica (ver Mapa - Tabela) e primese OK. A seguir, introduz-se a hora de orto (amanhecer) da nossa posição (ver
Mapa - Tabela), confirma-se com OK e procede-se de igual forma para o ocaso
(anoitecer). A hora de orto e ocaso pode ser visualizada a partir do modo normal,
premindo “C”, apresentando o visor AST e a hora de orto e ocaso do dia actual.
MUDANÇA DE ZONA GEOGRÁFICA
Se, uma vez programado o aparelho, se desejar mudar a latitude, a hora de orto
ou ocaso, entra-se de novo em MENU ZONA e procede-se à alteração dos
parâmetros necessários.
PROGRAMAÇÃO
No modo normal, premir a tecla OK e aceder a MENU PROGRAMA, premindo
novamente OK. Aparece no visor PROGRAMA ENTRAR. Prime-se OK e aparece
no visor PROGRAMA PROG 1. Se se desejar programar uma manobra neste
programa, prime-se OK e aparece no visor PROG 01 ENTRAR. Volta-se a premir
OK e escolhe-se o circuito e a manobra que se pretende executar entre: C1 ON,
C1 OFF, C2 ON e C2 OFF. Confirma-se a escolha com OK e selecciona-se o tipo
da manobra, que pode ser: Hora fixa, Astronómica à hora de Orto ou Astronómica
à hora do ocaso.
MANOBRA DE HORA FIXA
Se tivermos seleccionado hora fixa, prime-se OK e introduzem-se os dados de
hora e minutos, dia ou dias da semana, aceitando ou não, dia a dia, aqueles em
que se deseja que a manobra se efectue e confirma-se com OK. Se, ao confirmar
o último dia da semana com a tecla OK, se mantiver esta premida selecciona-se
esta manobra como feriado, aparece no visor a palavra FESTIVO e o símbolo
“
“ e, ao confirmar com OK, o visor mostra PROGRAMA PROG 2.
MANOBRA ASTRONÓMICA
Uma vez escolhido o circuito e a manobra entre C1 ON, C1 OFF, C2 ON e C2
OFF, aparece o tipo de manobra a seleccionar. Selecciona-se a manobra
astronómica de orto ou ocaso que se pretende executar e aparece no visor a
possibilidade de corrigir a hora de orto ou ocaso seleccionada. Se a hora indicada
no visor estiver certa, deixa-se a correcção em zero e confirma-se a hora e
minutos com OK. Se se desejar corrigi-la para mais ou para menos, introduz-se o
tempo de correcção em hora e minutos (até ± 9 horas 59 minutos), aparecendo
automaticamente no visor a hora em que se executará a manobra. Confirma-se
com OK e, a seguir, selecciona-se o dia ou dias da semana em que se pretende
que esta manobra se efectue.
Se, ao validar o último dia da semana com a tecla OK, se mantiver esta tecla
premida selecciona-se esta manobra como feriado. Aparece no visor a palavra
FESTIVO e o símbolo “
“.
ATENÇÃO: Se se programar alguma manobra em FESTIVO, o programa
FÉRIAS não pode ser utilizado e é eliminado do menu, ficando como período
FESTIVO.
Se, num mesmo circuito, se programarem manobras astronómicas (orto – ocaso)
e de hora fixa, tem de se ter em conta que estas podem sobrepor-se, dado que as
manobras astronómicas se adiantam ou atrasam durante o ano, podendo ocorrer
manobras inadequadas.
Por exemplo: Queremos ligar uma montra ao anoitecer (manobra Astronómica) e
que se apague às 21:30 horas (manobra Hora fixa). Como a manobra astronómica
de ligação se vai adiantando durante o Verão, chegará um momento em que
anoitece mais tarde que as 21:30 horas e, portanto, a ligação faz-se depois da
hora programada para desligar, não se efectuando nenhum corte e permanecendo
acesa até nova ordem em contrário.
Esta situação pode ser solucionada pondo os dois circuitos em série ou
programando mais outra manobra de desligar de segurança posterior à hora do
ocaso.
PRIORIDADE
No caso de 2 manobras contrárias coincidirem no mesmo momento, o ASTRO
LOG executará sempre a manobra de OFF.
VISUALIZAÇÃO DAS MANOBRAS PROGRAMADAS
Prime-se OK para entrar em MENU PROGRAMA, prime-se novamente OK e o
visor muda para PROGRAMA ENTRAR e, ao premir de novo OK, entra-se em
PROGRAMA PROG 1. Premindo sucessivamente as teclas ∆ e ∇, podemos ver
todos os programas de 1 a 22).
CRONOGRAMA
No modo normal, premindo 2 vezes “C”, aparece no visor C1 e o seu estado e o
cronograma das manobras programadas nesse circuito. Para visualizar o estado
do circuito C2, prime-se “C” uma vez mais.
MODIFICAR OU ELIMINAR MANOBRAS
Prime-se OK para entrar no MENU PROGRAMAS. Prime-se OK novamente e o
visor muda para PROGRAMA ENTRAR. Aceita-se com OK e aparece
PROGRAMA PROG 1. Com as teclas ∆ e ∇, selecciona-se o programa a modificar
ou eliminar e confirma-se com OK, aparecendo no visor o programa seleccionado
e PROG ENTRAR, Se se desejar modificá-lo, aceita-se com OK e procede-se
como na secção Programação. Se o que se pretende é eliminar a manobra, com
∆ e ∇ selecciona-se APAGAR e confirma-se com OK.
ELIMINAÇÃO DE TODAS AS MANOBRAS
Entra-se em MENU PROGRAMA premindo OK. Premindo OK de novo, acede-se
a PROGRAMA ENTRAR. Com as teclas ∆ e ∇, selecciona-se PROGRAMA
APAGAR, confirma-se com OK e aparece APAGAR TUDO: NÃO. Com ∆ e ∇,
selecciona-se APAGAR TUDO: SIM e confirma-se com OK.
ACCIONAMENTO MANUAL
Pode-se activar ou desactivar temporariamente o canal 1 ou 2 a partir do modo
normal, premindo ∇ para C1 e ∆ para C2.
ACCIONAMENTO MANUAL PERMANENTE
Entra-se em MENU PERMANENT. Confirmando com OK, aparece no visor
PERMANENT C1: SIM. Com ∆ e ∇ selecciona-se: C1: SIM, C1: NÃO, C2: SIM ou
C2: NÃO, conforme o canal que se queira activar ou desactivar de modo
permanente. O canal seleccionado fica permanentemente na posição em que
estiver até que, da mesma maneira, se modifique o seu estado.
Estando activado o accionamento permanente, é possível alterar o seu estado
(de ON para OFF ou vice-versa) com a tecla de accionamento manual ( C1)
(
C2) correspondente ao circuito desejado sem desactivar por isso o estado
permanente.
Em estado permanente não se executa nenhuma das manobras programadas.
Quando um circuito está em estado permanente, aparece no visor o símbolo
correspondente (
).
PROGRAMAÇÃO AVANÇADA (FUNÇÕES ESPECIAIS) EXTRAS
MUDANÇA DE HORÁRIO (ESTAÇÃO) (ADIANTO ATRASO DA HORA)
Para entrar no MENU, premir a tecla “OK “. Com as teclas ∆ e ∇ procura-se a
opção EXTRAS. Confirma-se com “OK “e aparece no visor EXTRAS ESTAÇÃO.
Prime-se de novo “ OK “ e o visor mostra ESTAÇÃO: AUTO. Com as teclas ∆ e ∇,
selecciona-se entre as três opções possíveis: AUTO, MANUAL e DESACT., e
confirma-se a opção escolhida com “ OK “.
(Se houver uma ou várias manobras programadas coincidentes no período de
mudança horária, estas duplicar-se-ão ou não se efectuarão, dependendo de qual
for a mudança horária).
AUTO (efectua automaticamente a mudança de horário no último domingo de
Março e no último domingo de Outubro às 2:00 h e às 3:00 h, respectivamente).
Esta opção não permite alterações. Ao escolher esta opção, aparece no visor
ESTAÇÃO AUTO.
MANUAL (Permite escolher o dia e a hora para efectuar a mudança de horário).
Ao escolher esta opção, aparece no visor EST I Æ V ( Inverno/Verão), o mês e a
data da mudança de Inverno para Verão, piscando a data correspondente ao mês.
Com as teclas ∆ e ∇, programa-se o mês em que se deseja que se efectue a
mudança. Confirma-se com “OK “e pisca o número correspondente ao dia.
Selecciona-se do mesmo modo o dia, a hora e os minutos e volta-se a confirmar
com OK. Aparece no visor EST V–I (Verão/Inverno) e, do mesmo modo,
programa-se a data e hora da mudança.
DESACTIVADO (DESACT) (não efectua a mudança de horário)
Se se seleccionar esta opção e se confirmar com “OK “, não se efectuará a
mudança horária e volta-se ao MENU EXTRAS.
PROGRAMAÇÃO DO PERÍODO FÉRIADOS
Este menu só aparece no visor se se tiver programado alguma manobra em
MENU PROGRAMAÇÃO como FESTIVO.
Só pode ser programado um período FESTIVO. Entra-se em MENU EXTRAS
FESTIVOS e o visor apresenta FESTIVOS DESACT. Esta opção permite
desactivar o programa de férias.
Se se desejar introduzir um programa de feriados, prime-se ∆ e ∇ e aparece no
visor FESTIVOS EDITAR. Confirma-se com OK e programa-se o INICIO pela
seguinte ordem: mês, dia, hora e minutos. A seguir, programa-se o FIM do período
de feriados da mesma forma e na mesma ordem.
Neste período, o aparelho só efectuará as manobras programadas como feriados.
Durante o período FESTIVO aparecerá o símbolo (
).
PROGRAMA DE FÉRIAS
Entra-se em MENU EXTRAS FÉRIAS e o visor mostra FÉRIAS DESACT.. Esta
opção permite desactivar o programa de férias. Se se desejar introduzir um
programa de férias, prime-se ∆ e ∇ e aparece no visor FÉRIAS EDITAR.
Confirma-se com OK e programa-se o INICIO pela seguinte ordem: mês, dia, hora
e minutos. A seguir, programa-se o FIM do período de férias da mesma forma e
pela mesma ordem. Neste período, o aparelho não efectuará nenhuma manobra e
aparece no visor o símbolo (
).
ATENÇÃO: Se se programar alguma manobra em FESTIVO, o programa
FÉRIAS não pode ser utilizado e é eliminado do menu, ficando como período
FESTIVO.
CONTADOR
Entra-se em MENU EXTRAS CONTADOR. Aparece no visor CONTADOR C1 e as
horas em que o canal C1 esteve activado (Posição ON). Com as teclas ∆ e ∇
aparece o contador do canal C2. Os contadores só adicionam horas quando o
equipamento tiver alimentação.
Para pôr a leitura dos contadores a zero, basta colocar no contador que se deseja
apagar e premir OK. Aparece no visor APAGAR C1 ou APAGAR C2, conforme for
o caso, e selecciona-se “SIM” com as teclas ∆ e ∇, confirmando com OK.
MODO 12H – 24H
Entra-se em MENU EXTRAS 12H – 24H. Prime-se OK e, com as teclas ∆ e ∇,
selecciona-se o modo em que se quer visualizar a hora. Confirma-se a escolha
com OK.
CONTRASTE
Entra-se no MENU EXTRAS CONTRASTE, prime-se OK e aparece no visor
CONTRASTE e números de 0 a 9, correspondentes ao contraste do visor. Com as
teclas ∆ e ∇, selecciona-se o grau de contraste desejado e confirma-se com OK.
CARACTERÍSTICAS TÉCNICAS
Alimentação
Poder de corte:
Cargas máximas recomendadas (N.O):
Lâmpadas incandescentes
Fluorescentes
Halogéneas baixa tensão
Halogéneas (230 V.)
Lâmpadas baixo consumo
Downlights
Lâmpada Led
Contacto:
Consumo próprio:
Tipo de acção:
Espaços de Memória:
Tipos de manobras.
Precisão de manobra:
Precisão de marcha:
Reserva de marcha:
Temperatura de funcionamento:
Tipo de protecção:
Classe de protecção:
Situação de contaminação:
Conforme indicação no
aparelho.
2 x 16 (10) A/250 V~
3000 W
1200 VA
2000 VA
3000 W
600 VA
400 VA
600 VA
AgSnO2 comutado
6 VA (1 W aprox.)
Tipo 1B, 1S, 1T e 1U.
22
ON OFF ASTRONÓMICA
Ao segundo
± 1s/dia a 23 ºC
4 anos sem alimentação
(Pilha de Lítio)
De –10 ºC a +45 ºC
IP 20 conforme EN 60529
II em instalação correcta
2
DIMENSÕES
65
35
88
60
45
Se necessitar de mais informação sobre os Ortos e Ocasos da zona onde vai
instalar o aparelho, pode recolhê-la nas seguintes páginas:
www.mfom.es/ign/home/astronomia/publico/efemerides/salidasypuestasdesol.html
www.sunrisesunset.com
www.worldtime.org
02/11.2011
A016.26.52913
ORBIS TECNOLOGÍA ELÉCTRICA S.A.
Lérida, 61
E-28020 MADRID
Tel.: + 34 91 567 22 77
Fax + 34 91 571 40 06
E-mail: [email protected]
http://www.orbis.es
Baixar