HANDS-ON
Technique
band saw
Resawing
A simple technique is
all it takes to quickly turn
thick boards into thin ones.
What do you do when you need thin
wood for a project and don’t want to
pay an arm and a leg for it? One of
the best solutions I can think of is to
take some thick stock over to the
band saw for resawing. In short
order, you can come away with accurately cut, thin boards and almost
no waste. And the best part is the
technique is quick, easy, and won’t
require any fancy equipment.
Getting Ready. My goal when
resawing is a perfectly straight cut,
both through the width of the
board and along its length. You’ll
find that proper setup of the band
saw for resawing goes a long way
toward making this happen.
The Blade. The best place to start
is by installing the right blade on
the band saw. For top-notch results,
you’ll want to use a blade that’s a
little wider than your usual “allpurpose” blade. A 1/2"-wide hooktooth blade, like the one shown in
the upper corner of the opposite
page, is my first choice. The hooktooth pattern makes the blade cut
aggressively, while the width adds
stiffness for a straighter cut.
Blade Drift. But
you’ll find that even
a wide band saw
blade won’t always
track straight in a
resaw cut. This is
called “blade drift”
and is caused by the
teeth on one side of
the blade cutting
a.
20
www.ShopNotes.com
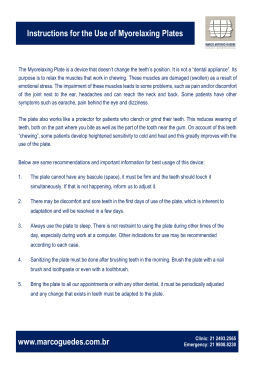
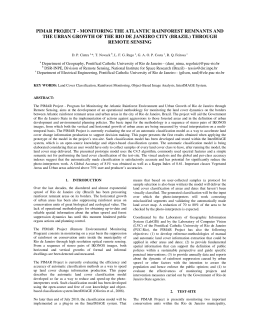
{ Complete Control. A shopmade push block allows you to
safely feed the workpiece
through the end of the cut.
more aggressively than the teeth on
the other side. The blade follows
the path of least resistance and
pulls to one side (far left drawing).
And with a straight fence, you
don’t have a way to deal with a
wandering blade.
Pivot Fence. So the second part
to my setup is a simple pivot fence,
like you see in the photo above and
in the drawing on the following
page. This type of fence allows you
to easily overcome the problem of
blade drift. As you can see, the
guiding edge of the fence is simply
a sharp point. This gives you the
freedom to simply steer the workpiece through the cut, adjusting for
any drift as you go.
The only trick to installing a
pivot fence is positioning it correctly on the band saw table. The
distance from the teeth to the point
of the fence equals the thickness of
the workpiece. And the guide point
should be aligned with the very tip
of the teeth on the blade.
The Stock. With the pivot fence
firmly clamped to the band saw
table, all you need to do is prepare
your stock and you’re ready to cut.
I always make certain that the
“guide” face of the stock is smooth
and flat and the edges are square to
the face. And before you can make
the cut, you’ll need a pencil line on
the top edge of the workpiece to
follow. I like to draw this line right
where I want the blade to cut. This
way you can simply guide the
workpiece to “split” the line.
The Cut. At this point, making
the cut is pretty straightforward.
Start by feeding the stock into the
blade directly on the line. The
workpiece will contact the blade
and the pivot fence simultaneously.
To get a consistent thickness, you’ll
need to keep the workpiece snug
against
the point of
the fence. And
as you can see in the
main photo, one hand
pushes while the other applies
steady pressure against the fence.
Guiding the cut along the layout
line is pretty easy. Just keep your
eye on the top edge of the workpiece to see how the blade is
tracking. If necessary, pivot the
trailing end of the workpiece
slightly to correct for any drift.
You’ll find that a slow, steady
feed will give you the smoothest
cut. Listen to the saw for cues on
the correct rate. You want to hear a
light, rasping sound as you cut.
As I near the end, I pick up a
simple, shop-made push block to
feed the workpiece through the
final few inches of the cut (inset
photo and drawing at left). This
lets me keep my focus on finishing
the cut accurately. When the blade
exits the board, you should see a
straight cut from top to bottom and
from end to end. But if the result
isn’t quite perfect, the problem is
usually pretty easy to fix. Just
check the box below.
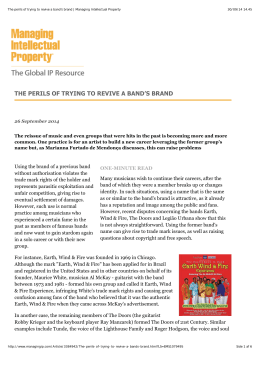
Problems and
Solutions
There are a couple of common problems you might encounter when
resawing, but both have easy fixes.
A Barrel Cut. When you end up
with a cut that’s rounded from top
to bottom, you’ve experienced
“barreling.” There are two easy
solutions for a barrel cut. First,
make sure the blade is properly
tensioned and increase the tension
if necessary. Next, the upper guide
assembly should be positioned as
close to the workpiece as possible
(detail ‘a’). These steps will keep
the blade from flexing in the cut.
An Angled Cut. Sometimes the
cut is perfectly straight, but the
workpiece tapers from top to
bottom (lower far right drawing).
This angled cut has a couple of
a.
possible causes. The first could be
that the blade or fence is not perpendicular to the table (detail ‘b’).
If this isn’t the problem, take a look
at the guide blocks. If not adjusted
properly, they can force the blade
out of alignment (detail ’c’).
b.
c.
www.ShopNotes.com
21
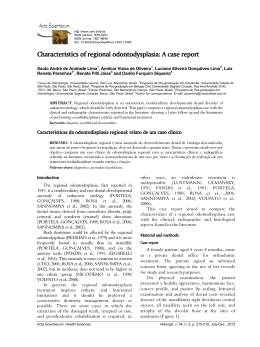
{ The Right
Blade. For
quick resaw
cuts, I like to
use a 1/2"-wide
blade with
three or four
teeth per inch.
Baixar