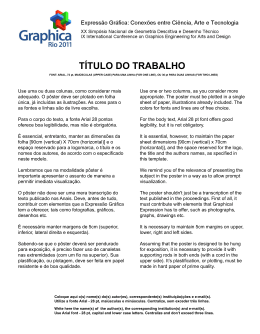
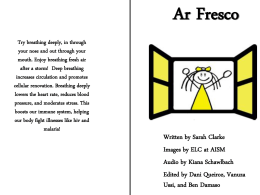
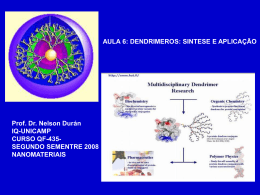
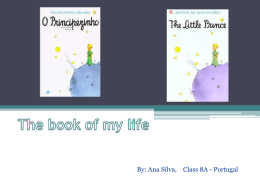
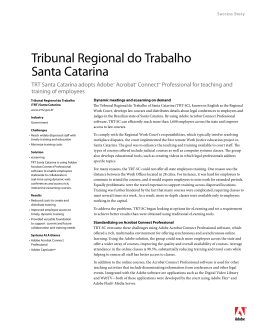
Applying keywords in Bridge
04/29/2007 01
Making selections
Versão
portuguesa
de Ângela
Home
/ Design
Center / Tutorials
04/29/2007 12:4
Rodrigues em www.posgraficos.pt
FazerHome
selecções
em
Applying
in Adobe
AdobePhotoshop
Bridge CS3CS3
/ keywords
Design Center / Tutorials
Michael
MichaelNinness
Ninness
Making selections in Adobe Photoshop CS3
é sobre
uma
Adobe Photoshop
CS3,Bridge
a Quick
Selection
Tool
(ferramenta
de
InEste
this tutorial
tutorial, you'll
learn
hownova
easyferramenta
it is to assigndo
keywords
to files in Adobe
CS3.
You'll start
by creating
keyword
Ninness
selecção
rápida).
Também
aprenderá
comotofazer
básicas
sets
andMichael
keywords,
and
then use
the keywords
apply selecções
filters to your
currentcom
view.outras ferramentas de selecção e
como seleccionar
áreas específicas da imagem.
This tutorial focuses on a brand new tool in Adobe Photoshop CS3 called the Quick Selection tool. You'll also learn how
Requirements
to make basic selections with the other selection tools and how to select specific areas of an image.
Requisitos
To followRequirements
along with this article, you will need the following software:
Para acompanhar este artigo, necessita de ter o seguinte software e ficheiros:
Adobe Bridge CS3
To followCS3
along with this article, you will need the following software:
• Photoshop
• Ficheiros
para experimentar
(2MB)
Photoshop
CS3
Prerequisite knowledge:
General knowledge of Adobe Bridge CS3.
Conhecimentos
Prerequisite necessários:
knowledge:
Conhecimento
geral doofPhotoshop
CS3.
General
knowledge
Photoshop CS3.
Applying
keywords
Making selections
1. In Adobe Bridge, open any folder of images on your computer.
Fazer
selecções
2. Choose
> Keywords
to File>Open
open the Keywords
(see Figure 1). The
displays some of the default
1. InView
Photoshop,
choose
and choosepanel
the Product_Shot.psd
file. panel
Click Open.
1.keyword
No Photoshop,
escolha
File >
Open ebuilt
escolha
o ficheiro
Product_Shot.psd.
Clique
categories
or
set
sand
keywords
into
Adobe
Bridge.
You
can
also
create
your Open.
own.
2. To use the Quick Selection tool, click the Quick Selection tool in the Tools panel (the fourth icon down) or press
2. Para usar
ferramenta
Quick Selection (selecção rápida), faça clique sobre esta ferramenta na paleta
the Wa key
on your keyboard.
de ferramentas (o quarto ícone de cima para baixo) ou prima a tecla W no teclado.
3. Drag within the handbag image, around the edges. The tool automatically snaps to the edges of the object, based
3. Arrasteonsobre
a mala,
junto
limites.
A Figure
ferramenta
automaticamente adere aos limites do objecto,
the pixel
color ofem
your
initialaos
selection
(see
1).
com base na cor dos pixeis da selecção inicial (veja Figura 1).
Figure 1: The Keywords panel displays built-in sets of keywords.
3. Click the New Keyword Set button, the folder icon, at the bottom of the Keywords panel to create a new keyword
set.
4. Type a name for the set name. Use a name that describes the images. In this example, I used the set name
family. Choose something that describes the images you have in your folder.
5. To add keywords to the set, click the set name you created and then click the New Keyword button at the bottom
Figura 1: Seleccione a mala com a ferramenta Quick Selection (selecção rápida).
of the panel.
http://www.adobe.com/designcenter/video_workshop/html/vid0002.html
Versão
portuguesa de Ângela Rodrigues em www.posgraficos.pt
http://www.adobe.com/designcenter/video_workshop/html/vid0095.html
Page 1
Página 1 de 4 Page
Making selections
Fazer Selecções
04/29/2007 12:
Figure 1: Select the handbag with the Quick Selection tool.
4. Arraste sobre as alças da mala para adicionar essas partes à selecção. Está predefinido que ao
parte
separada
imagem,
não fora By
ainda
seleccionada,
esta é adicionada
à
4. arrastar
Drag the uma
handbag
straps
to add da
those
parts toque
the selection.
default,
dragging a separate
part of the image
selecção
existente.
that hasn'tjábeen
selected yet, will add that to your selection.
5.
Pressione a tecla [Alt] e faça clique para excluir da selecção as partes brancas entre as alças da
5. Hold down the Alt /Option key and click to select the white areas in between the handbag straps and exclude
mala
(veja Figura 2). Tal como acontece com qualquer outra ferramenta de selecção do Photoshop,
them from the selection (see Figure 2). Just as with any other selection tool in Photoshop, you can hold down the
éAlt/Option
possívelkey
premir
a tecla
[Alt]
e fazer
clique
as áreas que não se pretende que fiquem
and click
areas
that
you don't
wantsobre
to select.
seleccionadas.
Figura 2: Exclua as áreas brancas entre as alças da mala.
Figure 2: Exclude the white areas between the handbag straps.
6. Pode
It can ser
be difficult
working with
small
areas likeáreas
this. Press
and the plus
keys to switch
to the
6.
difícil trabalhar
com
pequenas
comoCtrl/Ctrl
esta. Pressione
Cmd/Ctrl
e a tecla
[+]Zoom
para tool
momentarily
to make detailed
selectionsda
easier.
ter
acesso temporário
à ferramenta
Lupa, aumentando a visualização, para ser mais fácil fazer
emBracket
áreas detalhadas.
7. selecções
Press the Left
([) key to decrease the brush size of the Quick Selection tool, and hold down the Alt/Option
key and click
to continue
deselect
the white
areasusado
aroundpela
the handbag
straps.
You can make
the[Alt]
brush
size of
7. Diminua
o tamanho
da to
ponta
do pincel
(brush)
ferramenta,
pressione
a tecla
e faça
the Quick
Selection
toolalarger
by pressing
thede
Right
Bracket
(]) key.
clique
para
continuar
subtrair
selecção
áreas
brancas
em torno das alças da mala.
8.
a visualização,
a tecla
e a tecla [–] .
8. Diminua
Zoom back
out by pressingpremindo
Ctr/Cmd and
minusCmd/Ctrl
keys.
O
Photoshop
agoraa um
que
pode
ser usada
não
só comtool,
a ferramenta
Quick
Selection
Photoshop
CS3tem
features
newnova
optionopção
that you
can
use with
the Quick
Selection
as well as with
all the
other
(selecção
rápida),
também
qualquer
uma appears
das outras
ferramentas
selecção.
Umaand
vezit's
selection tools.
Oncecomo
you have
madecom
a selection,
a button
in the
options bar de
called
Refine Edge
seleccionada
really handy. uma área, surge na barra de opções o botão [Refine Edge] (melhorar contorno), que é
verdadeiramente útil.
9. Na
In the
options
bar above
the Document
window,
choose
Refine
Edge to contorno)
open the Refine
box
9.
barra
de opções
escolha
este botão
[Refine
Edge]
(melhorar
paraEdge
abrir dialog
a caixa
deand
diálogo
open a preview
yourjanela
selection
Figure 3).
Refine
Edge e window
tambémforuma
de (see
previsualização
para a área seleccionada (veja Figura 3).
http://www.adobe.com/designcenter/video_workshop/html/vid0002.html
Versão portuguesa de Ângela Rodrigues em www.posgraficos.pt
Page
Página 2 de 4
Fazer
Selecções
Making
selections
04/29/2007 1
Figura 3: Corte a imagem e rode-a para que fique direita.
Figura 3: A caixa de diálogo Refine Edge (melhorar contorno) tem opções para melhorar a selecção.
Figure 3: The Refine Edge dialog box has options to improve your selection.
10. Na parte inferior da caixa de diálogo, repare nos ícones para visualizar a sua selecção contra diferentes
10 . At the bottom of the dialog box, notice the icons for viewing your mask against different backgrounds:
fundos:
The left button shows it against the original background.
• O botão da esquerda mostra-a no fundo original
The second left view is a Quick Mask view.
• A segunda visualização da esquerda é o da Quick Mask (máscara rápida)
The middle option places your mask against a black background and is usually the most useful tool for
• A opção do meio coloca a sua selecção contra um fundo preto, que é geralmente a ferramenta mais
seeing how accurate your mask really is.
útil para ver se a sua máscara está bem definida
The fourth option shows the mask against a white background.
• A quarta opção mostra a selecção contra um fundo branco
The right
option shows
the mask,
as it would
an alpha channel.
• A opção
da direita
mostrajust
apenas
a máscara,
talappear
como in
apareceria
num canal alpha
11.
o quarto
botão,
sobreMask.
máscara
branca.
Pode
queEdge
o comando
Refine
Edge
(melhorar
11 . Seleccione
Select the fourth
button,
On White
You can
see that
the ver
Refine
command
created
a soft,
anti-aliased
contorno)
criou
uma
selecção
suave
e
sem
arestas.
Agora
pode
começar
a
alterar
o
tipo
de
contorno.
selection. Now you can start changing the nature of the edge.
12.
o valor
de Feather
(esbatimento)
12 . Mude
Change
the Feather
amount
to 0.5 pixels. para 0,5 pixeis.
13. Use o deslizador Contract/Expand (contrair/expandir) para contrair a máscara cerca de 25%.
13 . Use the Contract/Expand slider to contract the mask to about -35%.
14. Aumente o contraste cerca de 45%, para que os contornos não fiquem tão suaves. Estas alterações, só
14 . Increase the Contrast to about 45% so that the edges aren't quite so soft. These changes alone greatly improve
por si, melhoram bastante o contorno da selecção.
the edge of the selection.
Este procedimento é muito mais fácil do que em versões anteriores do Photoshop, em que teria de
This isno
much
easier
thanMask
previous
versions
of Photoshop,
where
you would (layers)
have hadpara
to enter
Quick
Mask mode
entrar
modo
Quick
e utilizar
uma
série de filtros
e camadas
obter
o mesmo
efeito.
and
use
a
series
of
filters
and
layers
masks
to
achieve
the
same
effect.
With
the
Refine
Edge
feature,
you apenas
can
Com este comando Refine Edge, pode fazer todas estas alterações de uma só vez, e aceitá-las
make allestiver
of thesesatisfeito
changes com
at once
without committing to them until you are satisfied with the selection.
quando
a selecção.
15.
OK.
Istotakes
trá-lo
deback
volta
visualização
original
da sua selecção.
15 . Clique
Click OK.
This
you
to àyour
original selection
view.
16. Certifique-se de que a paleta Layers está aberta. Se não estiver, vá ao menu Window > Layers para
16 . Make sure the Layers palette is open. If not, choose Window > Layers to open it. To separate the selection from
a tornar visível. Para separar a selecção da imagem de fundo (Background) faça clique sobre o botão
the background layer, click the Add Layer Mask button at the bottom of the Layers palette. This converts your
Add Layer Mask (adicionar máscara de selecção) na base da paleta Layers. Isto converte a selecção
selection to a mask and removes the background (see Figure 4).
numa máscara e remove o fundo (veja Figura 4).
Versão portuguesa de Ângela Rodrigues em www.posgraficos.pt
http://www.adobe.com/designcenter/video_workshop/html/vid0002.html
Página 3 de 4
Pag
Fazer
Selecções
Making
selections
04/29/2007 12:47
Figura 4: Ao adicionar uma máscara de camada remove o fundo da selecção.
Figure 4: Adding a Layer mask removes the background from the selection.
17 . To complete the image, click the Layer Style button (the fx icon) at the bottom of the Layers palette and choose
17. Para
completar
imagem,
clique
sobrethe
o botão
Layerdialog
Style box.
(o ícone fx) na base da paleta Layers e
Drop Shadow
froma the
pop-up faça
menu.
This opens
Layer Styles
escolha Drop Shadow (sombra) do menu. Isto abre a caixa de diálogo de Layer Styles.
18 . Lower the Opacity to 50% and click OK.
18. Baixe a opacidade para 50% e clique OK.
Now you have your finished selection, fined-tuned with the help of the Refine Edge feature.
Agora terminou a sua selecção, “afinada” através do comando Refine Edge.
Where to go from here
Visite
For moreainda:
information and additional tutorials, visit the Adobe Design Center.
Mais informação e outros tutoriais, em Adobe Design Center e também www.posgraficos.pt, estes em português.
http://www.adobe.com/designcenter/video_workshop/html/vid0002.html
Versão portuguesa de Ângela Rodrigues em www.posgraficos.pt
Page 4 o
Página 4 de 4
Baixar