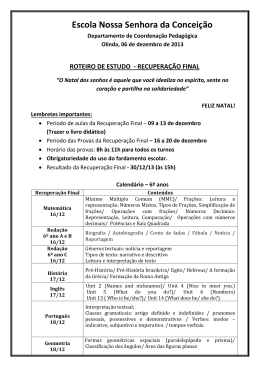
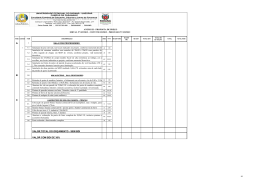
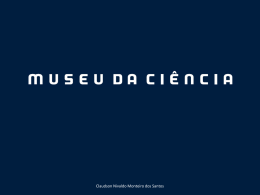
Operating Instructions
Air Conditioner
Manual de Instruções
Condicionador de ar
Model No.
Modelo
Indoor Unit
Unidade Interna
Outdoor Unit
Unidade Externa
CS-YE18NKV-7
CS-YE23NKV-7
CU-YE18NKV-7
CU-YE23NKV-7
ENGLISH
Before operating the unit, read these operating
instructions thoroughly and keep them for future
reference.
PORTUGUÊS (BR)
Antes de ligar a unidade, leia cuidadosamente
este manual de instruções e guarde-o para futura
referência.
QUICK GUIDE
GUΙA RÁPIDO
© Panasonic Appliances Air-Conditioning Malaysia
Sdn. Bhd. 2012. Unauthorized copying and distribution
is a violation of law.
© É expressamente proibida a reprodução total ou
parcial do conteúdo deste manual.
F568382
ENGLISH
Thank you for purchasing Panasonic Air Conditioner
TABLE OF CONTENTS
SAFETY PRECAUTIONS
REMOTE CONTROL
INDOOR UNIT
TROUBLESHOOTING
INFORMATION
QUICK GUIDE
4~5
6
7
8
9
BACK COVER
NOTE : The illustrations in this manual are for explanation purposes only and may differ from the actual unit. They are
subjected to change without notice for future improvement.
PORTUGUÊS (BR)
Obrigado por adquirir o Condicionador de ar da Panasonic
ÍNDICE
PRECAUÇÕES DE SEGURANÇA
CONTROLE REMOTO
UNIDADE INTERNA
SOLUÇÃO DE PROBLEMAS
INFORMAÇÕES
GUIA RÁPIDO
10~11
12
13
14
15
CONTRACAPA
NOTA : As ilustrações deste manual têm apenas caráter explicativo e podem diferir da unidade real. Estão sujeitas a
alterações sem aviso prévio para fins de melhoramento.
2
OPERATION CONDITION
Use this air conditioner under the following temperature range
Indoor
Temperature (°C)
COOLING
HEATING
Max.
Min.
Max.
Min.
*DBT
32
16
30
16
*WBT
23
11
-
Outdoor
*DBT
*WBT
43
26
16
11
24
18
-5
-6
* DBT: Dry bulb temperature
* WBT: Wet bulb temperature
Externa
*DBT
*WBT
43
26
16
11
24
18
-5
-6
* DBT: Temperatura de bulbo
Seco
* WBT: Temperatura de bulbo
úmido
CONDIÇÃO DE FUNCIONAMENTO
Utilize este condicionador de ar nas seguintes faixas de temperaturas
Interna
Temperatura (°C)
REFRIGERAÇÃO
AQUECIMENTO
Máx.
Mín.
Máx.
Mín.
*DBT
32
16
30
16
*WBT
23
11
-
3
SAFETY PRECAUTIONS
To prevent personal injury, injury to others, or property
damage, please comply with the following.
Incorrect operation due to failure to follow instructions below
may cause harm or damage, the seriousness of which is
classified as below:
WARNING
This sign warns of death or serious injury.
CAUTION
This sign warns of injury or damage to property.
The instructions to be followed are classified by the following
symbols:
This symbol denotes an action that is PROHIBITED.
These symbols denote an actions that is
COMPULSORY.
Indoor
Unit
Air Outlet
Air Inlet
Outdoor
Unit
4
INDOOR UNIT AND OUTDOOR UNIT
This appliance is not intended for use by
persons (including children) with reduced
physical, sensory or mental capabilities, or lack
of experience and knowledge, unless they have
been given supervision or instruction concerning
use of the appliance by a person responsible for
their safety. Children should be supervised to
ensure that they do not play with the appliance.
Please consult authorized dealer or specialist to
clean the internal parts, repair, install, remove
and reinstall the unit. Improper installation and
handling will cause leakage, electric shock or
fire.
Confirm to authorized dealer or specialist on
usage of specified refrigerant type. Using of
refrigerant other than the specified type may
cause product damage, burst and injury etc.
Do not install the unit in a potentially explosive
or flammable atmosphere. Failure to do so could
result in fire.
Do not insert your fingers or other
objects into the air conditioner indoor
or outdoor unit, rotating parts may
cause injury.
Do not touch the outdoor unit during lightning, it
may cause electric shock.
Do not expose yourself directly to cold air for a
long period to avoid excess cooling.
Do not sit or step on the unit, you may
fall down accidentally.
Air Inlet
Power
Supply
Remote
Control
WARNING
Air Outlet
REMOTE CONTROL
Do not allow infants and small children to play
with the remote control to prevent them from
accidentally swallowing the batteries.
POWER SUPPLY
Do not use a modified cord,
joint cord, extension cord or
unspecified cord to prevent
overheating and fire.
To prevent overheating, fire or electric shock:
• Do not share the same power outlet with other
equipment.
• Do not operate with wet hands.
• Do not over bend the power supply cord.
• Do not operate or stop the unit by inserting or
pulling out the power plug.
POWER SUPPLY
If the supply cord is damage, it must be replaced
by the manufacturer, its service agent or similarly
qualified persons in order to avoid a hazard.
It is strongly recommended to be installed
with Earth Leakage Circuit Breaker (ELCB)
or Residual Current Device (RCD) to prevent
electric shock or fire.
To prevent overheating, fire or electric shock:
• Insert the power plug properly.
• Dust on the power plug should be periodically
wiped with a dry cloth.
Stop using the product if any abnormality/failure
occurs and disconnect the power plug or turn off
the power switch and breaker.
(Risk of smoke/fire/electric shock)
Examples of abnormality/failure
• The ELCB trips frequently.
• Burning smell is observed.
• Abnormal noise or vibration of the unit is
observed.
• Water leaks from the indoor unit.
• Power cord or plug becomes abnormally hot.
• Fan speed cannot be controlled.
• The unit stops running immediately even if it is
switched on for operation.
• The fan does not stop even if the operation is
stopped.
Contact your local dealer immediately for
maintenance/repair.
This equipment must be earthed to prevent
electrical shock or fire.
Prevent electric shock by switching off the power
supply and unplug when:
- Before cleaning or servicing.
- Extended non-use.
- Abnormally strong lightning activity.
CAUTION
INDOOR UNIT AND OUTDOOR UNIT
Do not wash the indoor unit with water, benzene,
thinner or scouring powder to avoid damage or
corrosion at the unit.
Do not use for preservation of precise
equipment, food, animals, plants, artwork
or other objects. This may cause quality
deterioration, etc.
Do not use any combustible equipment in front of
the airflow outlet to avoid fire propagation.
Do not expose plants or pet directly to airflow to
avoid injury, etc.
Do not touch the sharp aluminium fin,
sharp parts may cause injury.
ENGLISH
WARNING
Do not switch ON the indoor unit when waxing
the floor. After waxing, aerate the room properly
before operating the unit.
Do not install the unit in oily and smoky areas to
prevent damage to the unit.
Do not dismantle the unit for cleaning purpose to
avoid injury.
Do not step onto an unstable bench when
cleaning the unit to avoid injury.
Do not place a vase or water container on the
unit. Water may enter the unit and degrade the
insulation. This may cause an electric shock.
Do not open window or door for long time during
COOL mode operation.
Ensure drainage pipe is connected properly and
keep drainage outlet clear of gutters, containers
or does not immersed in water to prevent water
leakage.
After a long period of use or use with any
combustible equipment, aerate the room
regularly.
After a long period of use, make sure the
installation rack does not deteriorate to prevent
the unit from falling down.
REMOTE CONTROL
Do not use rechargeable (Ni-Cd) batteries.
It may damage the remote control.
To prevent malfunction or damage of the remote
control:
• Remove the batteries if the unit is not going to
be used for a long period of time.
• New batteries of the same type must be
inserted following the polarity stated.
POWER SUPPLY
Do not pull the cord to disconnect the plug to
prevent electric shock.
5
REMOTE CONTROL
6
TO SET THE TIMER
• To turn ON the unit at a preset time, set the timer while
the unit is OFF.
• To turn OFF the unit at a delayed time, set the timer while
the unit is ON.
Maximum distance: 8m
Press twice → Press repeatedly to set your desired time
INDICATOR
POWER
(Green)
Press the remote control’s button
1
TO TURN ON OR OFF THE UNIT
• Once the timer is set, the TIMER indication on the remote
control display will be shown.
• To check the remaining time before the timer takes effect,
TIMER
press
.
TIMER
• To cancel the timer, press
once, then press again
and hold for approximately 3 seconds.
• The timer will also be canceled when you press
or
when power failure occurs.
• This setting is for one time operation, you will need to set
again each time you want to use the timer.
OFF/ON
• Please be aware of the OFF indication on the remote
control display to prevent the unit from starting/stopping
improperly.
2
TO SET TEMPERATURE
• The range of temperature for selection is 16°C ~ 30°C.
• Recommended temperature for energy saving:
HEAT mode: 20°C ~ 24°C.
COOL mode: 26°C ~ 28°C.
3
TO SELECT OPERATION MODE
AUTO mode - For your convenience
• Unit selects the operation mode according to temperature
setting, outdoor and room temperature.
• Operation mode is reselected every 30 minutes. During
operation mode selection the power indicator blinks.
HEAT mode - To enjoy warm air
• Unit takes a while to warm up. The power indicator blinks
during this operation.
COOL mode - To enjoy cool air
• Use curtains to screen off sunlight and outdoor heat to
reduce power consumption during cool mode.
4
Remote Control display
TO SELECT FAN SPEED (3 OPTIONS)
AUTO
HEAT
COOL
TIMER
OFF/O
N
1
MOD
E
3
5
AIR S
WING
TEMP
2
FAN S
PEED
TIME
R
4
6
FAN SPEED
• For AUTO, the indoor fan speed is automatically adjusted
according to the operation mode.
5
TO ADJUST VERTICAL AIRFLOW DIRECTION
(5 OPTIONS)
AIR SWING
• Keeps the room ventilated.
• If AUTO is set, the louver swing up/down automatically.
• In HEAT mode, if AUTO is set, the horizontal louver fix at
predetermined position.
6
• Switch off the power supply and unplug before cleaning.
• Do not touch the aluminium fin, sharp parts may cause injury.
CAUTION
CLEANING INSTRUCTIONS
HINT
• Do not use benzene, thinner or scouring powder.
• Use only soap ( pH7) or neutral household detergent.
• Do not use water hotter than 40°C.
• To ensure optimal performance of the unit, cleaning
maintenance has to be carried out at regular intervals.
Dirty unit may cause malfunction and you may see error
code “H99”. Please consult authorized dealer.
ENGLISH
INDOOR UNIT
4
1
2
3
5
6
7
AUTO
OFF/ON
8
POWER
1
INDOOR UNIT
• Wipe the unit gently with a soft, dry cloth.
2
FIXED PANEL
6
VERTICAL AIRFLOW DIRECTION LOUVER
• Do not adjust by hand.
7
REMOTE CONTROL RECEIVER
8
AUTO OFF/ON BUTTON
• Could not be removed.
3
FIXED FILTER
• Could not be removed.
• Wipe the filter gently with a soft damp cloth.
4
AIR FILTERS
• Air filter cleaning is required every two weeks.
• Wash/rinse the filters gently with water to avoid damage
to the filter surface.
• Dry the filters thoroughly under shade, away from fire or
direct sunlight.
• Replace any damaged filters.
5
HORIZONTAL AIRFLOW DIRECTION LOUVER
• Used when remote control is misplaced or a malfunction
occurs.
Action
Press once.
Press and hold until 1 beep is
heard, then release.
Press and hold until 1 beep is
heard, then release.
Press again until 2 beeps, then
release.
Press the button to turn off.
Mode
Auto
Cooling
Heating
• Manually adjustable.
7
TROUBLESHOOTING
The following symptoms do not indicate malfunction.
SYMPTOM
Mist emerges from indoor unit.
Water flowing sound during operation.
The room has a peculiar odor.
Indoor fan stops occasionally during automatic fan speed
setting.
Operation is delayed a few minutes after restarting.
Outdoor unit emits water/steam.
Indoor fan stops occasionally during heating operation.
Cracking sound during operation.
CAUSE
► • Condensation effect due to cooling process.
► • Refrigerant flow inside the unit.
► • This may be due to damp smell emitted by the wall,
carpet, furniture or clothing.
► • This helps to remove the surrounding odours.
►
►
►
►
•
•
•
•
The delay is a protection to the unit’s compressor.
Condensation or evaporation occurs on pipes.
To avoid unintended cooling effect.
Changes of temperature caused the expansion/
contraction of the unit.
Check the following before calling for servicing.
SYMPTOM
Heating/Cooling operation is not working efficiently.
Noisy during operation.
8
CHECK
► •
•
•
•
► •
•
Set the temperature correctly.
Close all doors and windows.
Clean or replace the filters.
Clear any obstruction at the air inlet and air outlet vents.
Check if the unit has been installed at an incline.
Insert the air filter properly.
Remote control does not work.
(Display is dim or transmission signal is weak.)
► • Insert the batteries correctly.
• Replace weak batteries.
The unit does not work.
► • Check if the circuit breaker is tripped.
• Check if timers have been set.
The unit does not receive the signal from the remote
control.
► • Make sure the receiver is not obstructed.
• Certain fluorescent lights may interfere with signal
transmitter. Please consult authorized dealer.
FOR SEASONAL INSPECTION AFTER EXTENDED NON-USE
• Checking of remote control batteries.
• No obstruction at air inlet and air outlet vents.
• Use Auto OFF/ON button to select Cooling/Heating operation.
After 15 minutes of operation, it is normal to have the following
temperature difference between air inlet and air outlet vents:
Cooling: ≥ 8°C
Heating: ≥ 14°C
NON SERVICEABLE CRITERIAS
TURN OFF POWER SUPPLY AND UNPLUG then
please consult authorized dealer under the following
conditions:
• Abnormal noise during operation.
• Water/foreign particles have entered the remote
control.
• Water leaks from Indoor unit.
• Circuit breaker switches off frequently.
• Power cord becomes unnaturally warm.
• Switches or buttons are not functioning properly.
FOR EXTENDED NON-USE
• Activate Heat mode for 2~3 hours as an alternative to remove
moisture left in the internal parts thoroughly to prevent mould
growth.
• Turn off the power supply and unplug.
• Remove the remote control batteries.
ENGLISH
INFORMATION
Information for Users on Collection and Disposal of Old Equipment and used Batteries
[Information on Disposal in other Countries
outside the European Union]
These symbols are only valid in the European
Union. If you wish to discard these items,
please contact your local authorities or dealer
and ask for the correct method of disposal.
Pb
Note for the battery symbol (bottom two
symbol examples):
This symbol might be used in combination with
a chemical symbol. In this case it complies with
the requirement set by the Directive for the
chemical involved.
Primary Battery
Attention:
Check the instructions of use of the product confirming if the polarities (+) and (-) are according
to the indicated direction. Batteries can leak or explode if polarities were inverted, exposed to fire,
disassembled or recharged.
Avoid mixing with other types of batteries or used batteries, carry or store them unattached, because
it increases the risk of leaking.
Take out the batteries from the product if it were not being used, to avoid possible damage in case
leak happens.
Batteries should be stored in dry and ventilated places.
In case leak happens to the battery, avoid touching it. Wash the affected part of the body with plenty
water. If irritation occurs, look for medical aid.
Don’t remove the wrapping of the battery.
9
PRECAUÇÕES DE SEGURANÇA
Para evitar lesões pessoais, lesões a outras pessoas, ou
danos materiais, siga as seguintes informações.
A utilização incorreta devido ao descumprimento das
instruções pode resultar em ferimentos ou danos cuja
gravidade é classificada da seguinte forma:
AVISO
Este símbolo indica perigo letal ou ferimento grave.
CUIDADO
Este símbolo indica perigo de ferimento ou danos materiais.
As instruções a seguir são classificadas com os seguintes
símbolos:
Este símbolo indica uma ação PROIBIDA.
Este símbolo indica uma ação que é OBRIGATÓRIA.
Unidade
Interna
Entrada de ar
Fonte de
alimentação
Controle
Remoto
Saída
de ar
10
UNIDADE INTERNA E UNIDADE EXTERNA
Este dispositivo não se destina ao uso por
pessoas (incluindo crianças) com reduzidas
capacidades físicas, sensoriais ou mentais, ou
falta de experiência e conhecimento, exceto se
tiverem supervisão ou instrução relacionadas
com o uso do dispositivo por uma pessoa
responsável pela sua segurança. As crianças
devem ser supervisionadas para assegurar que
não brinquem com o dispositivo.
Consulte um revendedor autorizado ou
especialista para limpar as peças internas,
reparar, instalar, remover e reinstalar a unidade.
A instalação e manuseio incorretos causarão
vazamento, choque elétrico ou fogo.
Confirme para o revendedor autorizado ou para
o especialista a utilização do tipo de refrigerante
especificado. O uso de um refrigerante diferente
do tipo especificado pode causar danos ao
produto, explosão, ferimentos, etc.
Não instale a unidade num ambiente
potencialmente explosivo ou inflamável. A
inobservância deste aviso poderá resultar num
incêndio.
Não insira seus dedos ou outros objetos
na unidade interna ou na unidade
externa do condicionador de ar, as
peças rotativas podem causar lesões.
Não toque na unidade externa durante
trovoadas, pode causar choque elétrico.
Não se exponha diretamente ao ar frio por
um longo período para evitar resfriamento
excessivo.
Não se sente na unidade nem utilize-a
como um degrau, você poderá cair
acidentalmente.
CONTROLE REMOTO
Não deixe as crianças brincarem com o
controle remoto para impedir que engulam
acidentalmente as pilhas.
Entrada de ar
Unidade
Externa
AVISO
Saída
de ar
FONTE DE ALIMENTAÇÃO
Não use um cabo modificado,
cabo de união, cabo de
extensão ou cabo não
especificado para evitar
sobreaquecimento ou
incêndio.
Para impedir sobreaquecimento, fogo ou choque
elétrico:
• Não compartilhe a mesma tomada de
alimentação com outro equipamento.
• Não opere com as mãos úmidas.
• Não dobre o cabo da fonte de alimentação.
• Não opere ou pare a unidade ao inserir ou
retirar o plugue de alimentação.
FONTE DE ALIMENTAÇÃO
Se o cabo de alimentação estiver danificado,
terá de ser substituído pelo fabricante, oficina
autorizada ou técnico qualificado para evitar
situações de perigo.
Recomendamos a instalação de um Disjuntor
de Fuga para Terra (DFT) ou Dispositivo de
Proteção Diferencial Residual (DPDR) para
evitar choque elétrico ou incêndio.
Para impedir sobreaquecimento, fogo ou choque
elétrico:
• Insira adequadamente o plugue de
alimentação.
• A poeira no plugue de alimentação deverá ser
limpa periodicamente com um pano seco.
Pare de utilizar o produto quando ocorrer alguma
anormalidade/falha e desconecte o plugue
de alimentação ou desligue o interruptor de
alimentação e o disjuntor.
(Risco de fumaça/fogo/choque elétrico)
Exemplos de anormalidades/falhas
• O disjuntor cai frequentemente.
• É observado cheiro de queimado.
• É observado ruído anormal ou vibração da
unidade.
• Goteja água da unidade interna.
• O cabo de alimentação ou o plugue se
aquecem excessivamente.
• A velocidade do ventilador não pode ser
controlada.
• A unidade pára de funcionar imediatamente,
mesmo quando é ligado.
• O ventilador não pára, mesmo quando é
desligado.
Entre em contato imediatamente com seu
revendedor local para manutenção/conserto.
Este equipamento deve ter uma conexão terra
para evitar choque elétrico ou incêndio.
Evite choque elétrico desligando a fonte de
alimentação e desconectando o plugue quando:
- Antes da limpeza ou manutenção.
- Período prolongado sem uso.
- Trovoadas fortes e anormais.
CUIDADO
UNIDADE INTERNA E UNIDADE EXTERNA
Não lave a parte interna com água, benzeno,
thinner ou pasta para limpeza, para evitar danos
ou corrosão à unidade.
Não utilize-o para preservação de equipamentos
de precisão, alimentos, animais, plantas,
desenhos e fotografias ou outros objetos. Isto
pode causar deterioração na qualidade, etc.
Não use nenhum produto combustível em
frente da entrada do fluxo de ar, para evitar a
propagação de incêndio.
Não exponha diretamente plantas ou animais de
estimação ao fluxo de ar para evitar ferimentos, etc.
Não toque na rebarba de alumínio, as
peças afiadas podem provocar lesões.
PORTUGUÊS (BR)
AVISO
Não ligue a unidade interna quando encerar
o assoalho. Depois de encerar, ventile a sala
adequadamente antes de colocar a unidade para
funcionar.
Não instale a unidade em áreas que contenham
óleo ou fumaça para evitar danos à unidade.
Não desmonte a unidade para finalidades de
limpeza para evitar ferimentos.
Para evitar ferimentos não coloque a unidade
sobre mesas instáveis antes de instalá-la.
Não coloque vasos ou reservatórios de água sobre
a unidade. Água pode entrar na unidade e reduzir a
isolação. Isso pode causar um choque elétrico.
Não abra a janela ou porta por um longo período de
tempo durante a operação do modo COOL (FRIO).
Assegure-se de que o tubo de drenagem esteja
conectado adequadamente e mantenha a saída
de drenagem em canaletas, reservatórios ou que
não fique imersa em água para evitar vazamento
de água.
Após longo período de utilização ou utilização
com qualquer equipamento combustível, areje
regularmente a sala.
Depois de um período prolongado de uso,
certifique-se de que o suporte da instalação não
esteja deteriorado para evitar a queda da unidade.
CONTROLE REMOTO
Não utilize pilhas recarregáveis (Ni-Cd).
Pode danificar o controle remoto.
Para impedir o mau funcionamento ou danos do
controle remoto:
• Remova as pilhas da unidade se não
pretender utilizar durante um período de
tempo prolongado.
• Pilhas novas do mesmo tipo devem ser
inseridas seguindo a polaridade determinada.
FONTE DE ALIMENTAÇÃO
Não puxe o cabo para desconectar o plugue para
evitar choque elétrico.
11
CONTROLE REMOTO
6
COMO CONFIGURAR O TEMPORIZADOR
• Para ligar a unidade em um horário predefinido, configure
o temporizador com a unidade desligada.
• Para desligar a unidade em um horário predefinido,
configure o temporizador com a unidade ligada.
Distância máxima: 8m
Pressione duas vezes → Pressione repetidamente para
definir o horário desejado
INDICADOR
POWER
(Verde)
Pressione o botão do controle remoto
1
PARA LIGAR OU DESLIGAR (ON/OFF)
A UNIDADE
• Assim que o temporizador estiver ajustado, será exibida a
indicação TIMER no display do controle remoto.
• Para verificar o tempo restante antes do temporizador
TIMER
atuar, pressione
.
TIMER
• Para cancelar o temporizador, pressione
uma
vez e, em seguida, pressione novamente e mantenha
pressionado por 3 s.
• O temporizador também será cancelado quando você
ou quando ocorrer uma falha na
pressionar
alimentação.
• Essa configuração é válida apenas para uma única
operação, e será necessário ajustar novamente o
temporizador a cada vez que você precisar dele.
OFF/ON
• Por favor preste atenção à indicação de desligado (OFF)
no visor do controle remoto, para evitar que a unidade
inicie/pare indevidamente.
2
PARA CONFIGURAR A TEMPERATURA
• A faixa de temperatura para seleção é de 16°C a 30°C.
• Temperatura recomendada para economia de energia:
Modo HEAT: 20°C ~ 24°C.
Modo de RESFRIAMENTO: 26°C ~ 28°C.
3
PARA SELECIONAR O MODO DE OPERAÇÃO
Modo AUTOMÁTICO - Para sua conveniência
• A unidade seleciona o modo de operação de acordo com
a definição da temperatura externa e da temperatura
ambiente.
• O modo de operação é selecionado novamente a cada
30 minutos. Durante a seleção do modo de operação, o
indicador de alimentação pisca.
Modo HEAT - Para desfrutar do ar morno
• A unidade demora algum tempo a aquecer. O indicador da
alimentação pisca durante este arranque.
Modo de RESFRIAMENTO - Para desfrutar de ar fresco
• Utilize cortinas para evitar a luz solar e o calor externo,
para reduzir o consumo de energia durante o modo frio.
4
PARA SELECIONAR A VELOCIDADE DO
VENTILADOR (3 OPÇÕES)
FAN SPEED
• Para AUTO, a velocidade do ventilador interna é ajustada
automaticamente de acordo com o modo de operação.
5
PARA AJUSTAR A DIREÇÃO DO FLUXO DE AR
VERTICAL (5 OPÇÕES)
AIR SWING
12
Visor do Controle Remoto
• Mantém a ventilação da sala.
• Na configuração AUTO, as aletas oscilam automaticamente
para cima e para baixo.
• No modo “HEAT” (Aquecimento), se “AUTO” (Automático)
estiver definido, a aleta horizontal fica fixa numa posição
pré-determinada.
AUTO
HEAT
COOL
TIMER
OFF/O
N
1
MOD
E
3
5
AIR S
WING
TEMP
2
FAN S
PEED
TIME
R
4
6
UNIDADE INTERNA
CUIDADO
INSTRUÇÕES DE LIMPEZA
SUGESTÃO
• Não utilize benzina, diluente, nem pó de limpeza abrasivo.
• Utilize apenas sabão neutro ou detergente de uso
doméstico neutro.
• Não utilize água com uma temperatura superior a 40°C.
• Deve limpar a unidade regularmente para assegurar o
seu melhor desempenho. A unidade suja pode provocar a
avaria e poderá indicar o código de erro “H99”. Consulte o
revendedor autorizado.
PORTUGUÊS (BR)
• Desligue a fonte de alimentação e desconecte-a antes da limpeza.
• Não toque nas aletas de alumínio, a parte fina pode causar
ferimentos.
4
1
2
3
5
6
7
AUTO
OFF/ON
8
POWER
1
UNIDADE INTERNA
• Limpe cuidadosamente a unidade com um pano macio
e seco.
2
PAINEL FIXO
• Não pode ser removido.
3
FILTRO FIXO
• Não pode ser removido.
• Esfregue com cuidado utilizando um pano úmido e macio.
4
FILTROS DE AR
• A limpeza do filtros deve ser feita a cada duas semanas.
• Lave/enxágue os filtros cuidadosamente com água para
evitar a ocorrência de danos na superfície do filtro.
• Seque os filtros cuidadosamente à sombra, longe de
chamas ou da luz solar direta.
• Substitua os filtro danificados.
DIFUSOR DA DIREÇÃO DO FLUXO DE AR
HORIZONTAL
• Ajustável manualmente.
5
DIFUSOR DA DIREÇÃO DO FLUXO DE AR
VERTICAL
• Não ajustável manualmente.
6
7
RECEPTOR DO CONTROLE REMOTO
8
BOTÃO AUTO OFF/ON
• Utilizado quando o controle remoto não pode ser
encontrado ou que não esteja funcionando.
Ação
Pressione uma vez.
Pressione sem soltar até ouvir 1
sinal sonoro e, em seguida, solte.
Pressione sem soltar até ouvir 1
sinal sonoro e, em seguida, solte.
Pressione novamente até ouvir
2 sinais sonoros e, em seguida,
libere.
Pressione o botão para desligar.
Modo
Automático
Resfriamento
Aquecimento
13
SOLUÇÃO DE PROBLEMAS
Os seguintes sintomas não indicam uma avaria do aparelho.
SINTOMA
Sai névoa da unidade interna.
Ouve-se o fluxo de água quando a unidade está
funcionando.
A sala tem um odor estranho.
O ventilador interno pára ocasionalmente quando o modo
de velocidade automática do ventilador está programado.
O funcionamento é retardado durante alguns minutos após
religar.
A unidade externa produz água/vapor.
O ventilador interno pisca durante a operação de
aquecimento.
Estalos durante o funcionamento.
CAUSA
► • Efeito de condensação devido ao processo de
resfriamento.
► • Fluxo do líquido de refrigeração no interior da unidade.
► • Pode ser devido a um odor de umidade produzida pela
parede, tapete, mobília ou vestuário.
► • Isto ajuda a remover os odores do ambiente.
► • O atraso é um mecanismo de proteção da unidade do
compressor.
► • Existe condensação ou evaporação nos tubos.
► • Evitar efeito de resfriamento não pretendido.
► • Mudanças de temperatura causam a dilatação/contração
da unidade.
Antes de chamar a assistência técnica, verifique o seguinte.
SINTOMA
14
VERIFICAR
A operação de aquecimento/resfriamento não está
funcionando eficientemente.
► •
•
•
•
Ruído durante o funcionamento.
► •
O controle remoto não funciona.
(O visor está escuro ou o sinal de transmissão está fraco.)
•
► •
•
Configure a temperatura corretamente.
Feche todas as portas e janelas.
Limpe ou substitua os filtros.
Retire qualquer obstrução que se encontra na entrada do
ar e nas aberturas de saída do ar.
Certifique-se de que a unidade não foi instalada
inclinada.
Insira adequadamente o filtro de ar.
Introduza as pilhas devidamente.
Substitua as pilhas gastas.
A unidade não funciona.
► • Verifique se o disjuntor desarmou.
• Verifique se o temporizador foi configurado.
A unidade não recebe o sinal do controle remoto.
► • Certifique-se que o receptor não está obstruído.
• Algumas luzes fluorescentes podem interferir no
transmissor de sinal. Consulte a oficina autorizada.
INSPEÇÃO SAZONAL QUANDO O PRODUTO NÃO É
UTILIZADO POR UM LONGO PERÍODO
• Verifique as pilhas do controle remoto.
• Os orifícios de entrada e saída devem estar desobstruídos.
• Use o botão Auto OFF/ON para selecionar a operação
de resfriamento/aquecimento. Após 15 minutos de
funcionamento, é normal que se verifique a diferença de
temperatura entre os orifícios de entrada e saída:
Resfriamento: ≥ 8°C
Aquecimento: ≥ 14°C
SITUAÇÕES QUE NÃO DEPENDEM DO
PRODUTO
DESLIGUE A FONTE DE ALIMENTAÇÃO E
DESCONECTE-A DO PLUGUE e, em seguida,
consulte o revendedor autorizado sob as condições
a seguir:
• Ruído anormal durante o funcionamento.
• Água/partículas estranhas entraram no controle
remoto.
• Vazamento de água da unidade interna.
• Os interruptores do disjuntor desligam-se
frequentemente.
• O cabo de força aquece de forma anormal.
• Os interruptores ou botões não estão funcionando
devidamente.
PREPARO DA UNIDADE PARA FICAR LONGO PERÍODO
SEM UTILIZAÇÃO
• Ative o Modo de Aquecimento durante 2~3 horas como uma
alternativa para remover a fundo poeira deixada nas partes
internas para prevenir o aparecimento de bolor.
• Desligue a fonte de alimentação e desconecte.
• Remova as pilhas do controle remoto.
PORTUGUÊS (BR)
INFORMAÇÕES
Informações para Usuários referentes ao Recolhimento e Descarte de Equipamentos Antigos e
Baterias
[Informação sobre ao descarte em outros
países fora da União Europeia]
Estes símbolos são válidos, apenas, na União
Europeia. Se pretender descartar este produto
contacte, por favor, as autoridades locais
responsáveis pelo recolhimento de resíduos
ou o ponto de venda onde o produto foi
adquirido e solicite informação sobre o método
de descarte correto.
Pb
Nota para os símbolos de baterias (dois
exemplos de símbolos):
Este símbolo pode ser utilizado com um
símbolo químico. Neste caso, terá de proceder
em conformidade com o estabelecido da
Norma local referente aos produtos químicos
utilizados.
Pilha Primária
Atenção:
Verifique as instruções de uso do aparelho certificando-se de que as polaridades (+) e (-) estão no
sentido indicado. As pilhas poderão vazar ou explodir se as polaridades forem invertidas, expostas
ao fogo, desmontadas ou recarregadas.
Evite misturar com pilhas de outro tipo ou com pilhas usadas, transportá-las ou armazená-las soltas,
pois aumenta o risco de vazamento.
Retire as pilhas caso o aparelho não esteja sendo utilizado, para evitar possíveis danos na
eventualidade de ocorrer vazamento.
As pilhas devem ser armazenadas em local seco e ventilado.
No caso de vazamento da pilha, evite o contato com a mesma. Lave qualquer parte do corpo
afetado com água abundante. Ocorrendo irritação, procure auxílio médico.
Não remova o invólucro da pilha.
“Após o uso, as pilhas e/ou baterias poderão ser entregues ao estabelecimento comercial ou
rede de assistência técnica autorizada’’.
15
QUICK GUIDE/GUIA RÁPIDO
Remote Control Preparation • Preparação Do Controle Remoto
1
2
3
1
1
Pull out • Retire
2
Insert AAA or R03 batteries (can be used ~ 1 year) •
Introduza pilhas AAA ou R03 (pode ser utilizado
aprox. 1 ano)
3
Close the cover • Feche a tampa
OFF/ON
Start/stop the operation.
Liga/Desliga a unidade.
AUTO
HEAT
COOL
TIMER
2
MODE
OFF/ON
1
AUTO
COOL
HEAT
MODE
Select the desired mode.
Selecione o modo de funcionamento desejado.
TEMP
3
2
AIR SWING
FAN SPEED
TIMER
3
TEMP
Select the desired temperature.
Programa a temperatura desejada.
Panasonic Corporation
Printed in Malaysia
Impresso na Malásia
Website: http://panasonic.net/
F568382
FS0811-0
Download