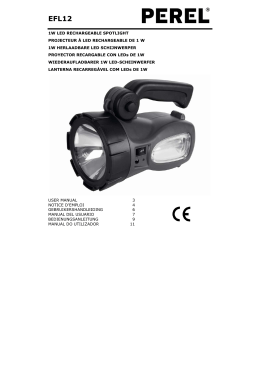
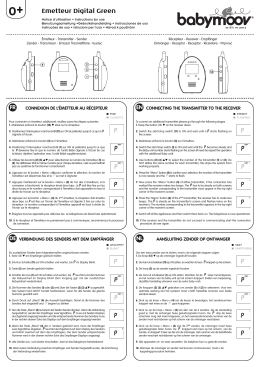
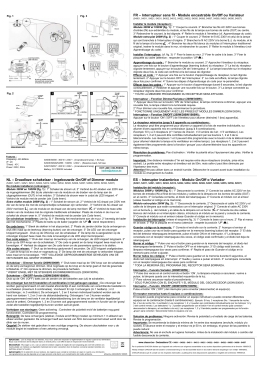
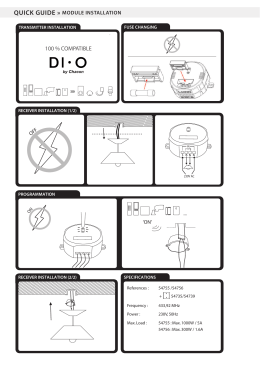
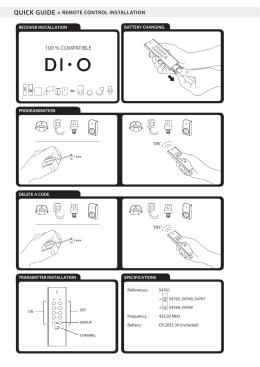
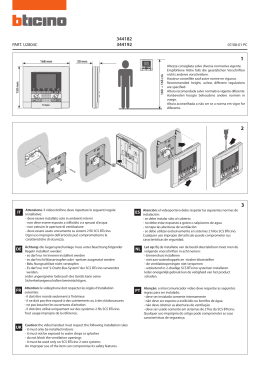
Teile und Zubehör - Einbauanleitung
F 46 0264 EVA
BMW Zubehör-Heckflügel
BMW 3er Coupé (E 46/2)
BMW Parts and Accessories – Installation Instruction
BMW Accessory rear wing
BMW 3 Series Coupé (E 46/2)
Instructions de montage des pièces et des accessoires BMW
Accessoire BMW : becquet
BMW Série 3 coupé (E 46/2)
BMW Onderdelen en accessoires – Montagehandleiding
BMW Accessoires-achterspoiler
BMW 3-serie coupé (E 46/2)
BMW Delar och tillbehör – Monteringsanvisning
BMW övre bakspoiler, tillbehör
BMW 3-serien coupé (E 46/2)
Ricambi e accessori BMW – Istruzioni di montaggio
Alettone posteriore opzionale BMW
BMW Serie 3 Coupé (E 46/2)
BMW piezas y accesorios – instrucciones de montaje
Accesorios BMW – Alerón posterior
BMW Serie 3 Coupé (E 46/2)
Peças e Acessórios BMW – Instruções de Montagem
Acessórios Original BMW - Spoiler traseiro
Modelos BMW Série 3 Coupé (E 46/2)
Best.-Nr. 01 29 0 004 544 III/99 Printed in Germany
1.
1.1
2.
Inhalt
Wichtige Hinweise . . . . . . . . . . . . . . . . . . . . . . . . . . . . . . . . . .
Teileübersicht . . . . . . . . . . . . . . . . . . . . . . . . . . . . . . . . . . . . .
Einbau . . . . . . . . . . . . . . . . . . . . . . . . . . . . . . . . . . . . . . . . . .
Seite
1-1
1-2
2-1
1.
1.1
2.
Contents
Important information . . . . . . . . . . . . . . . . . . . . . . . . . . . . . . . .
Overview of parts . . . . . . . . . . . . . . . . . . . . . . . . . . . . . . . . . . .
Installation . . . . . . . . . . . . . . . . . . . . . . . . . . . . . . . . . . . . . . . .
Page
1-3
1-4
2-2
1.
1.1
2.
Sommaire
Recommandations importantes . . . . . . . . . . . . . . . . . . . . . . . .
Ensemble des pièces . . . . . . . . . . . . . . . . . . . . . . . . . . . . . . .
Montage . . . . . . . . . . . . . . . . . . . . . . . . . . . . . . . . . . . . . . . . .
Page
1-5
1-6
2-3
1.
1.1
2.
Inhoudsopgave
Belangrijke aanwijzingen . . . . . . . . . . . . . . . . . . . . . . . . . . . . .
Overzicht van de onderdelen . . . . . . . . . . . . . . . . . . . . . . . . . .
Montage . . . . . . . . . . . . . . . . . . . . . . . . . . . . . . . . . . . . . . . . .
Bladzijde
1-7
1-8
2-4
1.
1.1
2.
Innehåll
Viktiga anvisningar . . . . . . . . . . . . . . . . . . . . . . . . . . . . . . . . . .
Delöversikt . . . . . . . . . . . . . . . . . . . . . . . . . . . . . . . . . . . . . . .
Montering . . . . . . . . . . . . . . . . . . . . . . . . . . . . . . . . . . . . . . . .
Sida
1-9
1-10
2-5
1.
1.1
2.
Indice
Avvertenze importanti . . . . . . . . . . . . . . . . . . . . . . . . . . . . . . .
Kit di montaggio . . . . . . . . . . . . . . . . . . . . . . . . . . . . . . . . . . .
Montaggio . . . . . . . . . . . . . . . . . . . . . . . . . . . . . . . . . . . . . . . .
Pagina
1-11
1-12
2-6
1.
1.1
2.
Indice
Indicaciones importantes . . . . . . . . . . . . . . . . . . . . . . . . . . . . .
Visión de conjunto de las piezas . . . . . . . . . . . . . . . . . . . . . . .
Montaje . . . . . . . . . . . . . . . . . . . . . . . . . . . . . . . . . . . . . . . . . .
Página
1-13
1-14
2-7
1.
1.1
2.
Indice
Informações importantes . . . . . . . . . . . . . . . . . . . . . . . . . . . . .
Descrição das peças . . . . . . . . . . . . . . . . . . . . . . . . . . . . . . . .
Montagem . . . . . . . . . . . . . . . . . . . . . . . . . . . . . . . . . . . . . . . .
Página
1-15
1-16
2-8
1. Wichtige Hinweise
Einbauzeit ca. 1 Stunde, die je nach Zustand und Ausstattung des Fahrzeuges abweichen kann.
Für Schäden, die durch Mißachtung der Arbeitsschritte und Hinweise auftreten, übernimmt BMW keine
Haftung. Außerdem erlischt bei unsachgemäßer, von der Einbauanleitung abweichender, Montage und
Handhabung der Garantieanspruch gegenüber der BMW AG.
Montagehinweise
Die Montage des Zubehör-Heckflügels sollte von zwei Personen durchgeführt werden. Die Montage des
Heckflügels ist an der rechten Fahrzeugseite dargestellt. Die Arbeiten auf der linken Fahrzeugseite sind entsprechend spiegelbildlich durchzuführen.
Nach dem Anbau des Heckflügels sind unbedingt die notwendigen Aushärtezeiten des
jeweiligen Klebstoffes einzuhalten.
Sicherheitshinweise
Das Typenschild befindet sich unter dem linken Fuß des Heckflügels.
Durch den Anbau des Heckflügels reduziert sich die mögliche Zuladung des Fahrzeuges um ca. 3,5 kg.
Lackierhinweise
Der Heckflügel wird grundiert geliefert und muß entsprechend vorbehandelt werden.
Beim Lackieren die BMW Lackieranweisung beachten.
Arbeitsverfahren:
Siehe BMW Lackieranweisung.
Der Heckflügel ist aus PUR Hartschaum gefertigt.
Die Lackierung erfolgt mit BMW Acryl-Lack +30% Softface-Zusatz.
Die maximale Temperatur bei Einbrennlackierung beträgt 40 °C.
Bohrhinweise
Spiralbohrer vor dem Bohren mit Fett bestreichen, um ein Hineinfallen der Bohrspäne in vorhandene
Karosseriehohlräume zu vermeiden.
Bohrspäne restlos entfernen. Bohrungsränder entgraten und mit den BMW üblichen Korrosionsschutzmaßnahmen
behandeln.
Erforderliches Werkzeug und Hilfsmittel
Schraubendreher
Spiralbohrer Ø 2 mm; 7 mm; 11 mm
Bohrmaschine
Korrosionsschutz
Entgrater
Pinsel
Reinigungsmittel
Putzlappen
Faserstift
Loctite 262
Klebeband
DE/1-1
1.1 Teileübersicht
Klappseite 1-17 ausklappen!
Position
1-2/DE
Bezeichnung
Menge
a
Zubehör-Heckflügel
1
b
Klebestanzling
2
c
Positionierhilfe
2
d
Einsteckmutter
2
e
Gewindestift M5 x 25 mm
2
f
1-Komponentenkleber
1
g
Hersteller-Gutachten
1
h
Einbauanleitung
1
1. Important information
Installation time is approx. 1 hour, but this may vary depending on the condition of the car and the
equipment in it.
BMW cannot accept any liability for damage caused by ignoring the work and the safety instructions set
out in this document. In addition, if the accessory part is not installed and handled properly as set out in these
installation instructions, no claims under the guarantee will be accepted by BMW AG.
Installation instructions
The accessory rear wing should be installed by two people.The installation work is shown for the rear wing on the
right-hand side of the car.The work for the left-hand side must be completed the opposite way round.
After installing the rear wing, it is essential to wait for the required hardening times for the adhesive.
Safety instructions
The model plate is under the left foot of the rear wing.
The installation of the rear wing will reduce the possible payload of the car by approx. 3.5 kg.
Painting instructions
The rear wing is supplied ready-primed and must undergo the appropriate pre-treatment.
Refer to the BMW painting instructions for all painting work.
Procedures
See BMW painting instructions
The side skirt is made of PUR rigid foam.
Paint it using BMW acrylic paint +30% softface additive
Maximum temperature for stoving 40°C.
Drilling instructions
Before drilling any holes coat the twist bits with grease to prevent chippings falling into the body cavities.
Remove all chippings. Deburr the edges of holes and treat them with the standard BMW anti-corrosion measures.
Tools and equipment required
Screwdriver
Twist drill bits, sizes 2 mm, 7 mm and 11 mm
Drill
Anti-corrosion product
Deburring tool
Paintbrush
Cleaning products
Cleaning cloths
Fibre pen
Loctite 262
Adhesive tape
EN/1-3
1.1 Parts overview
Unfold folded page 1-17
Item
1-4/EN
Description
Quantity
a
Accessory rear wing
1
b
Adhesive section
2
c
Positioning tool
2
d
Plug-in nut
2
e
Grub screw, M5 x 25 mm
2
f
Single component adhesive
1
g
Manufacturer’s report
1
h
Installation instructions
1
1. Recommandations importantes
Temps de montage env. 1 heure, susceptible de varier en fonction de l'état et de l'équipement de la voiture.
BMW exclut toute responsabilité pour les dommages résultant du non respect des opérations de montage ou
des recommandations. En outre, toute prétention à garantie vis-à-vis de BMW AG est frappée de nullité en cas de
montage ou de manipulation non conforme aux instructions de montage.
Recommandations concernant le montage
Il est conseillé de réaliser le montage de l’accessoire becquet à deux personnes. Le montage du becquet est
décrit pour le côté droit de la voiture. Sur le côté gauche de la voiture, les opérations doivent être réalisées tout à
fait logiquement dans le même ordre.
Après l’installation du becquet, il est impératif de respecter les temps de durcissement nécessaires
pour la colle concernée.
Remarques concernant la sécurité
La plaque signalétique se trouve sous la patte gauche du becquet.
L’installation du becquet réduit la charge possible de la voiture d’environ 3,5 kg.
Recommandations concernant la peinture
Le becquet est livré avec une couche d'apprêt et doit au préalable subir un traitement approprié.
Respecter les instructions de BMW concernant les travaux de peinture.
Procédure
Le becquet est en mousse dure de PUR.
Peinture acrylique BMW + addition de 30 % de softface.
En cas de laquage à la laque à cuire, la température maximale est de 40 °C.
Recommandations concernant le perçage
Avant de percer, enduire le foret hélicoïdal de graisse afin d'éviter que les copeaux ne tombent dans les cavités
existant dans la carrosserie.
Eliminer soigneusement les copeaux. Ebarber les arêtes des forures, puis leur appliquer les mesures anticorrosion
BMW habituelles.
Outillage et appareillage indispensables
Tournevis
Forets hélicoïdaux Ø 2 mm, 7 mm, 11 mm
Perceuse
Protection anticorrosion
Foret à fraiser
Pinceau
Produit nettoyant
Chiffon
Crayon feutre
Loctite 262
Ruban adhésif
FR/1-5
1.1 Ensemble des pièces
Déplier le rabat 1-17 !
Repère
1-6/FR
Désignation
Quantité
a
Accessoire becquet
1
b
Support de collage
2
c
Gabarit de positionnement
2
d
Ecrou à emboîter
2
e
Tige filetée M5 x 25 mm
2
f
Colle monocomposant
1
g
Attestation du fabricant
1
h
Notice de montage
1
1. Belangrijke aanwijzingen
Montagetijd ca. 1 uur; deze tijd kan afhankelijk van de toestand en de uitrusting van de auto variëren.
Voor schade die ontstaat doordat de montagestappen en aanwijzingen niet worden aangehouden is BMW
niet aansprakelijk. Bovendien vervalt bij onvakkundige, van de montagehandleiding afwijkende montage en gebruik
de garantieclaim ten opzichte van de BMW AG.
Montageaanwijzingen
De montage van de accessoires-achterspoiler dient door twee personen te worden uitgevoerd. De afbeeldingen
tonen de montage van de achterspoiler aan de rechter zijde van de auto. De werkzaamheden aan de linker zijde
van de auto moeten op overeenkomstige wijze in spiegelbeeld worden uitgevoerd.
Na het monteren van de achterspoiler dienen in ieder geval de nodige uithardingstijden van de
betreffende lijm te worden aangehouden.
Veiligheidsaanwijzingen
Het typeplaatje bevindt zich onder de linker poot van de achterspoiler.
Door de montage van de achterspoiler wordt het laadvermogen van de auto ca. 3,5 kg minder.
Aanwijzingen mbt. het lakken
De achterspoiler wordt gegrond geleverd en moet dienovereenkomstig worden voorbehandeld.
Let bij het lakken op de BMW aanwijzingen mbt. het lakken.
Werkwijze:
Zie BMW aanwijzing mbt. het lakken.
De achterspoiler is van PUR hard schuim gemaakt.
Voor het lakken wordt de BMW-acryl-lak +30% softface-toevoeging gebruikt.
De maximale temperatuur bij moffelen bedraagt 40° C.
Aanwijzingen mbt. het boren
Spiraalboor voor het boren met vet insmeren om te verhinderen dat het boorvijlsel in de aanwezige holle ruimten
van de carrosserie valt.
Boorvijlsel compleet verwijderen. Randen van de boorgaten ontbramen en met de bij BMW gebruikelijke
anti-corrosiemiddelen behandelen.
Benodigd gereedschap en hulpmiddelen
Schroevendraaier
Spiraalboor Ø 2mm, 7mm, 11mm
Boormachine
Bescherming tegen corrosie
Ontbramer
Kwast
Reinigingsmiddel
Poetsdoek
Viltstift
Loctite 262
Plakband
NL/1-7
1.1 Overzicht van de onderdelen
Vouwbladzijde 1-17 openklappen!
Positie
1-8/NL
Naam
Hoeveelheid
a
Accessoires-achterspoiler
1
b
Uitgestansd plakdeel
2
c
Positioneerhulpje
2
d
Steekmoer
2
e
Stifttap M5 x 25 mm
2
f
1-componentenlijm
1
g
Expertiserapport van de producent
1
h
Montagehandleiding
1
1. Viktiga anvisningar
Monteringstid cirka 1 timme, som kan avvika beroende på bilens skick och utrustning.
För skador som uppkommer till följd av att arbetsmoment och anvisningar inte följs tar BMW inget ansvar. Vid
osakkunnig montering och åtgärder som avviker från monteringsanvisningen upphör dessutom garantianspråken
gentemot BMW AG att gälla.
Monteringsanvisningar
Monteringen av den övre bakspoilern (tillbehör) bör genomföras av två personer. Illustrationerna av monteringen av
den övre bakspoilern avser bilens högra sida. Arbetsmomenten på bilens vänstra sida måste genomföras på
samma sätt och i samma ordningsföljd.
Efter monteringen av den övre bakspoilern måste ovillkorligen de härdningstider hållas som
är nödvändiga för det aktuella limmet.
Säkerhetsanvisningar
Typskylten finns under den övre bakspoilerns vänstra fot.
Genom monteringen av den övre bakspoilern reduceras bilens lastkapacitet med cirka 3,5 kg.
Lackeringsanvisningar
Den övre bakspoilern levereras grundad och måste förbehandlas på lämpligt sätt.
Vid lackering följ BMW lackeringsanvisning.
Arbetsförfarande:
Se BMW lackeringsanvisning.
Den övre bakspoilern är tillverkad av PUR hårdskum.
Lackeringen ska genomföras med BMW akryllack + 30 % Softface-tillsats.
Den maximala temperaturen vid brännlackering uppgår till 40°C.
Borrningsanvisningar
Stryk på fett på spiralborret före borrningen för att undvika att det faller borrspån i håligheter i karossen.
Ta bort alla borrspån. Grada av borrhålens kanter och behandla dem med BMWs vanliga korrosionsskydd.
Verktyg och hjälpmedel som behövs
Skruvmejsel
Spiralborr Ø 2 mm, 7 mm och 11 mm
Borrmaskin
Korrosionsskydd
Avgradningsverktyg
Pensel
Rengöringsmedel
Putslapp
Filtpenna
Loctite 262
Tape
SW/1-9
1.1 Delöversikt
Vik ut utvikningsbladet 1-17!
Position
Beteckning
Antal
a
Övre bakspoiler, tillbehör
1
b
Limningsmall
2
c
Placeringshjälp
2
d
Insticksmutter
2
e
Gängstift M5 x 25 mm
2
f
1-komponentlim
1
g
Tillverkarens intyg
1
h
Monteringsanvisning
1
1-10/SW
1. Avvertenze importanti
Tempo di montaggio circa 1 ora, secondo lo stato e l'equipaggiamento della vettura.
La BMW non risponde dei danni causati per il mancato rispetto della sequenza delle operazioni di lavoro
e delle norme di sicurezza. Inoltre, in caso di montaggio ed uso inadeguato, non secondo le relative istruzioni,
decade il diritto di garanzia nei confronti della BMW AG.
Avvertenze per il montaggio
Il montaggio dell'alettone posteriore opzionale dovrebbe essere eseguito da due persone. Il montaggio
dell'alettone posteriore è descritto per il lato destro della vettura. Le operazioni sul lato sinistro della vettura
si eseguono specularmente in maniera analoga.
Dopo l'applicazione dell'alettone posteriore si devono assolutamente rispettare i necessari tempi di
indurimento della colla utilizzata.
Norme di sicurezza
La targhetta d'identificazione si trova sotto il piedino sinistro dell'alettone posteriore.
L'applicazione dell'alettone posteriore comporta una riduzione di ca. 3,5 kg del carico utile possibile della vettura.
Avvertenze per la verniciatura
L'alettone posteriore viene fornito con mano di fondo e deve essere opportunamente pretrattato.
Nell'eseguire la verniciatura si prega di seguire le istruzioni BMW per la verniciatura.
Metodo di lavoro:
Vedi istruzioni BMW per la verniciatura.
L'alettone posteriore è realizzato in espanso rigido (PUR).
La verniciatura si esegue con vernice acrilica BMW +30% additivo softface.
Temperatura massima per la verniciatura a forno 40 °C.
Avvertenze per la trapanatura
Prima di iniziare a trapanare spalmare di grasso la punta elicoidale, onde evitare che i trucioli di trapanatura
cadano dentro le cavità presenti nella carrozzeria.
Rimuovere completamente i trucioli di trapanatura. Sbavare i bordi dei fori trapanati e trattarli con colore
anticorrosione.
Attrezzi e materiale ausiliario occorrente
Cacciavite
Punta elicoidale Ø = 2 mm; 7 mm; 11 mm
Trapano
Protezione anticorrosione
Sbavatore
Pennello
Detergente
Panno per pulire
Pennarello
Loctite 262
Nastro adesivo
IT/1-11
1.1 Kit di montaggio
Aprire la pagina pieghevole 1-17!
Voce
Descrizione
Quantità
a
Alettone posteriore opzionale
1
b
Fustella adesiva
2
c
Accessorio per agevolare il posizionamento
2
d
Dado autobloccante
2
e
Perno filettato M5 x 25 mm
2
f
Colla ad 1 componente
1
g
Perizia del fabbricante
1
h
Istruzioni di montaggio
1
1-12/IT
1. Indicaciones importantes
Tiempo de montaje aprox. 1 hora, que puede variar dependiendo del estado y equipamiento del vehículo.
BMW no asumirá responsabilidad alguna frente a los daños que se puedan originar por no respetar los pasos
de trabajo e indicaciones. Además, el derecho de garantía frente a la BMW AG perderá su efecto en el caso de
que se realice un montaje y un manejo de las piezas que resulte incorrecto o ajeno a lo indicado en las instrucciones de montaje.
Indicaciones de montaje
El montaje del accesorio de alerón posterior debe ser llevado a cabo por dos personas. El montaje del alerón
posterior se muestra en el lado derecho del vehículo. Hay que llevar a cabo los trabajos correspondientes en el
lado izquierdo del vehículo de manera simétrica.
Tras el montaje del alerón posterior, hay que respetar obligatoriamente los tiempos de secado
necesarios del pegamento correspondiente.
Indicaciones de seguridad
La placa de características se encuentra debajo del pie izquierdo del alerón posterior.
Con el montaje del alerón posterior, la carga útil del vehículo se reduce en aprox. 3,5 kg.
Indicaciones de pintura
El alerón posterior se suministra con imprimación y debe ser tratado correspondientemente.
Al pintarlo, fijarse en las instrucciones de pintura BMW.
Procedimiento de trabajo:
Véanse las instrucciones de pintura BMW.
El alerón posterior está hecho de espuma rígida PUR.
El pintado se realiza con pintura acrílica BMW + 30% aditivo Softface.
La temperatura máxima durante el barnizado al fuego es de 40 ºC.
Indicaciones para el taladrado
Antes del taladrado, untar las brocas con grasa para evitar que se introduzcan virutas en los huecos de la
carrocería.
Retirar las virutas totalmente. Desbarbar los bordes de los orificios y tratar con las habituales medidas
anticorrosión BMW.
Herramientas y medios auxiliares necesarios
Destornillador
Brocas de Ø 2 mm; 7 mm; 11 mm
Taladradora
Protección anticorrosión
Desbarbadora
Pincel
Productos de limpieza
Paño para limpiar
Rotulador
Loctite 262
Cinta adhesiva
ES/1-13
1.1 Visión de conjunto de las piezas
¡Desplegar la hoja 1-17 plegada!
Posición
Descripción
Cantidad
a
Accesorio de alerón posterior
1
b
Pieza estampada adhesiva
2
c
Ayuda de posicionamiento
2
d
Tuerca
2
e
Pasador roscado M5 X 25 mm
2
f
Pegamento de 1 componente
1
g
Certificado del fabricante
1
h
Instrucciones de montaje
1
1-14/ES
1. Informações importantes
Tempo de montagem: cerca de 1 hora, podendo variar em função do estado e do equipamento do veículo.
A BMW declina toda e qualquer responsabilidade por danos provocados pelo desrespeito tanto da sequência
das operações a seguir na montagem como das indicações de montagem. Além disso, sempre que o spoiler
traseiro seja montado ou utilizado de forma indevida e que não esteja de acordo com as respectivas instruções
de montagem e de utilização, a garantia concedida pela BMW AG perde a sua validade.
Instruções de montagem
A montagem do spoiler traseiro deverá ser efectuada por duas pessoas. Nestas instruções de montagem, a
montagem do spoiler traseiro é explicada do lado direito do veículo. As operações do lado esquerdo do veículo
terão de ser levadas a cabo de forma correspondente, e de acordo com a mesma sequência de operações.
Depois do spoiler traseiro ser montado terá obrigatoriamente de respeitar os tempos de secagem da
cola utilizada na montagem.
Informações de segurança
A placa de características do spoiler traseiro está situada por baixo do esquerdo pé do spoiler.
A montagem do spoiler traseiro implica uma redução de cerca de 3,5 kg na carga que o veículo pode transportar.
Instruções de pintura
O spoiler traseiro é fornecido com a demão de primário aplicada, necessitando, portanto, de ser pintado. Ao
pintá-lo, siga sempre as instruções de pintura da BMW.
Operações a executar:
Por favor, cumpra as instruções de pintura da BMW.
O spoiler traseiro é fabricado em poliuretano rígido (PUR).
O spoiler deverá ser pintado com tinta acrílica BMW com 30% de aditivo softface.
A temperatura máxima da esmaltagem em estufa é de 40ºC.
Instruções relativas à abertura dos furos
Antes de proceder à abertura dos furos, lubrifique a broca helicoidal com gordura, a fim de impedir a queda
de aparas resultantes da abertura dos furos para os vãos e espaços ocos existentes na carroçaria.
Remova totalmente todas as aparas resultantes da abertura dos furos. Rebarbe as arestas dos furos e aplique-lhes uma demão de tinta anticorrosiva, cumprindo sempre as medidas de protecção contra a corrosão
adoptadas pela BMW.
Ferramentas e utensílios necessários
Chave de fendas
Brocas helicoidais com os seguintes diâmetros: 2 mm; 7 mm; 11 mm
Berbequim
Produto anticorrosivo
Rebarbador
Pincel
Produto de limpeza
Pano de limpeza
Caneta de feltro
Loctite 262
Fita adesiva
PT/1-15
1.1 Descrição das peças
Abra a página desdobrável 1-17!
Posição
Designação
Quantidade
a
Spoiler traseiro
1
b
Autocolante de fixação do spoiler, com cola dos dois lados
2
c
Dispositivo auxiliar de posicionamento
2
d
Porca de encaixe
2
e
Parafuso sem cabeça M5 x 25 mm
2
f
1 Embalagem de cola para componentes
1
g
Relatório pericial do fabricante
1
h
Instruções de montagem
1
1-16/PT
a
c
b
Teile und Zubehör - Einbauanleitung
d
Original BMW Zubehör-Heckflügel
BMW 3er Coupé (E46/2)
Best.-Nr. 01 29 0 004 544 II/99 Printed in Germany
e
f
g
h
F 46 0265 EVA
1-17
2. Einbau
Hinweise
Sicherheitshinweise in Kapitel 1 beachten.
Für den Zubehöreinbau liegen die bekannten Werkstattinformationen zugrunde.
Vorarbeiten am Fahrzeug
Oben genannte Werkstattunterlagen bereitlegen.
Einbauort mit Reinigungsmittel und Putzlappen gründlich reinigen.
Klappseite 2-9 ausklappen!
A
Heckflügel (a) auf die Heckklappe aufsetzen und in die optimale Position bringen.
Optimale Position:
- mittig auf der Heckklappe;
- möglichst weit hinten in Richtung Abschlußkante der Heckklappe, so daß die gesamte Auflagefläche
des Heckflügelfußes auf der Heckklappe verbleibt.
Mit wasserlöslichen Faserstift (1) Position des Heckflügels (a) auf der Heckklappe markieren.
Heckflügel (a) wieder abnehmen.
B
Klebestanzling (b) in den Fuß des Heckflügels (a) kleben.
Positionierhilfe (c) in den Gewindeeinsatz (2) stecken.
Heckflügel (a) auf der Heckklappe an die markierte Position setzen (ggf. unter Zuhilfenahme einer zweiten Person).
Positionierhilfe (c) mit Klebeband an der Heckklappe befestigen und Heckflügel (a) vorsichtig abnehmen.
C
Bohrung mit einem Bohrerdurchmesser von 2 mm über die in der Positionierhilfe (c) befindliche Lochführung (3)
setzen. Positionierhilfe (c) von der Heckklappe entfernen. Anschließend Bohrung auf einen Durchmesser von
11 mm aufbohren.
Mit dem Bohrer nicht zu tief bohren, um Beschädigungen der Heckklappe zu vermeiden. Bohrungen entgraten
und mit den BMW üblichen Korrossionsschutzmaßnahmen behandeln.
D
Faserstiftmarkierung von der Heckklappe entfernen.
Einsteckmutter (d) in die Bohrung (4) eindrücken.
E
Gewindestifte (e) mit Loctite 262 bestreichen und von Hand mit der Spitze nach oben bis zum Anschlag in den
Heckflügel (a) eindrehen.
F
Auflagefläche des Heckflügels (a) vor dem Kleberauftrag gründlich reinigen.
Kleberaupe an der Klebelinie (5) (Kante zur inneren Vertiefung) gleichmäßig etwa in der Dicke derTubenöffnung auftragen. Die Kleberaupe muß in jedem Fall über die Vertiefung hinausragen !
Folie (6) vom Klebestanzling (b) abziehen.
G
Heckflügel (a) an der Hecklappe aufsetzen und die Gewindestifte (e) in die Einsteckmuttern (d) drücken.
Heckflügel (a) fest auf die Heckklappe pressen und Heckflügel (a) mit Klebeband am Fahrzeug fixieren.
Halten Sie in jedem Fall die Aushärtezeiten des Klebstoffes ein. Bewegen Sie während dieser Zeit das
Fahrzeug nicht (Aushärtezeit ca. 4 Stunden) und setzen Sie den Heckflügel keiner einwirkenden Feuchtigkeit aus
(Aushärtezeit ca. 24 Stunden).
DE/2-1
2. Installation
Notes
Refer to the safety instructions in section 1.
The installation work for the accessory is based on the workshop information.
Preparations
Place the above workshop documents to hand.
Clean the installation position with cleaning products and cloths.
Unfold folded page 2-9
A
Place the rear wing (a) on the boot lid and move it into its ideal position.
Ideal position:
On the centre of the boot lid
As far to the rear as possible towards the edge of the boot lid so that the entire support area of the rear wing
foot remains on the boot lid.
Mark the position of the rear wing (a) on the boot lid using a water-soluble pen (1).
Take off the rear wing (a) again.
B
Glue the adhesive section (b) into the foot of the rear wing (a).
Place the positioning tool (c) into the threaded insert (2).
Place the rear wing (a) on to the boot lid in the marked position (if necessary with the help of another person).
Secure the positioning tool (c) to the boot lid using adhesive tape and carefully remove the rear wing (a).
C
Drill the hole, with a diameter of 2 mm, using the hole guide (3) in the positioning tool (c).Take the positioning tool
(c) off the boot lid.Then enlarge the hole to a diameter of 11 mm.
Do not drill too deeply with the drill bit to ensure that you do not damage the boot lid. Deburr the holes and
treat them with the standard BMW anti-corrosion measures.
D
Remove the fibre pen marking from the boot lid.
Press a plug-in nut (d) into the hole (4).
E
Coat the grub screws (e) with Loctite 262 and turn them into the rear wing (a) as far as they will go by hand with
the tip pointing upwards.
F
Clean the support area for the rear wing (a) thoroughly before applying the adhesive.
Apply an even bead of adhesive, approximately as thick as the tube opening, to the adhesive line (5) (edge towards
the inner recess).The bead of adhesive must definitely go beyond the recess.
Remove the foil (6) from the adhesive section (b).
G
Place the rear wing (a) on the boot lid and press the grub screws (e) into the plug-in nuts (d). Press the rear wing
(a) firmly on to the boot lid and secure the rear wing (a) to the car using adhesive tape.
It is essential that you wait for the hardening times for the adhesive. During this time do not move the car
(the hardening time is approximately 4 hours) and do not expose the rear wing to any moisture (hardening time
approx. 24 hours).
2-2/EN
2. Montage
Recommandations
Respecter les recommandations concernant la sécurité du chapitre 1.
Pour le montage des accessoires, se référer aux informations d'atelier traditionnelles.
Travaux préliminaires sur la voiture
Préparer les documents d’atelier mentionnés ci-dessus.
Nettoyer soigneusement l'emplacement de montage avec le produit nettoyant et un chiffon.
Déplier le rabat 2-9 !
A
Installer le becquet (a) sur le hayon et le placer dans la position optimale.
Position optimale :
- au milieu du hayon ;
- le plus à l’arrière possible en direction du bord du hayon de manière à ce que l’ensemble de la surface de
contact de la patte du becquet soit bien sur le hayon.
Repérer sur le hayon la position du becquet (a) à l’aide d’un crayon feutre soluble à l’eau (1).
Retirer le becquet (a).
B
Coller le support de collage (b) dans la patte du becquet (a).
Insérer le gabarit de positionnement (c) dans l’insert fileté (2).
Placer le becquet (a) sur le hayon dans la position repérée (le cas échéant en faisant appel à une autre personne).
Fixer le gabarit de positionnement (c) sur le hayon avec du ruban adhésif et retirer le becquet (a) avec précaution.
C
Faire un avant-trou avec un foret de Ø 2 mm par l’intermédiaire du guide de perçage (3) qui se trouve dans le
gabarit de positionnement (c). Retirer du hayon le gabarit de positionnement (c). Finir de percer le trou d’un
diamètre de 11 mm.
Ne pas percer trop profondément avec le foret pour ne pas abîmer le hayon. Ebarber les trous, puis leur
appliquer les mesures anticorrosion BMW habituelles.
D
Enlever la marque au crayon feutre effectuée sur le hayon.
Enfoncer l’écrou à emboîter (d) dans le trou (4).
E
Enduire les tiges filetées (e) de Loctite 262 et les visser à la main jusqu'à la butée, la pointe étant tournée vers le
haut.
F
Nettoyer soigneusement la surface de contact du becquet (a) avant l’opération de collage.
Appliquer régulièrement le trait de colle sur la ligne de collage (5) (prendre comme repère la gorge intérieure ;
son épaisseur sera à peu près celle de l’ouverture du tube. Le trait de colle doit en tout état de cause déborder
de la gorge !
Retirer le film protecteur (6) du support de collage (b).
G
Placer le becquet (a) sur le hayon et enfoncer les tiges filetées (e) dans les écrous à emboîter (d). Presser fortement le becquet (a) sur le hayon et fixer le becquet (a) sur la voiture avec du ruban adhésif.
Respectez dans tous les cas les temps de durcissement de la colle. Pendant ce délai, ne pas déplacer la
voiture (temps de durcissement : env. 4 heures) et n’exposez le becquet à l’humidité (délai de durcissement
env. 24 heures).
FR/2-3
2. Montage
Aanwijzingen
Let op de veiligheidsaanwijzingen in hoofdstuk 1.
Aan de montage van accessoires liggen de bekende werkplaatsinformaties ten grondslag.
Vooraf uit te voeren werkzaamheden aan de auto
Bovengenoemde werkplaatsinformaties klaar leggen.
Montageplaats met reinigingsmiddel en poetsdoek grondig reinigen.
Vouwbladzijde 2-9 openklappen!
A
Achterspoiler (a) op de achterklep zetten en in de optimale positie brengen.
Optimale positie:
- centrisch op de achterklep;
- zo ver mogelijk achterop in de richting van de afsluitrand van de achterklep, zodat het complete steunvlak
van de achterspoilerpoot zich op de achterklep bevindt.
Met in water oplosbare viltstift (1) de positie van de achterspoiler (a) op de achterklep markeren.
Achterspoiler (a) weer wegnemen.
B
Uitgestansd plakdeel (b) in de poot van de achterspoiler (a) plakken.
Positioneerhulpje (c) in de stifttap (2) steken.
Achterspoiler (a) in de gemarkeerde positie op de achterklep zetten (eventueel met behulp van een tweede
persoon). Positioneerhulpje (c) met plakband op de achterklep bevestigen en de achterspoiler (a) voorzichtig
verwijderen.
C
Boorgat met een boordiameter van 2 mm met behulp van de in het positioneerhulpje (c) aanwezige geleiding (3)
aanbrengen, positioneerhulpje (c) van de achterklep verwijderen. Vervolgens het boorgat tot op een doorsnede van
11 mm openboren.
Niet te diep boren om beschadiging van de achterklep te vermijden. Boorgaten ontbramen en met de bij
BMW gebruikelijke anti-corrosiemiddelen behandelen.
D
Viltstiftmarkering van de achterklep afvegen.
Steekmoer (d) in het boorgat (4) drukken.
E
Stifttap (e) met Loctite 262 insmeren en met de hand met de punt naar boven tot de aanslag in de achterspoiler (a)
draaien.
F
Steunvlak van de achterspoiler (a) voor het aanbrengen van de lijm zorgvuldig reinigen.
Lijmrups langs de plaklijn (5) (rand naar de binnenliggende verdieping) gelijkmatig ongeveer zo dik als de opening
van de tube aanbrengen. De lijmrups moet in ieder geval over de verdieping uit steken!
Folie (6) van het voorgestanste plakdeel (b) aftrekken.
G
Achterspoiler (a) op de achterklep zetten en de stifttaps (e) in de steekmoeren (d) drukken.
Achterspoiler (a) vast op de achterklep drukken en de achterspoiler (a) met plakband op de auto fixeren.
De uithardingstijden van de lijm moeten in ieder geval worden aangehouden. Beweeg de auto gedurende
deze tijd niet (uithardingstijd ca. 4 uur) en stel de achterspoiler niet aan vocht bloot (uithardingstijd ca. 24 uur).
2-4/NL
2. Montering
Hänvisningar
Följ säkerhetsanvisningarna i kapitel 1.
Den kända verkstadsinformationen ligger till grund för montering av tillbehör.
Förarbeten på bilen
Lägg fram den ovannämnda verkstadsdokumentationen.
Rengör monteringsområdet grundligt med rengöringsmedel och putslapp.
Vik ut utvikningsbladet 2-9!
A
Placera den övre bakspoilern (a) på bagageluckan och placera den i optimal position.
Optimal position:
- mitt på bagageluckan
- så långt bak som möjligt i riktning mot bagageluckans avslutande kant, så att hela anliggningsytan på
bakspoilerns fot sluter an mot bagageluckan.
Markera bakspoilerns (a) position på bagageluckan med en vattenlöslig filtpenna (1).
Ta av bakspoilern (a) igen.
B
Limma fast limningsmallen (b) i bakspoilerns fot.
Sätt in placeringshjälpen (c) i gängbussningen (2).
Placera bakspoilern (a) på bagageluckan vid den markerade positionen (eventuellt med hjälp av ytterligare en
person).
Fäst placeringshjälpen (c) med tape på bagageluckan och ta försiktigt av bakspoilern (a).
C
Borra ett hål med diametern 2 mm via den hålstyrning (3) som finns i placeringshjälpen (c).Ta bort placeringshjälpen (c).Ta bort placeringshjälpen (c) från bagageluckan. Borra därefter upp hålet med en diameter på 11 mm.
Borra inte för djupt med borren, bagageluckan kan skadas. Grada av hålen och behandla dem med BMWs
vanliga korrosionsskydd.
D
Ta bort filtpennemarkeringen från bagageluckan.
Tryck in insticksmuttern (d) i hålet (4).
E
Stryk på Loctite 262 på gängstiftet (e) och skruva in för hand med spetsen uppåt till anslaget i bagageluckan (a).
F
Rengör monteringsytan på bagageluckan (a) grundligt före limpåläggningen.
Lägg på en jämn limsträng utefter klisterlinjen (5) (kanten till den inre fördjupningen) ungefär lika tjock som tubens
hål. Limsträngen måste i varje fall sticka ut över fördjupningen!
Dra av folien från limningsmallen (b).
G
Sätt på den övre bakspoilern (a) på bagageluckan och tryck in gängstiften (e) i insticksmuttrarna (d).
Pressa fast bakspoilern (a) på bagageluckan och fixera bakspoilern (a) med tape vid bilen.
Håll alltid limmets härdningstid. Rör inte bilen under denna tid (härdningstid cirka 4 timmar) och utsätt inte
bakspoilern för någon påverkande fuktighet (härdningstid cirka 24 timmar).
SW/2-5
2. Montaggio
Avvertenze
Seguire le norme di sicurezza di cui al capitolo 1.
Per il montaggio degli accessori ci si deve basare sulle informazioni note di officina.
Lavori preliminari sulla vettura
Predisporre la documentazione di officina sopra menzionata.
Pulire accuratamente la sede di montaggio con detersivo e un panno per pulire.
Aprire la pagina pieghevole 2-9!
A
Applicare l'alettone posteriore (a) sul cofano posteriore collocandolo nella posizione ottimale.
Posizione ottimale:
- centrata sul cofano posteriore;
- spostata il più possibile verso il bordo terminale del cofano posteriore, in modo che l'intera superficie
d'appoggio dell'alettone posteriore resti sul cofano posteriore.
Con un pennarello solubile in acqua (1) segnare la posizione dell'alettone posteriore (a) sul cofano posteriore.
Togliere di nuovo l'alettone posteriore (a).
B
Incollare la fustella adesiva (b) nel piedino dell'alettone posteriore (a).
Infilare l'accessorio per agevolare il posizionamento (c) nel filetto riportato (2).
Collocare l'alettone posteriore (a) sul cofano posteriore nella posizione segnata (eventualmente con l'aiuto di una
seconda persona). Fissare con del nastro adesivo l'accessorio per agevolare il posizionamento (c) sul cofano
posteriore e togliere con delicatezza l'alettone posteriore (a).
C
Mettere il foro con un diametro di 2 mm sopra la guida perforata (3) che si trova nell'accessorio per agevolare il
posizionamento (c).Togliere dal cofano posteriore l'accessorio per agevolare il posizionamento (c). Quindi allargare
il foro al diametro di 11 mm.
Non entrare troppo in profondità con la punta del trapano, onde evitare di danneggiare il cofano posteriore.
Sbavare i fori e trattarli con i consueti prodotti anticorrosione BMW.
D
Togliere dal cofano posteriore il segno fatto con il pennarello.
Spingere il dado autobloccante (d) dentro il foro (4).
E
Spalmare il perno filettato (e) con Loctite 262 e avvitarlo a mano fino all'arresto con la punta rivolta in alto
nell'alettone posteriore (a).
F
Pulire accuratamente la superficie d'appoggio dell'alettone posteriore (a) prima di applicare la colla.
Applicare uniformemente la striscia di colla sulla linea d'incollaggio (5) (bordo verso l'avvallamento interno) più o
meno con lo spessore dell'apertura del tubo. In ogni caso la striscia di colla deve sporgere oltre l'avvallamento!
Staccare la pellicola (6) dalla fustella (b).
G
Applicare l'alettone posteriore (a) sul cofano posteriore e spingere i perni filettati (e) nei dadi autobloccanti (d).
Premere a fondo l'alettone posteriore (a) sul cofano posteriore e fissare l'alettone posteriore (a) con nastro adesivo
sulla vettura.
Attenetevi in ogni caso ai tempi di indurimento della colla. In questo periodo la vettura non deve essere
spostata (tempo d'indurimento ca. 4 ore) e l'alettone posteriore non deve essere esposto all'azione dell'umidità
(tempo d'indurimento ca. 24 ore).
2-6/IT
2. Montaje
Indicaciones
Fijarse en las indicaciones de seguridad del capítulo 1.
La instalación de accesorios se basa en las conocidas informaciones del taller.
Trabajos previos en el vehículo
Preparar la documentación de taller arriba mencionada.
Limpiar exhaustivamente el lugar de montaje con un producto de limpieza y paño para limpiar.
¡Desplegar la hoja 2-9 plegada!
A
Colocar el alerón posterior (a) sobre la tapa del maletero y situarlo en la posición óptima.
Posición óptima:
- centrado sobre la tapa del maletero;
- lo más atrás posible en dirección al canto de cierre de la tapa del maletero, de manera que la superficie de
apoyo completa del pie del alerón posterior quede sobre la tapa del maletero.
Marcar la posición del alerón posterior (a) con un rotulador acrílico (1) sobre la tapa del maletero.
Retirar de nuevo el alerón posterior (a).
B
Pegar la pieza estampada adhesiva (b) en el pie del alerón posterior (a).
Insertar la ayuda de posicionamiento (c) en el elemento roscado (2).
Colocar el alerón posterior (a) sobre la tapa del maletero en la posición marcada (en caso necesario, con ayuda
de una segunda persona). Fijar la ayuda de posicionamiento (c) con cinta adhesiva a la tapa del maletero y
retirar cuidadosamente el alerón posterior (a).
C
Marcar el orificio con un diámetro de broca de 2 mm a través de la guía de orificio (3) situada en la ayuda de
posicionamiento (c). Retirar la ayuda de posicionamiento (c) del alerón posterior. A continuación, taladrar el orificio
con un diámetro de 11 mm.
No taladrar demasiado profundo con la broca para evitar daños en la tapa del maletero. Desbarbar los
orificios y tratar con las habituales medidas anticorrosión BMW.
D
Limpiar la marca de rotulador en la tapa del maletero.
Insertar la tuerca (d) en el orificio (4).
E
Untar los pasadores roscados (e) con Loctite 262 y atornillarlos a mano con la punta hacia arriba hasta el tope en
el alerón posterior (a).
F
Limpiar exhaustivamente la superficie de apoyo del alerón posterior (a) antes de aplicar el pegamento.
Aplicar una tira de pegamento uniforme sobre la línea de pegado (5) (canto hacia la hendidura interior)
aproximadamente del grosor de la abertura del tubo. ¡En cualquier caso, la tira de pegamento debe sobresalir
por encima de la hendidura!
Retirar la lámina (6) de la pieza estampada adhesiva (b).
G
Colocar el alerón posterior (a) en la tapa del maletero y presionar los pasadores roscados (e) en las tuercas (d).
Apretar el alerón posterior (a) sobre la tapa del maletero y fijar el alerón posterior (a) al vehículo con cinta adhesiva.
Respete, en cualquier caso, los tiempos de secado del pegamento. No mueva el vehículo durante ese
tiempo (tiempo de secado aprox. 4 horas) y no exponga el alerón posterior a humedad (tiempo de secado
aprox. 24 horas).
ES/2-7
2. Montagem
Observações
Respeite as indicações de segurança do capítulo 1.
A montagem de acessórios deverá ser levada a cabo de acordo com as instruções das já conhecidas
informações para as oficinas.
Trabalhos de preparação necessários no veículo
Coloque as instruções para as oficinas acima indicadas à mão.
Antes de proceder à montagem, limpe cuidadosamente o local em que o spoiler traseiro vai ser montado com um
produto de limpeza e um pano de limpeza.
Abra a página desdobrável 2-9.
A
Coloque o spoiler traseiro (a) sobre a tampa do porta-bagagens e ajuste-o na posição ideal.
Posição ideal:
- Centrado em relação à tampa do porta-bagagens;
- o mais chegado para trás possível, na direcção da aresta de terminação da tampa do porta-bagagens,
de modo a que toda a superfície de apoio do spoiler traseiro fique perfeitamente apoiada na tampa do
porta-bagagens.
Servindo-se de uma caneta de feltro (1) hidrossolúvel, marque a posição do spoiler traseiro (a) na tampa do
porta-bagagens.
Isto feito, volte a remover o spoiler traseiro (a).
B
Cole o autocolante de fixação do spoiler com cola dos dois lados (b) ao pé do spoiler traseiro (a).
Introduza o dispositivo auxiliar de posicionamento (c) na rosca (2).
Coloque o spoiler traseiro (a) sobre a tampa do porta-bagagens, na posição previamente marcada (se necessário,
peça ajuda a uma segunda pessoa).
Prenda o dispositivo auxiliar de posicionamento (c) com fita adesiva à tampa do porta-bagagens e, agindo com
todo o cuidado, remova o spoiler traseiro (a).
C
Introduzindo uma broca de 2 mm de diâmetro pela guia de abertura de furos (3) de que o dispositivo auxiliar de
posicionamento (c) dispõe, abra um furo. Isto feito, remova o dispositivo auxiliar de posicionamento (c) da tampa
do porta-bagagens e alargue então o furo de modo a ficar com um diâmetro de 11 mm.
A fim de evitar quaisquer danos na tampa do porta-bagagens, certifique-se sempre de que não esteja a abrir
um furo demasiado profundo. Rebarbe o furo e proteja-o contra a corrosão com as medidas de protecção
adoptadas pela BMW.
D
Apague da tampa do porta-bagagens a marcação feita com a caneta de feltro.
Introduza a porca de encaixe (d) no furo (4), exercendo a pressão necessária para que fique bem encaixada.
E
Aplique uma camada de Loctite 262 no parafuso sem cabeça (e), introduza-o no spoiler traseiro (a) com a ponta
voltada para cima, e aperte-o à mão, até ao encosto.
F
Antes de aplicar a cola deverá limpar cuidadosamente a superfície de apoio do spoiler traseiro (a).
Aplique um cordão de cola ao longo da linha de colagem (5) (aresta voltada para a reentrância interior), certificando-se de que este cordão fica regular e de que a sua espessura corresponde aproximadamente à largura da
boca do tubo de cola. O cordão de cola tem sempre de ficar saliente em relação à reentrância.
Remova a película de protecção (6) do autocolante de fixação do spoiler com cola dos dois lados (b).
G
Coloque o spoiler traseiro (a) sobre a tampa do porta-bagagens e pressione os parafusos sem cabeça (e) para o
interior das porcas de encaixe (d).
Comprima o spoiler traseiro (a) com força contra a tampa do porta-bagagens e, servindo-se de fita adesiva,
prenda o spoiler (a) ao veículo.
Respeite sempre os tempos de secagem indicados para a cola utilizada. Nunca desloque o veículo enquanto
a cola estiver a secar (a cola demora cerca de 4 horas a secar) nem o exponha à humidade (tempo de secagem
de cerca de 24 horas).
2-8/PT
A
B
c
1
2
a
b
a
F 46 0270 EVA
C
F 46 0266 EVA
D
d
4
3
c
F 46 0271 EVA
E
F 46 0267 EVA
F
e
a
5
a
6
b
F 46 0268 EVA
F 46 0272 EVA
G
a
e
d
F 46 0269 EVA
2-9
Download