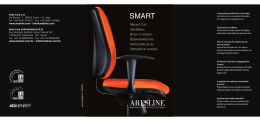
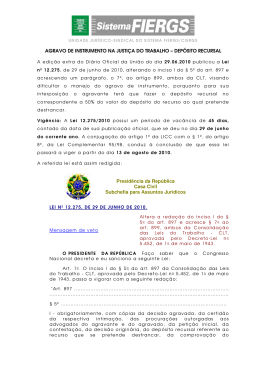
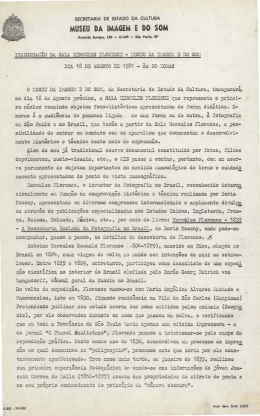
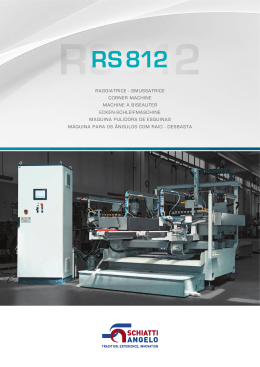
Voice Prosthesis with SmartInserter™
U
nr
eg
is
te
r
ed
co
py
Clinician’s Manual
Region 1
Illustrations
1. Provox® Vega™ XtraSeal™ voice prosthesis
a) Size information (shaft diameter and length between flanges)
b) Prosthesis Hood
c) Esophageal Flange
d) Tracheal Flange
e) Safety Strap
f ) Valve Flap
g) Prosthesis Shaft
h) Radio-opaque fluoroplastic Valve Seat
i) Additional enlarged Esophageal Flange
a)
c)
d)
b)
e)
i)
g)
d)
f)
c)
co
py
h)
is
te
r
ed
i)
U
nr
a) Guide
b) Connection Side
c) Folding Device
d) Distal tip
e) Inserter Pin
f ) Voice prosthesis
g) Loading Tube
h) Step marker
i) Tip
eg
2. SmartInserter™ System
a)
b)
c)
d)
e)
g)
f)
h)
i)
3. Over-shooting
3.1
U
nr
3.3
eg
is
te
r
ed
co
py
3.2
3.4
3. Over-shooting
3.5
3.6
U
nr
eg
is
te
r
ed
co
py
3.7
3.8
3. Over-shooting
3.9
U
nr
eg
is
te
r
ed
co
py
3.10
4. Re-loading
4.1
ed
co
py
4.2
U
nr
eg
is
te
r
4.3
4.6
U
is
eg
nr
te
r
ed
co
py
4.4
4.5
Prescription information
CAUTION: United States Federal law restricts this device to sale, distribution and use
by or on order of a physician or a licensed practitioner. The availability of this product
without prescription outside the United States may vary from country to country.
Disclaimer
Atos Medical offers no warranty - neither expressed nor implied - to the purchaser
hereunder as to the lifetime of the product delivered, which may vary with individual use
and biological conditions. Furthermore, Atos Medical offers no warranty of merchantability
or fitness of the product for any particular purpose.
Patents and trademarks
U
nr
eg
is
te
r
ed
co
py
Provox® is a registered trademark owned by Atos Medical AB, Sweden. Provox® Vega™
is protected by US patent no 8.332.999 as well as other patents, patents pending and
design patents pending.
Contents
ENGLISH .................................................................................10
DEUTSCH ...............................................................................14
NEDERLANDS .......................................................................19
FRANÇAIS ..............................................................................24
ITALIANO ................................................................................29
ESPAÑOL ................................................................................34
PORTUGUÊS..........................................................................39
SVENSKA ................................................................................44
U
nr
eg
is
te
r
ed
co
py
ORDERING INFORMATION ..............................................49
ENGLISH
Provox® Vega™ XtraSeal™
The Instructions for Use, which accompanies this product, may be revised from time to
time and must therefore be reviewed prior to each procedure in which the product is used.
Contents
1. Descriptive information..................................................................................................................10
1.1 Intended use ................................................................................................................................10
1.2 Description of the device ........................................................................................................10
1.3 CONTRAINDICATIONS ...............................................................................................................10
1.4 WARNINGS ....................................................................................................................................10
1.5 PRECAUTIONS ..............................................................................................................................10
2. Instructions for use...........................................................................................................................11
2.1 Preparation ...................................................................................................................................11
2.2 Anterograde replacement procedure using overshooting .........................................11
2.3 Reloading the Provox SmartInserter ...................................................................................11
3. Important patient information ....................................................................................................12
3.1 General information ..................................................................................................................12
3.2 Prosthesis maintenance ...........................................................................................................12
3.3 Accessories....................................................................................................................................12
4. Adverse events/Trouble shooting information......................................................................12
5. Additional information ...................................................................................................................13
5.1 Compatibility with MRI, X-ray and radiation therapy ....................................................13
5.2 Device lifetime .............................................................................................................................13
5.3 User assistance information ...................................................................................................13
1. Descriptive information
1.1 Intended use
co
py
The Provox Vega Voice Prosthesis is a sterile single use indwelling voice prosthesis
intended for voice rehabilitation after surgical removal of the larynx (laryngectomy).
Cleaning of the voice prosthesis is performed by the Patient while it remains in situ.
The Provox SmartInserter is a sterile single use device intended for anterograde
replacement of the Provox Vega Voice Prosthesis. This replacement procedure is carried
out by a medical doctor or a trained medical professional in accordance with local or
national guidelines.
The Provox SmartInserter is not intended to be used for insertion of a voice prosthesis
in a freshly made puncture.
ed
1.2 Description of the device
te
r
General
nr
eg
is
The Provox Vega is a one-way valve (prosthesis) that keeps a TE-puncture open for
speech, while reducing the risk of fluids and food entering the trachea. The Provox
Vega voice prosthesis is not a permanent implant, and needs periodic replacement. The
prosthesis (Fig. 1) is available in different diameters and several lengths. Provox Vega
XtraSeal has an additional enlarged esophageal flange that is intended to solve problems
with leakage around the voice prosthesis. The device is made of medical grade silicone
rubber and fluoroplastic.
U
Provox Vega XtraSeal package
The Provox Vega XtraSeal package contains the following items:
• 1 Provox Vega XtraSeal voice prosthesis, pre-loaded in a single-use SmartInserter,
sterile (Fig. 2)
• 1 Provox Brush of a size corresponding to the voice prosthesis, non-sterile
• 1 Provox Vega XtraSeal Clinician’s manual
• 1 Provox Vega Patient’s manual
• 1 Provox Brush Instructions for Use
1.3 CONTRAINDICATIONS
There are no known contraindications for use or replacement of a Provox Vega voice
prosthesis among patients already using prosthetic voice rehabilitation.
1.4 WARNINGS
Dislodgement or extrusion of a Provox Vega voice prosthesis from the TE puncture and
subsequent ingestion, aspiration or tissue damage may occur. For further information
about these events, see section Adverse Events/Trouble Shooting Information below.
To reduce the risk of dislodgment/extrusion and its potential sequelae:
• Select the proper prosthesis size. A tight fit may cause tissue necrosis and extrusion.
• Instruct the patient to consult a physician immediately if there are any signs of tissue
edema and/or signs of inflammation/infection.
• If used, choose laryngectomy tubes or stoma buttons with a suitable shape that do
not exert pressure on the prosthesis or catch onto the tracheal flange of the prosthesis
during insertion and removal of the laryngectomy tube or stoma button.
• Instruct the patient to use only genuine Provox accessories of corresponding size
(Brush, Flush, Plug) for maintenance, and to avoid all other kinds of manipulation.
• Re-use and re-processing may cause cross-contamination and damage to the device,
which could cause patient harm.
1.5 PRECAUTIONS
• Carefully assess any patient with bleeding disorders or who is undergoing anticoagulant
treatment for the risk of bleeding or hemorrhage prior to placement or replacement of
the prosthesis.
• Inspect the package before use. If damaged or opened, do not use the product.
• Always use aseptic technique when handling the prosthesis to reduce infection risk.
• Make sure that any external or internal stoma attachment devices used do not exert
pressure or hook the flange of the prosthesis (e.g., HME base plates, laryngectomy
tubes, or stoma buttons). This may lead to severe tissue damage and/or accidental
ingestion of the prosthesis.
10
2. Instructions for use
2.1 Preparation
Choosing the right size of the replacement prosthesis
Be sure to use a Provox Vega XtraSeal voice prosthesis of the proper shaft diameter and
length. Provox Vega XtraSeal is available in different length/diameter combinations.
• Selecting shaft diameter
The Clinician should determine the proper diameter of the prosthesis appropriate for
the patient.
• If the selected diameter is larger than the previous prosthesis the tract must be dilated,
using the Provox Dilator, appropriate to the diameter of the prosthesis being inserted.
• If a prosthesis with a smaller shaft diameter is inserted, observe and ensure that the
puncture shrinks to the appropriate diameter.
• Selecting shaft length
To select the correct length, you may use the current prosthesis as its own measuring
device. If there is too much (i.e. 3 mm / ~0.12 inches, or more) space between the
Tracheal Flange of the old prosthesis and the mucosal wall, a shorter prosthesis should
be used. If the prosthesis sits too tight, a longer prosthesis should be used.
Note: The shaft of Provox Vega XtraSeal is ca 1 mm shorter than the size indicated due
to the enlarged esophageal flange.
2.2 Anterograde replacement procedure using overshooting
(Fig. 3.1 – 3.10)
CAUTION: Provox Vega XtraSeal with enlarged esophageal flange must be placed using
the overshooting technique to ensure the additional enlarged esophageal flange and the
esophageal flange both deploy inside the esophageal lumen. Overshooting means that the
whole prosthesis is deployed in the esophagus and then retracted to the intended position.
Activating System for replacement using overshooting
1. With one hand holding the loading tube, use the other hand to push the inserter pin
partially into the loading tube, until the blue ring of the prosthesis has passed the
step marker of the loading tube (Fig. 3.1).
2. Squeeze the Guide between thumb and index fi nger (Fig. 3.2). Push it further into
the loading tube (Fig. 3.3 ). The Provox Vega XtraSeal voice prosthesis is now ready
for overshoot-insertion.
Inserting the new prosthesis into the puncture - Overshoot
U
nr
eg
is
te
r
ed
co
py
1. Probing the TE-puncture
Hold the Provox SmartInserter by the Loading Tube. Gently insert the Tip of the
Loading Tube. Proceed with care if you encounter resistance during insertion of
the Loading Tube into the puncture. In this case, dilatation and/or lubrication of the
puncture can ease the insertion
2. “Injecting” the prosthesis
Hold the loading tube stable in this position and use the other hand to advance the
Inserter Pin until completely inserted into the SmartInserter (Fig. 3.4). As the Guide is
being pushed further into the Loading Tube, the Inserter Pin will advance further and
release the Provox Vega XtraSeal voice prosthesis completely within the esophagus.
3. Pulling the prosthesis back
Pull the Loading Tube out from the puncture (Fig. 3.5). Pull the Provox Vega XtraSeal
voice prosthesis back into the puncture by grasping and pulling the tracheal flange
of the prosthesis with a non-toothed hemostat (Fig. 3.6).
4. Checking the proper fit
Check to see if the prosthesis and the flanges are in the proper position by rotating
and moving the prosthesis back and forth in the puncture. Apply slight traction on
the tracheal flange to ensure proper retention of the voice prosthesis (Fig 3.7).
Caution: Confi rm that both esophageal flanges have deployed entirely in the lumen of
the esophagus. No part of the enlarged esophageal flange should be visible alongside
the shaft of the voice prosthesis and when rotated the voice prosthesis should move
freely. Rotating the voice prosthesis while at the same time slightly pushing it towards
the esophagus can help to unfold the enlarged flange completely. In case of uncertainty,
use flexible endoscopy to confi rm proper placement inside the esophagus.
5. Test proper function
Test proper function of the prosthesis by asking the patient to speak (Fig. 3.8) and
by observing the prosthesis while the patient drinks water (Fig. 3.9).
6. Cut the Safety Strap with scissors
When the prosthesis is confi rmed to be in place, position the oval end of the tracheal
flange pointing downwards and use a pair of scissors to cut off the Safety Strap on
the outer edge of the flange (Fig. 3.10). The voice prosthesis is now ready for use.
2.3 Reloading the Provox SmartInserter
(Fig. 4.1 – 4.6)
If the first attempt to insert the Provox Vega XtraSeal voice prosthesis into the TE-puncture
was unsuccessful, it is possible to reload the Provox Vega XtraSeal into the SmartInserter.
CAUTION: Do not reload the SmartInserter more than 2 times.
If the Provox Vega XtraSeal voice prosthesis shows any signs of damage, do not use the prosthesis.
1. Make sure the prosthesis is still safely attached to the Inserter Pin. If not, secure the
Safety Strap on the Inserter Pin by leading the Safety Strap through the Attachment
Hole in the Inserter Pin (Fig. 4.1).
2. Put the Provox Vega XtraSeal voice prosthesis with the tracheal side down on top
of the Inserter Pin (Fig. 4.2). Use your thumb to ensure that the voice prosthesis is
properly positioned.
3. Check that the Folding Device and Guide are still assembled in the upper Guide
position. If not, re-assemble the Folding Device into Guide (Fig. 4.3). Do not push
the Folding Device in the bottom position of the Guide.
4. Gently pull the Inserter Pin with the attached prosthesis into the Folding Device
until you can clearly hear it click in place (Fig. 4.4). The Esophageal Flange of the
prosthesis is now in level with the Folding Device.
5. The enlarged E-flange must be manually positioned below the curved tips of the
folding device (Fig. 4.5).
NOTE: If this step is omitted, preloading the voice prosthesis will require excessive
force and may damage the voice prosthesis.
6. Attach the Loading Tube to the top of the Folding Device / Guide (Fig. 4.6) and let
the two parts snap together.
The Provox Vega XtraSeal voice prosthesis is now ready for activation and can be used
as described in section “Anterograde Replacement Procedure using overshooting”.
11
3. Important patient information
3.1 General information
Ensure that the patient understands to contact their clinician if:
• There is leakage through or around the prosthesis (coughing and/or change of
mucus color).
• Speaking becomes difficult (higher effort and/or voice sounds more strained).
• There are any signs of inflammation or tissue changes at the puncture site or the stoma
region (pain, redness, heat, swelling, traces of blood on the brush after brushing).
Also inform the patient that:
• After a prosthesis replacement traces of blood may be found in the sputum. This may
come from granulation tissue on the edges of the TE puncture.
• Occasionally, mild leakage through or around the prosthesis may occur in the first
weeks after insertion of a new prosthesis. This often resolves spontaneously and does
not require immediate replacement of the prosthesis.
• If leakage spontaneously occurs through the prosthesis a temporary blockage can be
done with a Provox Vega Plug.
• Speech Training Sessions with a trained clinician are advised in order to acquire
optimal voice sound, fluent speech, and optimal intelligibility.
3.2 Prosthesis maintenance
Instruct the patient when and how to clean the Provox Vega XtraSeal voice prosthesis.
Cleaning the prosthesis at least twice a day can help prolong the device life.
CAUTION: Only use genuine Provox accessories that are intended for use with
Provox Vega when cleaning the prosthesis.
• Brushing the prosthesis with the Provox Brush twice a day will help to remove mucus
and food remnants from the prosthesis.
• Flushing the prosthesis with the Provox Flush also helps to clean debris and mucus
from the prosthesis, which helps increase the life of the device.
Note: The Provox Flush is intended for use only by patients who, as assessed by the
clinician who prescribes the device, have demonstrated ability to understand and
consistently follow the instructions for use without clinician supervision.
• Some dietary measures, like the daily intake of yogurt or butter milk containing
lactobacilli, are considered to be helpful against excessive Candida growth.
For detailed information on how to clean a Provox Vega, please see Instructions for
each accessory.
3.3 Accessories
co
py
CAUTION: Only use genuine Provox accessories that are intended for use with
Provox Vega. Other accessories may cause patient harm or product malfunction.
Accessories to facilitate insertion of the prosthesis (for clinician’s use)
te
r
ed
• Provox Dilator: Helps to convert from a prosthesis with a smaller shaft diameter to a
Provox voice prostheses of larger diameter.
• Provox GuideWire: for placement of a Provox, Provox2 or a Provox Vega voice
prosthesis in a freshly made TE puncture, or for retrograde replacement of a Provox
indwelling voice prosthesis.
Accessories to maintain the device function (for patient’s use)
nr
eg
is
• Provox Brush / Provox Brush XL is used by the patient to clean the inside of the
prosthesis.
• Provox Flush is an additional cleaning device that allows flushing of the prosthesis.
• Provox Vega Plug is a First Aid tool for patient’s use that temporarily blocks leakage
through the prosthesis.
U
Other supplementary products that can be used with Provox voice prostheses
• Provox HME: Heat- and Moisture Exchanger partially restores lost nasal functions
(heating, humidifying, breathing resistance).
• Provox FreeHands HME: A Heat and Moisture Exchanger combined with an
automatic tracheostoma valve, designed to allow hands-free speech.
• Provox LaryTube: A silicone tracheal cannula intended to support shrinking stomas
while retaining other rehabilitation devices of the Provox System.
• Provox LaryButton: A soft, self-retaining silicone tracheal cannula intended to
support shrinking stomas while retaining other rehabilitation devices of the Provox
System.
4. Adverse events/Trouble shooting information
The following are possible risks associated with prosthetic voice rehabilitation:
Prosthesis related
Leakage through the valve – Leakage through the prosthesis may occur in association
with Candida overgrowth of the valve flap or dislodgement of the radio opaque ring (valve
seat). It may also occur if the esophageal flange of the prosthesis is not fully developed
in the lumen of the esophagus or if the prosthesis is too short. Endoscopic examination
should be performed to determine whether any of these phenomena has occurred. If the
prosthesis is in the correct position and of the right length, and if cleaning of the prosthesis
does not resolve leakage through the prosthesis, replacement of the prosthesis is indicated.
Candida overgrowth – Candida overgrowth of the prosthesis occurs in almost all patients.
Radiotherapy, salivary content and dietary habits may influence how rapidly Candida
can affect the silicone material. Treatment with antifungal agents may be considered as a
preventive measure if Candida overgrowth causes leakage through the prosthesis or other
incompetence of the valve.
Compatibility with antifungal medicine – An unknown variety of chemical substances
may immediately influence the material properties of the device or may be absorbed by
the material and subsequently released at a later time. Therefore, the introduction of
antifungal medicines or drugs directly to or within close proximity of the voice prosthesis
should be carefully assessed.
Laboratory tests show only minor negative influence on the function of the Provox
Vega voice prosthesis and components when using the following antifungal medications:
• Nystatin
• Fluconazole
• Mikonazol
12
Puncture related
Aspiration of the prosthesis – Accidental aspiration of the voice prosthesis or other
components of the voice rehabilitation system may occur. Immediate symptoms may include
gagging, coughing, choking or wheezing. As with any other foreign body, complications
from aspiration of a component may cause obstruction or infection. Complications may
include pneumonia, atelectasis, bronchitis, lung abscess, bronchopulmonary fistula
and asthma. If the patient can breathe, coughing may remove the foreign body. Partial
airway obstruction or complete airway obstruction requires immediate intervention for
removal of the object.
Ingestion of the prosthesis – Accidental ingestion of the voice prosthesis, or other
components of the voice rehabilitation system, may occur. As with any other foreign
body, the symptoms caused by ingestion of the prosthesis or component of the voice
rehabilitation system depends largely on size, location, degree of obstruction (if any)
and the length of time it has been present. Ingested components that have remained in
the lower esophagus may be removed by esophaguscopy or observed for a short period
of time. The object may pass spontaneously into the stomach; foreign bodies that pass
into the stomach usually pass through the intestinal tract. Surgical removal of foreign
bodies in the intestinal tract must be considered when bowel obstruction occurs, bleeding
is present, perforation occurs or the object fails to pass through the intestinal tract.
Hemorrhage/Bleeding of the puncture – Slight bleeding from the edges of the TE-puncture
may occur during replacement of the prosthesis and generally resolves spontaneously.
Patients on anti-coagulant therapy, however, should be carefully evaluated for the risk
of hemorrhage prior to placement or replacement of the prosthesis.
Infection and/or edema of the TE-puncture –Infection, granulation formation and/or
edema of the puncture (e.g during radio therapy) may increase the length of the puncture
tract. This may cause the prosthesis to be drawn inward and under the tracheal or esophageal
mucosa. Or, inflammation or overgrowth of the esophageal mucosa may cause the prosthesis
to protrude from the puncture. Temporary replacement of the prosthesis by a prosthesis
with a longer shaft is then advisable. Treatment with broad-spectrum antibiotics with or
without corticosteroids may be considered for treatment of the infection. If the infection
does not resolve with antibiotics and/or corticosteroid intervention in the presence of
the prosthesis, the prosthesis should be removed. In some cases stenting the puncture
with a catheter might be considered. If the puncture closes spontaneously secondary to
removal of the prosthesis, repuncture for insertion of a new prosthesis may be required.
Granulation around the puncture – Formation of granulation tissue around the
TE-puncture has been reported at an incidence of 5%. Electrical, chemical, or laser
cauterization of the area of granulation may be considered.
co
py
Hypertrophic scarring around the puncture – Bulging of the tracheal mucosa over
the tracheal flange may occur if the prosthesis is relatively short. This excess tissue may
be removed by using a laser (CO2, or NdYAG). Alternatively, a prosthesis with a longer
shaft can be used.
is
te
r
ed
Protrusion/extrusion of the prosthesis– Protrusion of the prosthesis and subsequent
spontaneous extrusion is sometimes observed during infection of the TE-puncture.
Removal of the prosthesis is required to avoid dislodgement into the trachea. The puncture
may close spontaneously secondary to the removal of the prosthesis. Repuncture may be
necessary for insertion of a new prosthesis.
U
nr
eg
Leakage around the prosthesis – Transient leakage around the prosthesis may occur
and may improve spontaneously. The most common reason is that the prosthesis is too
long, which is solved by inserting a shorter prosthesis. A prosthesis of another diameter
(upsizing) can also solve the leakage. It can also occur when the enlarged flange of the
Provox Vega XtraSeal has not deployed fully into the esophageal lumen. No part of the
enlarged esophageal flange should be visible alongside the shaft of the voice prosthesis
and when rotated the voice prosthesis should move freely. Rotating the voice prosthesis
while at the same time slightly pushing it towards the esophagus can help to unfold the
enlarged flange completely. In case of uncertainty, use flexible endoscopy to confi rm
proper placement inside the esophagus.
If leakage does not improve (which it often does spontaneously), a Provox XtraFlange
can be used. Other methods to solve leakage around the voice prosthesis are temporary
removal of the prosthesis and the insertion of a cuffed tracheal cannula and/or nasogastric
feeding tube to permit shrinkage of the puncture. Alternatively, a purse string suture
with 3x0 absorbable material could be submucosally applied around the TE-puncture
after removal of the prosthesis. The new prosthesis should be inserted and the suture
should be tightened gently, enclosing the puncture walls around the prosthesis. If leakage
around the prosthesis is intractable, more conservative measures, surgical closure of the
puncture and subsequent re-puncture may be necessary.
Tissue damage – If the prosthesis is too short, too long, or is pushed frequently against
the esophageal wall by a tracheal cannula, stoma button, or the patients’ fi nger, damage
of the puncture, tracheal and/or esophageal tissues may occur. In patients undergoing
radiotherapy this may happen more easily. Inspect the conditions regularly to avoid
severe damage.
5. Additional information
5.1 Compatibility with MRI, X-ray and radiation therapy
Provox voice prostheses have been tested and found to be compatible, except Provox
ActiValve, with Magnetic Resonance Imaging (tested up to 3.0 Tesla), x-ray and radiation
therapy (tested up to 70 Gy). The prosthesis can be left in the TE-puncture during the
examination/therapy session. Note that the radio-opaque valve seat is visible on x-ray.
5.2 Device lifetime
Depending on individual biological circumstances the device life varies, and it is not
possible to predict the integrity of the device over a longer period of time. The material
of the device will be affected by e.g. bacteria and yeast, and the structural integrity of
the device will eventually deteriorate.
5.3 User assistance information
For additional help or information, please see back cover of the Instructions for Use for
contact information.
13
DEUTSCH
Abbildungen
1. Provox® Vega™ XtraSeal™ Stimmprothese
a) Hinweise zur Größe (Schaftdurchmesser und Länge/Abstand zwischen
den Flanschen)
b) Prothesenkappe (Prosthesis Hood)
c) Ösophagealer Flansch (Esophageal Flange)
d) Trachealer Flansch (Tracheal Flange)
e) Sicherheitsfaden (Safety Strap)
f ) Ventilklappe (Valve Flap)
g) Prothesenschaft (Prosthesis Shaft)
h) Strahlenundurchlässiger Ventilsitz (Valve Seat) aus Fluorplastik
i) Zusätzlicher vergrößerter ösophagealer Flansch (Esophageal Flange)
2. SmartInserter™ System
a) Führung (Guide)
b) Anschlussseite (Connection Side)
c) Falthilfe (Folding Device)
d) Distale Spitze (Distal Tip)
e) Inserter Pin
f ) Stimmprothese (Voice Prosthesis)
g) Ladekanüle (Loading Tube)
h) Markierung (Step marker)
i) Spitze
Provox® Vega™ XtraSeal™
co
py
Die diesem Produkt beiliegende Bedienungsanleitung unterliegt gelegentlichen
Änderungen und ist deshalb vor jedem Verfahren, bei dem das Produkt verwendet
wird, durchzusehen.
ed
Inhalt
U
nr
eg
is
te
r
1. Beschreibung .....................................................................................................................................14
1.1 Verwendungszweck .................................................................................................................14
1.2 Produktbeschreibung ..............................................................................................................14
1.3 GEGENANZEIGEN .....................................................................................................................15
1.4 WARNUNGEN ..............................................................................................................................15
1.5 VORSICHTSMASSNAHMEN .....................................................................................................15
2. Bedienungsanleitung ......................................................................................................................15
2.1 Vorbereitung ...............................................................................................................................15
2.2 Anterograde Austauschprozedur mit Überschießen ...................................................15
2.3 Provox SmartInserter neu laden ..........................................................................................16
3. Wichtige Patienteninformationen ..............................................................................................16
3.1 Allgemeine Informationen .....................................................................................................16
3.2 Wartung und Pflege der Prothese .......................................................................................16
3.3 Zubehör ........................................................................................................................................17
4. Nebenwirkungen/Problemlösung..............................................................................................17
5. Zusätzliche Informationen ............................................................................................................18
5.1 Kompatibilität mit MRI, Röntgen und Strahlentherapie .............................................18
5.2 Lebensdauer des Produkts.....................................................................................................18
5.3 Weitere Hilfe für Anwender....................................................................................................18
1. Beschreibung
1.1 Verwendungszweck
Die Provox Vega Stimmprothese ist eine sterile Verweilprothese zum einmaligen
Gebrauch während der Stimmrehabilitation nach einer chirurgischen Entfernung des
Larynx (Laryngektomie). Der Patient kann die Stimmprothese in eingesetztem Zustand
selbst reinigen.
Der Provox SmartInserter ist ein steriles Gerät zum einmaligen anterograden Austausch
der Provox Vega Stimmprothese. Das Produkt darf nur von einem dafür, entsprechend
lokaler oder nationaler Richtlinien, geschulten Mediziner angewendet werden.
Der Provox SmartInserter darf nicht zum Einsetzen einer Stimmprothese in eine
frische Punktion verwendet werden.
1.2 Produktbeschreibung
Allgemein
Provox Vega ist ein Einweg-Ventil (Prothese), das eine TE-Punktion zum Sprechen
offen hält. Gleichzeitig vermindert sie das Risiko, dass Flüssigkeiten oder Speisen in
die Luftröhre gelangen können. Die Provox Vega Stimmprothese ist kein permanentes
Implantat und muss daher regelmäßig ausgetauscht werden. Die Prothese (Abb. 1) ist in
unterschiedlichen Durchmessern und mehreren Längen erhältlich. Provox Vega XtraSeal
weist einen zusätzlichen, vergrößerten ösophagealen Flansch auf, der Probleme durch
Leckagen rund um die Stimmprothese beheben soll. Das Produkt ist aus medizinischem
Silikon und Fluorplastik hergestellt.
14
Provox Vega XtraSeal Lieferumfang
Eine Provox Vega XtraSeal Packung enthält:
• 1 Provox Vega XtraSeal Stimmprothese, zum Einsetzen vorgeladen in einem
SmartInserter zur einmaligen Verwendung, steril (Abb. 2)
• 1 Provox Brush in der passenden Größe, nichtsteril
• 1 Provox Vega XtraSeal Bedienungsanleitung für den Arzt
• 1 Provox Vega Bedienungsanleitung für den Patienten
• 1 Bedienungsanleitung für die Provox Brush
1.3 GEGENANZEIGEN
Für den Gebrauch oder den Austausch einer Provox Vega Stimmprothese sind bei Patienten,
die bereits eine prothetische Stimmrehabilitation nutzen, keine Gegenanzeigen bekannt.
1.4 WARNUNGEN
Die Provox Vega Stimmprothese kann in der TE-Punktion verrutschen, versehentlich
verschluckt oder eingeatmet werden, zudem können Gewebeschäden auftreten. Lesen Sie
für weitere Informationen den Abschnitt Nebenwirkungen/Problemlösungen weiter unten.
Sie können das Risiko der Extrusion folgendermaßen reduzieren:
• Wählen Sie die richtige Prothesengröße. Ein zu enger Sitz kann zu Nekrose und
Extrusion führen.
• Weisen Sie den Patienten darauf hin, dass er bei den ersten Infektionen unverzüglich
einen Arzt aufsuchen muss.
• Falls verwendet, wählen Sie Laryngektomiekanülen oder Stoma Buttons in einer
geeigneten Form, die keinen Druck auf die Prothese ausüben und die während
des Einsetzens oder Herausnehmens nicht am trachealen Flansch der Prothese
hängenbleiben.
• Weisen Sie den Patienten darauf hin, dass er zur Pflege ausschließlich original Provox
Zubehör in der entsprechenden Größe (Brush, Flush, Plug) verwenden sollte und keine
Veränderung an der Prothese vornehmen darf.
• Wiederverwendung und Wiederaufbereitung können eine Kreuzkontamination und
eine Beschädigung des Produktes verursachen, was für den Patienten negative Folgen
haben könnte.
1.5 VORSICHTSMASSNAHMEN
co
py
• Bei Patienten, die an Gerinnungsstörungen leiden oder die mit Antikoagulanzien
behandelt werden, muss das Blutungs-/Hämorrhagierisiko vor dem Einsetzen bzw.
Austauschen der Prothese sorgfältig beurteilt werden.
• Prüfen Sie vor der Verwendung die Verpackung. Verwenden Sie das Produkt nicht,
wenn die Verpackung beschädigt oder geöffnet ist.
• Berühren Sie die Prothese nur aseptisch, um das Infektionsrisiko zu verringern.
• Achten Sie darauf, dass alle Produkte zur inneren und äußeren Befestigung am Stoma
keinen Druck ausüben oder am Flansch der Prothese hängen bleiben (z. B. HMEBasisplatten, Laryngektomie-Kanülen oder Stoma-Buttons). Dies kann zu schweren
Gewebeschäden und/oder zu versehentlichem Verschlucken der Prothese führen.
ed
2. Bedienungsanleitung
te
r
2.1 Vorbereitung
Auswahl einer Austauschprothese der korrekten Größe
eg
is
Achten Sie darauf, eine Provox Vega XtraSeal Stimmprothese mit dem richtigen
Schaftdurchmesser und der richtigen Länge zu verwenden. Provox Vega XtraSeal ist in
verschiedenen Längen-/Durchmesserkombinationen erhältlich.
U
nr
• Auswahl des Schaftdurchmessers
Der richtige Schaftdurchmesser der Prothese wird vom Arzt bestimmt.
• Wenn der gewählte Durchmesser größer als derjenige der bisher verwendeten
Prothese ist, muss die neue Fistel mit dem Provox Dilator vergrößert werden.
• Sollte der Durchmesser kleiner als derjenige der bisher verwendeten Prothese
sein, ist darauf zu achten, dass sich die Punktion auf den richtigen Durchmesser
zusammenzieht.
• Auswahl der Schaftlänge
Zur Bestimmung der richtigen Länge kann die aktuelle Prothese als Maßstab
genommen werden. Wenn zwischen dem trachealen Flansch der alten Prothese und
der Schleimhautwand zu viel Platz ist (etwa 3 mm oder mehr), sollten Sie eine kürzere
Prothese verwenden. Setzen Sie eine längere Prothese ein, falls die verwendete
Prothese zu eng sitzt.
Hinweis: Aufgrund des vergrößerten ösophagealen Flanschs ist der Schaft bei Provox
Vega XtraSeal ca. 1 mm kürzer als die angegebene Größe.
2.2 Anterograde Austauschprozedur mit Überschießen
(Abb. 3.1 – 3.10)
VORSICHT: Provox Vega XtraSeal mit vergrößertem ösophagealem Flansch muss mittels
Überschießen eingesetzt werden, um sicherzustellen, dass sich sowohl der zusätzliche
vergrößerte ösophageale Flansch als auch der ösophageale Flansch im Ösophaguslumen
entfalten. Überschießen bedeutet, dass Sie die Stimmprothese komplett in den Ösophagus
einführen und anschließend in die vorgesehene Position zurückziehen.
Aktivieren des Systems zum Austausch mit Überschießen
1. Halten Sie mit einer Hand die Ladekanüle und schieben Sie mit der anderen Hand
den Inserter Pin so weit in die Ladekanüle hinein, bis der blaue Ring der Prothese
die Markierung der Ladekanüle überschreitet (Abb. 3.1).
2. Halten Sie die Führung (Guide) zwischen Daumen und Zeigefi nger (Abb. 3.2).
Schieben Sie sie tiefer in die Ladekanüle hinein (Abb. 3.3). Die Provox Vega XtraSeal
Stimmprothese ist jetzt für ein Einsetzen mit bewusstem Überschießen bereit.
Einsetzen einer neuen Prothese in die Punktion - Überschießen
1. Sondieren der TE-Punktion
Halten Sie den Provox SmartInserter an der Ladekanüle fest. Führen Sie die Spitze
der Ladekanüle vorsichtig ein. Sollten Sie beim Einführen der Ladekanüle in die
Punktion einen Widerstand spüren, müssen Sie sehr behutsam vorgehen. In diesem
Fall kann das Einsetzen durch Dilatieren oder der Punktion und/oder Anwendung
eines Gleitmittels erleichtert werden.
15
2. Einführen der Prothese
Halten Sie die Ladekanüle stabil in dieser Position und schieben Sie dann den
Inserter Pin mit der anderen Hand so weit vor, bis er vollständig in den SmartInserter
eingeführt ist (Abb. 3.4). Indem Sie die Führung (Guide) weiter in die Ladekanüle
einführen, wird der Inserter Pin vorwärts geschoben und somit die Provox Vega
XtraSeal Stimmprothese vollständig in die Speiseröhre eingeführt.
3. Zurückziehen der Prothese
Ziehen Sie die Ladekanüle gerade aus der Punktion heraus (Abb. 3.5). Ziehen Sie
die Provox Vega XtraSeal Stimmprothese mit einer ungezahnten Gefäßklemme am
trachealen Flansch zurück in die Punktion (Abb. 3.6).
4. Überprüfen Sie den richtigen Sitz der Prothese
Überprüfen Sie den richtigen Sitz der Prothese und der Flansche, indem Sie die Prothese
drehen und in der Punktion vor- und zurückziehen. Ziehen Sie leicht am trachealen
Flansch, um den korrekten Halt der Stimmprothese zu überprüfen (Abb. 3.7).
Vorsicht: Überprüfen Sie, dass sich beide ösophageale Flansche vollständig im
Ösophaguslumen entfaltet haben. Neben dem Schaft der Stimmprothese darf kein Teil
des vergrößerten ösophagealen Flanschs sichtbar sein; die Stimmprothese muss sich
ungehindert drehen lassen. Die vollständige Entfaltung des vergrößerten Flanschs
gestaltet sich eventuell einfacher, wenn die Stimmprothese gedreht und gleichzeitig
leicht in Richtung des Ösophagus gedrückt wird. Wenn in dieser Hinsicht Unsicherheit
besteht, muss die korrekte Platzierung im Ösophagus mit einem flexiblen Endoskop
bestätigt werden.
5. Funktionstest
Bitten Sie den Patienten zu sprechen (Abb. 3.8) und lassen Sie ihn ein Glas Wasser
trinken, um die Funktion der Prothese zu überprüfen (Abb. 3.9).
6. Abschneiden des Sicherungsfadens mit einer Schere
Sobald der korrekte Sitz der Prothese bestätigt wurde, drehen Sie das ovale Ende des
trachealen Flanschs nach unten und schneiden Sie den Sicherungsfaden am äußeren
Rand des trachealen Flanschs mit einer Schere ab (Abb. 3.10). Die Stimmprothese
kann jetzt verwendet werden.
2.3 Provox SmartInserter neu laden
(Abb.en 4.1 – 4.6)
Sollte der erste Versuch, die Provox Vega XtraSeal Stimmprothese in die TE-Punktion
einzusetzen misslingen, können Sie die Provox Vega XtraSeal erneut in den SmartInserter
laden.
BITTE BEACHTEN SIE: Laden Sie den SmartInserter nicht häufiger als zwei Mal.
U
nr
eg
is
te
r
ed
co
py
Falls die Provox Vega XtraSeal Stimmprothese Zeichen von Beschädigungen aufzeigt,
dürfen Sie sie nicht einsetzen.
1. Vergewissern Sie sich, dass die Prothese weiterhin am Inserter Pin befestigt ist. Falls
nicht, befestigen Sie den Sicherheitsfaden am Inserter Pin, indem Sie ihn durch das
Befestigungsloch führen (Abb. 4.1).
2. Setzen Sie die Provox Vega XtraSeal Stimmprothese mit der trachealen Seite nach
unten auf den Inserter Pin (Abb. 4.2). Überprüfen Sie mit Ihrem Daumen die richtige
Position der Stimmprothese.
3. Überprüfen Sie, dass die Falthilfe (Folding Device) fest in der oberen Hälfte der
Führung sitzt. Falls nicht, setzen Sie die Falthilfe erneut in die Führung ein (Abb. 4.3).
Drücken Sie die Falthilfe nicht in die untere Hälfte der Führung.
4. Ziehen Sie den Inserter Pin mit der befestigten Prothese vorsichtig in die Falthilfe, bis
Sie mit einem Klicken einrastet (Abb. 4.4). Der oesophageale Flansch der Prothese
ist jetzt bündig mit der Falthilfe.
5. Der vergrößerte ösophageale Flansch muss von Hand unterhalb der gebogenen
Spitzen der Falthilfe platziert werden (Abb. 4.5).
HINWEIS: Wenn dieser Schritt ausgelassen wird, ist zum Vorladen der Stimmprothese
ein übermäßiger Kraftaufwand erforderlich, wobei die Stimmprothese beschädigt
werden kann.
6. Befestigen Sie die Ladekanüle oben an der Falthilfe/Führung (Abb. 4.6) und lassen
Sie die beiden Teile zusammenschnappen.
Die Provox Vega XtraSeal Stimmprothese kann jetzt wie im Abschnitt „Anterograde
Austauschprozedur mit Überschießen“ aktiviert und benutzt werden.
3. Wichtige Patienteninformationen
3.1 Allgemeine Informationen
Informieren Sie den Patienten darüber, dass er unverzüglich einen Arzt aufsuchen
muss, wenn:
• Die Stimmprothese undicht ist (Husten und/oder eine Veränderung der Sekretfarbe
deutet hierauf hin).
• Das Sprechen schwierig wird (Er muss sich mehr anstrengen und/oder seine Stimme
klingt unnatürlich).
• Er Anzeichen einer Entzündung oder Veränderungen des Gewebes an der Punktion
bemerkt (Schmerzen, Rötungen, Hitzegefühl, Schwellungen, Blutspuren nach dem
Reinigen auf der Bürste).
Informieren Sie den Patienten auch, dass:
• Nach einem Austausch der Stimmprothese Spuren von Blut im Speichel auftreten
können. Dies entsteht durch Granulationsgewebe an den Rändern der TE-Punktion.
• In den ersten Wochen nach dem Einsetzen einer neuen Prothese leichte undichte Stellen
in der Mitte oder an den Rändern der Prothese auftreten können. Dieses Problem löst
sich meistens von selbst, die Prothese muss deswegen nicht sofort wieder ausgetauscht
werden.
• Sollte es zu spontanen Leckagen durch die Prothese kommen, kann die Prothese
vorübergehend mit einem Provox Vega Plug abgedichtet werden.
• Der Patient für eine optimale Stimme, flüssiges Sprechen und deutliche Artikulation
ein Sprachtraining mit einem geschulten Sprachtherapeuten/Logopäden absolvieren
sollte.
3.2 Wartung und Pflege der Prothese
Weisen Sie den Patienten ein, wann und wie die Provox Vega XtraSeal Stimmprothese zu
reinigen ist. Um eine lange Lebensdauer zu garantieren, sollte die Prothese mindestens
zwei Mal täglich gereinigt werden.
BITTE BEACHTEN SIE: Verwenden Sie nur original Provox Zubehör, das für
Verwendung und Reinigung der Provox Vega Stimmprothese gedacht ist.
16
• Die Prothese sollte zwei Mal täglich mit der Provox Brush gebürstet werden, um
Sekret und Speisereste von der Prothese zu entfernen.
• Durch Spülen der Prothese mit Provox Flush wird das Entfernen von Sekret und
Speiseresten erleichtert.
Achtung: Provox Flush darf nur von Patienten benutzt werden, die von Ihrem Arzt
in deren Verwendung eingewiesen wurden und in der Lage sind, diese ohne Aufsicht
eines Mediziners zu benutzen.
• Bestimmte Nahrungsmittel, wie etwa der tägliche Konsum von Yoghurt oder
Buttermilch mit Milchsäurebakterien, können hilfreich gegen exzessives Wachstum
von Candida sein.
Lesen Sie für weitere Informationen zur Reinigung der Provox Vega Stimmprothese
auch die Bedienungsanleitungen des jeweiligen Zubehörs.
3.3 Zubehör
BITTE BEACHTEN SIE: Verwenden Sie nur original Provox Zubehör, das für
Verwendung und Reinigung der Provox Vega Stimmprothese gedacht ist. Anderes
Zubehör kann zu Verletzungen oder Fehlfunktionen führen.
Zubehör für ein leichteres Einsetzen der Prothese (zur Verwendung
durch den Mediziner)
• Provox Dilator: Hilft beim Wechsel von einer Prothese mit kleinerem
Schaftdurchmesser zu einer Provox Stimmprothese mit größerem Schaftdurchmesser.
• Provox GuideWire: für das Einsetzen einer Provox, Provox2 oder Provox Vega
Stimmprothese in eine frische TE-Punktion, oder für den retrograden Wechsel einer
Provox Verweilprothese.
Zubehör für eine bessere Funktionalität (zur Verwendung durch den
Patienten)
• Die Provox Brush/Provox Brush XL wird vom Patienten zur Reinigung der
Innenseite der Stimmprothese verwendet.
• Provox Flush ist ein zusätzliches Reinigungsprodukt zum Abspülen der Prothese.
• Provox Vega Plug dient der ersten Hilfe bei undichten Stellen, und dichtet sie
vorübergehend ab.
Weitere Produkte zur Verwendung mit der Provox Stimmprothese
ed
co
py
• Provox HME: Ein HME, Heat- and Moisture Exchanger (Wärme- und
Feuchtigkeitstauscher), stellt verlorene nasale Funktionen zum Teil wieder her
(Aufwärmen und Anfeuchten der Atemluft, Atemwiderstand).
• Provox FreeHands HME: Ein mit einem automatischen Tracheostoma-Ventil
kombiniertes HME zum freihändigen Sprechen.
• Provox LaryTube: Eine Trachealkanüle aus Silikon zur Unterstützung von sich
zusammenziehenden Stomas, das gleichzeitig als Befestigung für weitere Produkte
aus dem Provox System dient.
• Provox LaryButton: Eine weiche, selbsthaltende Trachealkanüle aus Silikon zur
Unterstützung von sich zusammenziehenden Stomas, das gleichzeitig als Befestigung
für weitere Produkte aus dem Provox System dient.
te
r
4. Nebenwirkungen/Problemlösung
eg
Prothesenbezogen
is
Folgende Risiken können bei der prothetischen Stimmrehabilitation auftreten:
U
nr
Leckage durch das Ventil – Eine Leckage durch die Prothese kann durch Überwucherung
der Ventilklappe durch Candida oder ein Verrutschen des strahlenundurchlässigen
Rings (Ventilsitz) entstehen. Undichte Stellen können auch dann auftreten, wenn der
oesophageale Flansch der Prothese sich nicht im Lumen des Oesophagus ausbreiten
kann oder wenn die Prothese zu kurz ist. Untersuchen Sie endoskopisch, ob eines dieser
Probleme vorliegt. Wenn die Prothese gut sitzt und die richtige Länge hat und falls eine
Reinigung der Prothese keine Abhilfe schafft, müssen Sie die Prothese austauschen.
Candida-Wachstum – Candida-Wachstum auf der Prothese tritt bei fast allen Patienten
auf. Strahlentherapien, Speichelbestandteile und Ernährung können das Wachstum von
Candida auf dem Silikon beeinflussen. Präventiv ist eine Behandlung mit einem Pilz
bekämpfenden Mittel möglich, wenn Candida-Wachstum die Funktion der Prothese
beeinträchtigt.
Kompatibilität mit Antimykotika – Chemische Substanzen kön nen die
Materialeigenschaften des Produkts beeinflussen oder vom Material absorbiert und
nach und nach freigesetzt werden. Daher sollten Antimykotika oder andere Medikamente
in der Nähe der Prothese sehr vorsichtig eingesetzt werden.
Labortests zeigen nur geringe negative Einflüsse auf die Funktion der Provox Vega
Stimmprothese bei den folgenden Antimykotika:
• Nystatin
• Fluconazol
• Miconazol
Punktionsbezogen
Aspiration der Prothese – Die Stimmprothese oder andere Komponenten des
Stimmrehabilitationssystems können versehentlich aspiriert werden. Unmittelbare
Symptome können Husten, Würgen oder Keuchen sein. Wie bei jedem Fremdkörper
auch können hierdurch die Atemwege blockiert oder Infektionen verursacht werden. Zu
möglichen Komplikationen gehören Pneumonie, Atelektase, Bronchitis, Lungenabszesse,
bronchopulmonäre Fisteln und Asthma. Sofern der Patient atmen kann, kann die Prothese
durch Husten gelöst werden. Ein teilweiser oder vollständiger Verschluss der Atemwege
erfordert eine unverzügliche Behandlung und Entfernung des Fremdkörpers.
Verschlucken der Prothese – Die Prothese oder andere Komponenten des
Stimmrehabilitationssystems können versehentlich verschluckt werden. Wie bei jedem
Fremdkörper sind die Symptome nach einem Verschlucken der Prothese oder von
Komponenten des Stimmrehabilitationssystems abhängig von ihrer Größe, Position,
dem Grad der Blockierung (falls vorhanden) und der Verweildauer. Verschluckte Teile,
die im unteren Ösophagus verbleiben, können durch eine Ösophaguskopie entfernt,
oder über einen kurzen Zeitraum beobachtet werden. Das Objekt kann spontan in den
Magen weitergelangen, von wo aus es gewöhnlich in den Verdauungstrakt gelangt.
Eine chirurgische Entfernung von Fremdkörpern aus dem Verdauungstrakt ist dann
erforderlich, wenn ein Darmverschluss, Perforationen oder Blutungen auftreten oder
das Objekt nicht durch den Verdauungstrakt geleitet wird.
17
Blutung der Punktion – Die Ränder der TE-Punktion können nach dem Austausch
der Prothese leicht bluten. Dieses Problem löst sich in der Regel spontan. Patienten in
gerinnungshemmender Behandlung sollten vor dem Einsetzen oder Austauschen einer
Prothese sorgfältig auf ihr Blutungsrisiko untersucht werden.
Infektion und/oder Ödeme an der TE-Punktion – Infektionen, die Bildung
von Granulationsgewebe und/oder Ödemen an der Punktion (z. B. während einer
Strahlentherapie) können zu einer Verlängerung des Punktionstrakts führen. Hierdurch
kann die Prothese nach innen und unter die tracheale oder ösophageale Schleimhaut
gezogen werden. Oder die Prothese kann durch Entzündungen oder ein Überwachsen
der ösophagealen Schleimhaut aus der Punktion herausragen. In diesem Fall ist ein
vorübergehender Austausch der Prothese durch eine Prothese mit einem längeren
Schaft ratsam. Zur Behandlung der Infektion ist eventuell eine Behandlung mit einem
Breitband-Antibiotikum mit oder ohne Corticosteroiden erforderlich. Falls die Infektion
mit Antibiotika und/oder Corticosteroiden nicht bei eingesetzter Prothese behandelt
werden kann, sollte die Prothese entfernt werden. In einigen Fällen kann das Einsetzen
eines Stents mit einem Katheter in die Punktion erforderlich sein. Sollte sich die Punktion
spontan nach dem Herausnehmen der Prothese schließen, ist zum Einsetzen einer neuen
Prothese eventuell eine erneute Punktion erforderlich.
Granulationsgewebe an der Punktion – In etwa 5% aller Fälle wurde von der Bildung
von Granulationsgewebe an der TE-Punktion berichtet. In diesem Fall empfiehlt sich
eine elektrische, chemische oder lasergeführte Kauterisation.
Hypertrophische Narbenbildung an der Punktion – Bei relativ kurzen Prothesen kann
sich tracheale Schleimhaut über den trachealen Flansch wölben. Diese überschüssige
Schleimhaut kann mit einem Laser entfernt werden (CO2 oder NdYAG). Alternativ
können Sie auch eine Prothese mit einem längeren Schaft einsetzen.
Protrusion/Extrusion der Prothese – In einigen Fällen wurde bei einer Infektion
der TE-Punktion von einer Protrusion der Prothese und einer subsequenten spontanen
Extrusion berichtet. Entfernen Sie in diesem Fall die Prothese, um ein Hineinfallen in die
Luftröhre zu verhindern. Die Punktion kann sich nach dem Herausnehmen der Prothese
spontan verschließen. In diesem Fall ist vor dem Einsetzen einer neuen Prothese eventuell
eine neue Punktion erforderlich.
U
nr
eg
is
te
r
ed
co
py
Leckagen an der Prothese – Vorübergehend können an der Prothese undichte Stellen
auftreten, was sich auch spontan wieder bessern kann. Die häufigste Ursache ist eine zu
lange Prothese. Setzen Sie in diesem Fall eine kürzere Prothese ein. Undichte Stellen
können auch dann auftreten, wenn sich der vergrößerte Flansch der Provox Vega
XtraSeal nicht vollständig im Ösophaguslumen entfaltet hat. Neben dem Schaft der
Stimmprothese darf kein Teil des vergrößerten ösophagealen Flanschs sichtbar sein;
die Stimmprothese muss sich ungehindert drehen lassen. Die vollständige Entfaltung
des vergrößerten Flanschs gestaltet sich eventuell einfacher, wenn die Stimmprothese
gedreht und gleichzeitig leicht in Richtung des Ösophagus gedrückt wird. Wenn in dieser
Hinsicht Unsicherheit besteht, muss die korrekte Platzierung im Ösophagus mit einem
flexiblen Endoskop bestätigt werden.
Falls sich die Leckage nicht bessert (was häufig spontan geschieht), kann ein Provox
XtraFlange verwendet werden. Weitere Methoden zur Behebung von Leckagen rund um
die Stimmprothese sind eine vorübergehende Entfernung der Prothese und Einführung
einer Trachealkanüle mit Cuff und/oder einer nasalen Magensonde, damit sich die Punktion
zusammenziehen kann. Alternativ können Sie nach dem Herausnehmen der Prothese um
die TE-Punktion herum eine submucosale Schnürnaht aus 3x0 absorbierbarem Material
anbringen. Setzen Sie eine neue Prothese ein und ziehen Sie die Schnürnaht vorsichtig
fest, um die Punktionswände um die Prothese herum zu schließen. Sollten die undichten
Stellen nicht zu beheben sein, sind konservative Maßnahmen, etwa ein chirurgischer
Verschluss der Punktion und eine subsequente Neupunktion erforderlich.
Gewebeschäden – Ist die Prothese zu kurz, zu lang oder wird sie häufig durch die
Trachealkanüle, den Stoma-Button oder den Finger des Patienten gegen die ösophageale
Wand gedrückt, können Beschädigungen an der Punktion und/oder dem ösophagealen
Gewebe auftreten. Bei Patienten in Strahlentherapie kann dies leichter auftreten.
Untersuchen Sie den Patienten regelmäßig, um ernsthafte Verletzungen zu vermeiden.
5. Zusätzliche Informationen
5.1 Kompatibilität mit MRI, Röntgen und Strahlentherapie
Provox Stimmprothesen wurden getestet und sind, außer der Provox ActiValve, kompatibel
mit MRI (bis zu 3,0 Tesla getestet), Röntgenstrahlung und Strahlentherapien (bis 70 Gy
getestet). Die Prothese kann während der Untersuchungs-/Therapiesitzung in der
TE-Punktion verbleiben. Beachten Sie bitte, dass der strahlenundurchlässige Ventilsitz
im Röntgenbild sichtbar ist.
5.2 Lebensdauer des Produkts
Auf Grund individueller biologischer Umstände kann die Lebensdauer der Stimmprothese
variieren, wodurch eine Unversehrtheit über einen längeren Zeitraum nicht gewährleistet
werden kann. Im Laufe der Zeit befallen Mikroorganismen wie Bakterien und Pilze das
Produkt, wodurch die Struktur des Produkts geschädigt werden kann.
5.3 Weitere Hilfe für Anwender
Wenn Sie weitere Unterstützung oder Informationen wünschen: Kontaktinformationen
stehen auf der Rückseite dieser Bedienungsanleitung.
18
NEDERLANDS
Illustraties
1. Provox® Vega™ XtraSeal™-stemprothese
a) Maatvoering (schachtdiameter en lengte tussen flenzen)
b) Prothesekapje
c) Oesofagale flens
d) Tracheale flens
e) Veiligheidslus
f ) Klep
g) Protheseschacht
h) Radiopake klepzitting van fluorkunststof
i) Met tweede, extra grote oesofagale flens
2. SmartInserter™-systeem
a) Geleider
b) Verbindingszijde
c) Vouwhulpmiddel
d) Distale tip
e) Inbrengpen
f ) Stemprothese
g) Plaatsingsbuis
h) Stapmarkering
i) Punt
Provox® Vega™ XtraSeal™
co
py
De gebruiksaanwijzing bij dit product kan van tijd tot tijd worden herzien en moet
daarom vóór elke procedure waarin dit product wordt gebruikt worden doorgenomen.
Inhoud
U
nr
eg
is
te
r
ed
1. Algemene informatie ......................................................................................................................19
1.1 Beoogd gebruik .........................................................................................................................19
1.2 Productbeschrijving .................................................................................................................19
1.3 CONTRA-INDICATIES ...............................................................................................................20
1.4 WAARSCHUWINGEN .................................................................................................................20
1.5 VOORZORGSMAATREGELEN ..................................................................................................20
2. Gebruiksaanwijzing .........................................................................................................................20
2.1 Voorbereiding .............................................................................................................................20
2.2 Anterograde vervangingsprocedure met doorschieten .............................................20
2.3 De Provox SmartInserter opnieuw klaarmaken voor plaatsing................................21
3. Belangrijke informatie voor de patiënt .....................................................................................21
3.1 Algemene informatie ...............................................................................................................21
3.2 Onderhoud van de prothese .................................................................................................21
3.3 Accessoires...................................................................................................................................22
4. Bijwerkingen/Informatie voor het oplossen van problemen ...........................................22
5. Extra informatie .................................................................................................................................23
5.1 Compatibiliteit met MRI, röntgen- en bestralingstherapie ........................................23
5.2 Levensduur van het hulpmiddel ..........................................................................................23
5.3 Hulp voor de gebruiker ...........................................................................................................23
1. Algemene informatie
1.1 Beoogd gebruik
De Provox Vega-stemprothese is een steriele vaste stemprothese voor eenmalig gebruik
bedoeld voor spraakrevalidatie na operatieve verwijdering van het strottenhoofd
(laryngectomie). De prothese wordt in situ gereinigd door de patiënt.
De Provox SmartInserter is een steriel hulpmiddel voor eenmalig gebruik voor de
anterograde vervanging van de Provox Vega-stemprothese. Deze vervanging dient te
worden uitgevoerd door een arts of een getraind en ervaren therapeut in overeenstemming
met de locale of nationale richtlijnen.
De Provox SmartInserter is niet bestemd voor het plaatsen van stemprotheses in een
recent gemaakte punctie.
1.2 Productbeschrijving
Algemeen
De Provox Vega is een eenrichtingsklep (prothese) om een TE-punctie open te houden
voor spraak en te voorkomen dat vloeistoffen of voeding in de trachea komen. De Provox
Vega-stemprothese is geen permanent implantaat en dient periodiek te worden vervangen.
De prothese (afbeelding 1) is verkrijgbaar in verschillende diameters en diverse lengtes.
Met een tweede, extra grote oesofagale flens worden bij de Provox Vega XtraSeal problemen
met lekkage rond de stemprothese verholpen. Het hulpmiddel is gemaakt van siliconen
rubber en fluorkunststof van medische kwaliteit.
19
Provox Vega XtraSeal-pakket
Het Provox Vega XtraSeal-pakket bevat de volgende onderdelen:
• 1 Provox Vega XtraSeal-stemprothese vooraf aangebracht in een SmartInserter voor
eenmalig gebruik, steriel (afbeelding 2)
• 1 Provox Brush (borsteltje) in een maat die overeenkomt met de stemprothese, nietsteriel
• 1 Provox Vega XtraSeal-handleiding voor de behandelaar
• 1 Provox Vega-handleiding voor de patiënt
• 1 Gebruiksinstructies voor de Provox Brush
1.3 CONTRA-INDICATIES
Er zijn geen contra-indicaties bekend in verband met het gebruik of de vervanging van
de Provox Vega-stemprothese bij patiënten die al gebruikmaken van spraakrevalidatie
met een prothese.
1.4 WAARSCHUWINGEN
Losraken of extrusie van de Provox Vega-stemprothese uit de TE-punctie en inslikken,
inademen of weefselbeschadiging als gevolg hiervan kunnen voorkomen. Voor meer
informatie over deze mogelijke gevolgen leest u het hoofdstuk Bijwerkingen/Informatie
voor het oplossen van problemen hieronder.
Ga als volgt te werk om de kans op losraken/extrusie en de mogelijke bijverschijnselen
te verkleinen:
• Selecteer de juiste prothesemaat. Een strakke aansluiting kan leiden tot weefselnecrose
en extrusie.
• Instrueer de patiënt onmiddellijk contact op te nemen met een arts als er tekenen zijn van
weefseloedeem en/of ontsteking/infectie.
• Kies, indien deze worden gebruikt, laryngectomiecanules of stomabuttons met
geschikte afmetingen die tijdens het inbrengen ervan geen druk uitoefenen op, of
blijven haken achter tracheale flens van de prothese.
• Vertel de patiënt alleen originele Provox-accessoires van de overeenkomstige maat te
gebruiken (Brush, Flush, Plug) voor onderhoud en alle andere vormen van manipulatie
te vermijden.
• Hergebruik en herverwerking kan kruisbesmetting en schade aan het hulpmiddel
veroorzaken, met als gevolg letsel aan de patiënt.
1.5 VOORZORGSMAATREGELEN
te
r
ed
co
py
• Beoordeel patiënten met bloedingsziekten of patiënten die antistollingsbehandelingen
ondergaan vóór plaatsing of vervanging van de prothese zorgvuldig op de kans op
bloedingen.
• Inspecteer voor gebruik de verpakking. Gebruik het product niet als deze beschadigd
of geopend is.
• Pas bij het hanteren van de prothese altijd aseptische technieken toe om de kans op
infectie te verkleinen.
• Zorg ervoor dat eventuele externe of interne stomabevestigingen die worden gebruikt
geen druk uitoefenen op of blijven haken achter de flens van de prothese (bijv. HMEpleisters, laryngectomiecanules of stemprotheses). Dit kan ernstige weefselschade en/
of het onbedoeld inslikken van de prothese tot gevolg hebben.
eg
2.1 Voorbereiding
is
2. Gebruiksaanwijzing
De juiste maat van de vervangingsprothese kiezen
U
nr
Zorg ervoor dat er een Provox Vega XtraSeal-stemprothese met de juiste schachtdiameter
en lengte wordt gebruikt. De Provox Vega XtraSeal is verkrijgbaar in verschillende
lengte-/diametercombinaties.
• De schachtdiameter selecteren
De behandelaar moet bepalen welke diameter van de prothese geschikt is voor de
patiënt.
• Als de geselecteerde diameter groter is dan die van de vorige prothese moet het
kanaal met de Provox Dilator worden vergroot tot de diameter van de prothese die
wordt geplaatst.
• Indien een prothese met een kleinere schachtdiameter wordt geplaatst, moet goed in
de gaten worden gehouden of de punctie krimpt tot de juiste diameter.
• De schachtlengte selecteren
Voor het selecteren van de juiste lengte kunt u de huidige prothese als meethulpmiddel
gebruiken. Als er teveel ruimte is (d.w.z. 3 mm of meer) tussen de tracheale flens van
de oude prothese en de slijmvlieswand, moet een kortere prothese worden gebruikt.
Indien de prothese te strak zit, moet een langer exemplaar worden gebruikt.
Opmerking: De schacht van de Provox Vega XtraSeal is ca. 1 mm korter dan de
aangegeven maat vanwege de extra grote oesofagale flens.
2.2 Anterograde vervangingsprocedure met doorschieten
(Afbeelding 3.1 – 3.10)
LET OP: De Provox Vega XtraSeal met extra grote oesofagale flens moet met de
doorschiettechniek worden geplaatst om te verzekeren dat de tweede, extra grote
oesofagale flens én de oesofagale flens beide in het lumen van de oesofagus ontplooid
worden. Doorschieten betekent dat de gehele prothese in de oesofagus wordt ontplooid
en vervolgens tot in de gewenste positie wordt teruggetrokken.
Het systeem voor vervanging met doorschieten activeren
1. Houd met een hand de plaatsingsbuis vast en gebruik de andere hand om de inbrengpen
gedeeltelijk in de plaatsingsbuis te duwen tot de blauwe ring van de prothese op de
stapmarkering op de plaatsingsbuis is gepasseerd (afbeelding 3.1).
2. Knijp de geleider in tussen duim en wijsvinger (afbeelding 3.2). Duw hem verder
in de plaatsingsbuis (afbeelding 3.3). De Provox Vega XtraSeal-stemprothese is nu
klaar voor plaatsing door middel van doorschieten.
De nieuwe prothese in de punctie plaatsen - doorschieten
1. De TE-punctie peilen
Houd de Provox SmartInserter vast bij de plaatsingsbuis. Breng de punt van de
plaatsingsbuis voorzichtig in. Ga met uiterste zorg te werk als u weerstand voelt
tijdens het inbrengen van de plaatsingsbuis in de punctie. In dit geval kan verwijding
en/of smering van de punctie het inbrengen vergemakkelijken.
20
2. De prothese ‘injecteren’
Houd de plaatsingsbuis met één hand stabiel in deze positie en gebruik de andere
hand om de inbrengpen zo ver door te duwen dat deze volledig in de SmartInserter
is ingebracht (af beelding 3.4). Naarmate de geleider verder in de plaatsingsbuis
wordt geduwd, wordt de inbrengpen verder in de plaatsingsbuis geschoven waarbij
de Provox Vega XtraSeal-stemprothese volledig in de oesofagus wordt losgemaakt.
3. De prothese terugtrekken
Trek de plaatsingsbuis uit de punctie (afbeelding 3.5). Trek de Provox Vega XtraSealstemprothese terug in de punctie door de tracheale flens van de prothese met een nietgetande vaatklem vast te pakken en te trekken (afbeelding 3.6).
4. De pasvorm controleren
Controleer of de prothese en de flenzen zich op de juiste positie bevinden door de
prothese te draaien en heen en weer te bewegen in de punctie. Trek voorzichtig aan
de tracheale flens om te controleren of de stemprothese goed vastzit (afbeelding 3.7).
Let op: Bevestig dat beide oesofagale flenzen volledig ontplooid zijn in het lumen
van de oesofagus. Geen enkel deel van de extra grote oesofagale flens hoort langs de
schacht van de stemprothese zichtbaar te zijn en wanneer eraan gedraaid wordt, moet
de stemprothese vrij bewegen. Om de extra grote flens volledig te ontplooien helpt
het de stemprothese te draaien en deze tegelijkertijd een klein beetje in de richting
van de oesofagus te duwen. Maak bij twijfel gebruik van een flexibele endoscoop
om correcte plaatsing in de oesofagus te bevestigen.
5. De juiste werking testen
Test de juiste werking van de prothese door de patiënt te vragen te spreken
(afbeelding 3.8) en door de prothese te observeren terwijl de patiënt water drinkt
(afbeelding 3.9).
6. Knip de veiligheidslus door met een schaar
Richt, wanneer bevestigd is dat de prothese op zijn plaats zit, het ovale uiteinde van
de tracheale flens omlaag en knip met een schaar de veiligheidslus aan de buitenste
rand van de flens door (afbeelding 3.10). De stemprothese is nu klaar voor gebruik.
2.3 De Provox SmartInserter opnieuw klaarmaken voor
plaatsing
(Afbeeldingen 4.1 – 4.6)
Als de eerste poging om de Provox Vega XtraSeal-stemprothese in te brengen in de
TE-punctie mislukt, kan de Provox Vega XtraSeal opnieuw worden klaargemaakt voor
plaatsing de SmartInserter.
LET OP: De SmartInserter niet meer dan 2 maal opnieuw klaarmaken voor plaatsing.
U
nr
eg
is
te
r
ed
co
py
Als de Provox Vega XtraSeal-stemprothese tekenen van beschadiging vertoont, mag
deze niet worden gebruikt.
1. Zorg ervoor dat de prothese nog steeds veilig vast zit aan de inbrengpen. Als dit niet
het geval is, maakt u de veiligheidslus aan de inbrengpen vast door de lus door de
montageopening in de inbrengpen te halen (afbeelding 4.1).
2. Zet de Provox Vega XtraSeal-stemprothese boven op de inbrengpen met de tracheale
zijde naar beneden (af beelding 4.2). Gebruik uw duim om te controleren of de
stemprothese goed op zijn plaats zit.
3. Controleer of het vouwhulpmiddel en de geleider nog steeds in de bovenste positie
van de geleider zitten. Zo niet, zet het vouwhulpmiddel en de geleider dan opnieuw
in elkaar (afbeelding 4.3). Duw het vouwhulpmiddel niet in de onderste positie van
de geleider.
4. Trek de inbrengpen met de daaraan bevestigde prothese voorzichtig in het
vouwhulpmiddel totdat u hem duidelijk op zijn plek hoort klikken (afbeelding 4.4).
De oesofagale flens van de prothese ligt nu op niveau met het vouwhulpmiddel.
5. De extra grote oesofagale flens moet handmatig onder de gekromde punten van het
vouwhulpmiddel geplaatst worden (afbeelding 4.5).
OPMERKING: Als deze stap wordt overgeslagen, kost het vooraf aanbrengen van
de stemprothese te veel kracht, wat de stemprothese kan beschadigen.
6. Bevestig de plaatsingsbuis boven op het vouwhulpmiddel/de geleider (afbeelding 4.6)
en laat de twee onderdelen in elkaar klikken.
De Provox Vega XtraSeal-stemprothese is nu klaar om geactiveerd te worden en kan worden
gebruikt volgens de beschrijving in het hoofdstuk ‘Anterograde vervangingsprocedure
met doorschieten’.
3. Belangrijke informatie voor de patiënt
3.1 Algemene informatie
Zorg ervoor dat de patiënt weet dat hij/zij contact met de behandelaar moet
opnemen indien:
• Er lekkage optreedt door of langs de prothese (hoesten en/of slijm dat anders van
kleur is).
• Spreken moeilijk wordt (grotere inspanning kost en/of de spraak meer afgeknepen
klinkt).
• Er tekenen zijn die op een ontsteking of weefselverandering op de plek van de punctie
of de stomaregio duiden, (pijn, roodheid, warmte, zwelling, bloed op borsteltje na
reinigen).
Vertel de patiënt tevens het volgende:
• Na vervanging van de prothese kan er wat bloed in het sputum zitten. Dit kan afkomstig
zijn van granulatieweefsel op de randen van de TE-punctie.
• Gedurende de eerste weken na het plaatsen van een nieuwe prothese kan er af en toe
een beetje lekkage door of rond de prothese voorkomen. Dit gaat vaak spontaan weer
over en vereist geen onmiddellijke vervanging van de prothese.
• Indien er spontaan lekkage door de prothese optreedt, kan een tijdelijke afdichting
worden gecreëerd met een Provox Vega Plug.
• Voor het bereiken van een optimaal stemgeluid, vloeiende spraak en optimale
verstaanbaarheid wordt spraaktherapie bij een getraind behandelaar aanbevolen.
3.2 Onderhoud van de prothese
Instrueer de patiënt wanneer en hoe zijn/haar Provox Vega XtraSeal-stemprothese
moet worden gereinigd. De levensduur van de prothese kan worden verlengd door deze
minstens tweemaal per dag te reinigen.
LET OP: Gebruik voor het schoonmaken van uw prothese alleen originele Provoxaccessoires die zijn bedoeld voor gebruik met de Provox Vega.
21
• Door de prothese tweemaal per dag schoon te borstelen met de Provox Brush worden
slijm en voedselresten uit de prothese verwijderd.
• Door de stemprothese door te spoelen met de Provox Flush worden aanslag en slijm
van de prothese verwijderd, wat de levensduur ervan ten goede komt.
Opmerking: De Provox Flush is uitsluitend bestemd voor gebruik door patiënten
die, naar beoordeling van de behandelaar die het hulpmiddel voorschrijft, hebben
aangetoond dat zij de gebruiksinstructies begrijpen en consequent kunnen opvolgen
zonder toezicht van de behandelaar.
• Bepaalde dieetvoorschriften, zoals het dagelijkse gebruik van yoghurt of karnemelk
die lactobacillen bevat, kan de overmatige groei van candida helpen voorkomen.
Raadpleeg de instructies voor elke accessoire voor uitgebreide informatie over het
reinigen van de Provox Vega.
3.3 Accessoires
LET OP: Gebruik alleen originele Provox-accessoires die zijn bedoeld voor gebruik
met de Provox Vega. Andere accessoires kunnen schadelijk zijn voor de patiënt of
storingen van het product veroorzaken.
Accessoires die het inbrengen van de prothese vergemakkelijken
(voor gebruik door de behandelaar)
• Provox Dilator: helpt bij de overstap van een prothese met een kleinere schachtdiameter
naar een Provox-stemprothese met een grotere diameter.
• Provox GuideWire: voor plaatsing van een Provox-, Provox2 of Provox Vega
stemprothese direct na de TE-punctie (primair of secundair), of voor retrograde
vervanging van een vaste Provox-stemprothese.
Accessoires om de functie van de prothese te onderhouden
(voor gebruik door de patiënt)
• De Provox Brush/Provox Brush XL wordt door de patiënt gebruikt om de binnenkant
van de prothese te reinigen.
• De Provox Flush is een extra reinigingshulpmiddel waarmee de prothese kan worden
gespoeld.
• De Provox Vega Plug is een eerstehulpsysteem voor gebruik door de patiënt waarmee
lekkage via de prothese tijdelijk kan worden afgedicht.
Met de Provox-stemprothese kunnen andere aanvullende producten
worden gebruikt
is
te
r
ed
co
py
• Provox HME: de Heat- and Moisture Exchanger (warmte- en vochtwisselaar) herstelt
deels de functies van de neus die verloren zijn gegaan (verwarming, bevochtiging,
ademhalingsweerstand).
• Provox FreeHands HME: een warmte- en vochtwisselaar gecombineerd met een
automatische tracheostomaklep, waarmee de patiënt kan spreken zonder de handen te
gebruiken.
• Provox LaryTube: een tracheale canule van silicone bedoeld ter ondersteuning van
krimpende stoma’s en het vastklemmen van andere revalidatiehulpmiddelen uit het
Provox-systeem.
• Provox LaryButton: een zachte, zelfklemmende tracheale canule van silicone
bedoeld ter ondersteuning van krimpende stoma’s en het vastklemmen van andere
revalidatiehulpmiddelen uit het Provox-systeem.
nr
eg
4. Bijwerkingen/Informatie voor het oplossen
van problemen
U
Onderstaande risico’s kunnen optreden bij spraakrevalidatie met een prothese:
Gerelateerd aan de prothese
Kleplekkage – Lekkage door de prothese kan plaatsvinden door overwoekering van
de klep door candida of het losraken van de radiopake ring (klepzitting). Kan tevens
voorkomen indien de oesofagale flens van de prothese niet volledig is ontvouwen in het
lumen van de oesofagus of indien de prothese te kort is. Door middel van endoscopisch
onderzoek moet worden vastgesteld of zich een van deze verschijnselen heeft voorgedaan.
De prothese dient te worden vervangen indien de prothese in de juiste positie staat en
van de juiste lengte is en indien de lekkage door de prothese niet door reiniging ervan
kan worden verholpen.
Overwoekering door candida – Overwoekering van de prothese door candida komt
bij vrijwel alle patiënten voor. Radiotherapie, de samenstelling van het speeksel en
eetgewoonten kunnen van invloed zijn op de snelheid waarmee candida het silicone
materiaal aantast. Behandeling met schimmelwerende middelen kan als preventieve
maatregel worden overwogen als overwoekering door candida lekkage door de prothese
of andere storingen van de klep veroorzaakt.
Compatibiliteit met antimycotica – Een onbekende verscheidenheid aan chemische
stoffen kan de materiaaleigenschappen van het hulpmiddel onmiddellijk beïnvloeden of
kan door het materiaal worden geabsorbeerd en op een later tijdstip vrijkomen. Het gebruik
van antimycotica of geneesmiddelen rechtstreeks in of in de buurt van de stemprothese
dient daarom zorgvuldig te worden beoordeeld.
Bij het gebruik van de volgende antimycotica tonen laboratoriumtests slechts een
zeer kleine negatieve invloed aan op het functioneren van de Provox Vega-stemprothese
en onderdelen ervan:
• Nystatin
• Fluconazole
• Mikonazol
Gerelateerd aan de punctie
Inademing van de prothese – Het per ongeluk inademen van de stemprothese of andere
onderdelen van het spraakrevalidatiesysteem kan voorkomen. Symptomen die direct
kunnen optreden, zijn kokhalzen, hoesten, stikken of een fluitende ademhaling. Net als
met andere vreemde voorwerpen kunnen complicaties als gevolg van inademing van een
onderdeel obstructie of infecties veroorzaken. Tot de complicaties kunnen longontsteking,
atelectase, bronchitis, longabces, bronchopulmonair fistel en astma behoren. Indien de
patiënt kan ademen, kan het vreemde voorwerp mogelijk worden verwijderd door te
hoesten. Bij gedeeltelijke of volledige obstructie van de luchtweg is onmiddellijk ingrijpen
vereist om het object te verwijderen.
22
Inslikken van de prothese – Het per ongeluk inslikken van de stemprothese of andere
onderdelen van het spraakrevalidatiesysteem kan voorkomen. Net als met andere vreemde
voorwerpen zijn de symptomen die door het inslikken van de stemprothese of andere
onderdelen van het spraakrevalidatiesysteem worden veroorzaakt grotendeels afhankelijk
van de grootte, locatie, mate van obstructie (indien van toepassing) en de tijdsduur ervan.
Ingeslikte onderdelen die onder in de oesofagus zijn achtergebleven, kunnen worden
verwijderd door middel van oesofagusscopie of kunnen korte tijd worden geobserveerd.
Het voorwerp kan spontaan in de maag terecht komen; vreemde voorwerpen die in de
maag terecht komen, passeren gewoonlijk het darmkanaal. Het operatief verwijderen
van vreemde voorwerpen dient te worden overwogen wanneer er een darmobstructie
optreedt, bloedingen voorkomen, perforatie optreedt of als het voorwerp niet door het
darmkanaal kan worden gepasseerd.
Hemorragie/bloeding van de punctie – Tijdens vervanging van de prothese kunnen
de randen van de TE-punctie licht gaan bloeden. Dit gaat gewoonlijk spontaan over.
Patiënten die worden behandeld met antistollingsmiddelen dienen vóór plaatsing of
vervanging van de prothese echter zorgvuldig te worden beoordeeld in verband met de
kans op bloedingen.
Infectie en/of oedeem van de TE-punctie – Infectie, vorming van granulatieweefsel en/of
oedeem van de punctie (bijv. tijdens radiotherapie) kunnen de lengte van het punctiekanaal
vergroten. Hierdoor kan de prothese naar binnen en onder het tracheale of oesofagale
slijmvlies worden getrokken. Anderzijds kunnen ontsteking of overwoekering van het
oesofagale slijmvlies ervoor zorgen dat de prothese uit de punctie gaat steken. In dit geval
wordt tijdelijke vervanging van de prothese door een prothese met een langere schacht
aanbevolen. Voor behandeling van de infectie kan een kuur met breedspectrumantibiotica
met of zonder corticosteroïden worden overwogen. Indien de infectie niet met een
behandeling met antibiotica en/of corticosteroïden kan worden verholpen terwijl de
prothese op zijn plaats zit, moet de prothese worden verwijderd. In sommige gevallen
kan plaatsing van een stent in de punctie met een katheter worden overwogen. Indien de
punctie zich na verwijdering van de prothese spontaan sluit, moet een nieuwe punctie
worden uitgevoerd voor de plaatsing van een nieuwe prothese.
Granulatie rond de punctie – De vorming van granulatieweefsel rond de TE-punctie
komt voor bij 5% van alle gebruikers. Elektrische, chemische of lasercauterisatie van
het granulatiegebied kan worden overwogen.
Hypertrofische littekenvorming rond de punctie – Als de prothese relatief kort is kan
uitstulping van het tracheale slijmvlies over de tracheale flens voorkomen. Dit overtollige
weefsel kan worden verwijderd door middel van een laser (CO2 of Nd:YAG). Ook kan
een prothese met een langere schacht worden gebruikt.
ed
co
py
Uitsteken/extrusie van de prothese – Tijdens infectie van de TE-punctie komt het
uitsteken en vervolgens spontane extrusie van de prothese soms voor. De prothese dient
te worden verwijderd om losraken ervan in de trachea te voorkomen. De punctie kan
zich na verwijdering van de prothese spontaan sluiten. Mogelijk moet dan een nieuwe
punctie worden uitgevoerd voor de plaatsing van een nieuwe prothese.
U
nr
eg
is
te
r
Lekkage rond de prothese – Er kan kortstondige lekkage rond de prothese optreden
die zich spontaan weer kan oplossen. De meest voorkomende reden hiervan is dat de
prothese te lang is, hetgeen kan worden verholpen door een kortere prothese te plaatsen.
De lekkage kan ook worden verholpen met een prothese van een andere (grotere) diameter.
Dit kan tevens voorkomen wanneer de extra grote flens van de Provox Vega XtraSeal
niet volledig ontvouwen is in het lumen van de oesofagus. Geen enkel deel van de extra
grote oesofagale flens hoort langs de schacht van de stemprothese zichtbaar te zijn en
wanneer eraan gedraaid wordt, moet de stemprothese vrij bewegen. Om de extra grote
flens volledig te ontplooien helpt het de stemprothese te draaien en deze tegelijkertijd
een klein beetje in de richting van de oesofagus te duwen. Maak bij twijfel gebruik van
een flexibele endoscoop om correcte plaatsing in de oesofagus te bevestigen.
Indien de lekkage niet verbetert (wat vaak wel spontaan gebeurt), kan er een Provox
XtraFlange [flens] worden gebruikt. Andere manieren om lekkage rond de stemprothese
te verhelpen, zijn tijdelijke verwijdering van de prothese en het inbrengen van een
tracheacanule met cuff en/of nasogastrische voedingssonde zodat de punctie kan krimpen.
Ook kan na verwijdering van de prothese een tabakszakhechting met 3x0 resorbeerbaar
materiaal submucosaal worden aangebracht rond de TE-punctie. De nieuwe prothese moet
worden ingebracht en de hechting voorzichtig worden aangetrokken zodat de wanden van
de punctie de prothese rondom afsluiten. Indien de lekkage rond de prothese hardnekkig
is, zijn wellicht conservatievere maatregelen, operatieve sluiting van de punctie en het
uitvoeren van een nieuwe punctie nodig.
Weefselschade – Indien de prothese te kort of te lang is of vaak tegen de oesofagale wand
wordt gedrukt door een tracheale canule, stemprothese of de vinger van de patiënt, kan er
schade aan de punctie of het tracheale en/of oesofagale weefsel ontstaan. Dit kan vaker
voorkomen bij patiënten die radiotherapie ondergaan. Inspecteer de omstandigheden
regelmatig om ernstige schade te voorkomen.
5. Extra informatie
5.1 Compatibiliteit met MRI, röntgen- en
bestralingstherapie
Provox-stemprotheses zijn getest en compatibel bevonden met kernspintomografie
(getest tot 3,0 tesla), röntgen- en bestralingstherapie (getest tot 70 Gy), met uitzondering
van de Provox ActiValve. De prothese kan gedurende onderzoeks-/behandelsessies in
de tracheo-oesofagale-punctie aanwezig blijven. De radiopake klepzitting is zichtbaar
op röntgenopnamen.
5.2 Levensduur van het hulpmiddel
De levensduur varieert afhankelijk van de individuele biologische omstandigheden. De
mate van slijtage van het hulpmiddel kan voor een langere periode niet worden voorspeld.
Het materiaal van de prothese wordt na verloop van tijd aangetast door bijvoorbeeld
micro-organismen als bacteriën en gist. De structurele integriteit van de prothese zal
na verloop van tijd achteruit gaan.
5.3 Hulp voor de gebruiker
Zie het achterblad van deze gebruiksaanwijzing voor de contactgegevens voor aanvullende
hulp of informatie.
23
FRANÇAIS
Illustrations
1. Prothèse phonatoire Provox® Vega™ XtraSeal™
a) Taille (diamètre et écartement des collerettes)
b) Auvent
c) Collerette œsophagienne
d) Collerette trachéale
e) Attache de sécurité
f ) Clapet de la valve
g) Fût
h) Siège de la valve en fluoroplastique, radio-opaque
i) Collerette œsophagienne supplémentaire élargie
2. Système SmartInserter™
a) Guide
b) Côté connexion
c) Dispositif de pliage
d) Extrémité distale
e) Axe d’insertion
f ) Prothèse phonatoire
g) Tube de chargement
h) Marque repère
i) Embout
Provox® Vega™ XtraSeal™
co
py
Le mode d’emploi qui accompagne ce produit peut être révisé périodiquement et doit donc
être revu avant chaque procédure au cours de laquelle le produit est utilisé.
Table des matières
U
nr
eg
is
te
r
ed
1. Description ..........................................................................................................................................24
1.1 Utilisation prévue ......................................................................................................................24
1.2 Description du dispositif.........................................................................................................24
1.3 CONTRE-INDICATIONS ...........................................................................................................25
1.4 AVERTISSEMENTS ......................................................................................................................25
1.5 PRÉCAUTIONS .............................................................................................................................25
2. Mode d’emploi ...................................................................................................................................25
2.1 Préparation ..................................................................................................................................25
2.2 Remplacement antérograde avec dépassement ...........................................................25
2.3 Réarmement du Provox SmartInserter ..............................................................................26
3. Information du patient ...................................................................................................................26
3.1 Généralités ...................................................................................................................................26
3.2 Entretien de la prothèse..........................................................................................................26
3.3 Accessoires...................................................................................................................................27
4. Effets indésirables / Solutions aux problèmes .......................................................................27
5. Informations complémentaires ...................................................................................................28
5.1 Compatibilité avec l’IRM, la radiographie et la radiothérapie ...................................28
5.2 Durée de vie du dispositif.......................................................................................................28
5.3 Informations pour l’utilisateur ..............................................................................................28
1. Description
1.1 Utilisation prévue
Provox Vega est une prothèse phonatoire stérile non amovible à usage unique destiné
à réhabiliter la voix après l’ablation chirurgicale du larynx (laryngectomie). Le patient
procède au nettoyage de la prothèse phonatoire en la laissant en place.
Provox SmartInserter est un dispositif à usage unique destiné au remplacement
antérograde de la prothèse phonatoire Provox Vega. La procédure de remplacement sera
effectuée par un médecin ou un professionnel de la santé expérimenté, conformément
aux dispositions locales ou nationales en vigueur.
Le Provox SmartInserter n’est pas destiné à l’insertion d’une prothèse phonatoire
dans une fi stule trachéo-œsophagienne nouvellement créée.
1.2 Description du dispositif
Généralités
Provox Vega est une valve à sens unique (prothèse) qui maintient la fistule trachéoœsophagienne (TO) ouverte pour la phonation et empêche les aliments et les liquides
de pénétrer dans la trachée. La prothèse phonatoire Provox Vega n’est pas un implant
permanent et doit être remplacée régulièrement. La prothèse (figure 1) est disponible en
différents diamètres et plusieurs longueurs. Provox Vega XtraSeal dispose d’une collerette
œsophagienne supplémentaire élargie qui a pour but de résoudre les problèmes de fuite
autour de la prothèse phonatoire. Le dispositif est fabriqué en caoutchouc de silicone et
en fluoroplastique de qualité médicale.
24
Kit Provox Vega XtraSeal
Le kit Provox Vega XtraSeal contient les éléments suivants :
• 1 prothèse phonatoire Provox Vega XtraSeal pré-armée dans un applicateur
SmartInserter à usage unique, stérile (figure 2)
• 1 brosse Provox Brush de taille correspondante à la prothèse phonatoire, non stérile
• 1 Manuel du clinicien Provox Vega XtraSeal
• 1 Manuel du patient Provox Vega
• 1 mode d’emploi de la brosse Provox Brush
1.3 CONTRE-INDICATIONS
Il n’existe pas de contre-indications connues à l’utilisation ou au remplacement
d’une prothèse phonatoire Provox Vega, chez les patients utilisant déjà une prothèse
phonatoire.
1.4 AVERTISSEMENTS
Il peut arriver que la prothèse Provox Vega soit délogée ou rejetée de la fistule TO et
soit avalée, aspirée ou provoque des lésions. Pour plus d’informations à ce sujet, voir la
section Effets indésirables / Solutions aux problèmes ci-dessous.
Pour réduire le risque du déplacement ou de l'extrusion de la prothèse :
• Sélectionnez la bonne taille de prothèse. En cas d’ajustement trop serré, il y a un risque
de nécrose tissulaire avec rejet de la prothèse.
• Recommandez au patient de consulter un médecin au moindre signe d’œdème tissulaire
et/ou d’inflammation ou d’infection.
• Le cas échéant, choisissez des canules ou des boutons trachéaux de forme adéquate
n’exerçant pas de pression sur la prothèse et ne pouvant pas accrocher la collerette
trachéale durant les manipulations.
• Recommandez au patient l’utilisation exclusive d’accessoires Provox d’origine, de
taille adéquate (Brush, Flush, Plug) et déconseillez toute autre manipulation.
• La réutilisation et le retraitement peuvent provoquer une contamination croisée ou
l’endommagement du dispositif, ce qui pourrait causer préjudice au patient.
1.5 PRÉCAUTIONS
co
py
• Considérez attentivement tout patient présentant des troubles de la coagulation ou sous
traitement anticoagulant : vérifiez que le risque de saignement ou d’hémorragie ne
constitue pas une contre-indication au placement ou au remplacement de la prothèse.
• Inspectez l’emballage avant utilisation. S’il est endommagé ou ouvert, n’utilisez pas le
produit.
• Afin de réduire le risque d’infection, manipulez toujours la prothèse en respectant les
règles d’asepsie.
• Veillez à ce que les dispositifs de fixation trachéale (par exemple les adhésifs, canules
ou boutons) n’exercent pas de pression et qu'ils n'accrochent pas la collerette de
la prothèse. Cela pourrait entraîner de graves lésions tissulaires et/ou l’ingestion
accidentelle de la prothèse.
ed
2. Mode d’emploi
te
r
2.1 Préparation
Choix de la bonne taille de prothèse de remplacement
eg
is
Veillez à utiliser une prothèse phonatoire Provox Vega XtraSeal d’un diamètre et d’une
longueur adéquats. Provox Vega XtraSeal est disponible en différentes combinaisons
de longueur/diamètre.
U
nr
• Choix du diamètre du fût
Le diamètre approprié de prothèse à utiliser sera déterminé par le clinicien.
• Si le diamètre sélectionné est supérieur au précédent, dilater la fistule au moyen
d’un dilatateur Provox Dilator d’un diamètre correspondant à celui de la nouvelle
prothèse.
• Lorsque la nouvelle prothèse a un diamètre de fût plus petit, assurez-vous que la
fistule rétrécisse jusqu’au diamètre approprié.
• Choix de la longueur du fût
Pour déterminer la longueur correcte, vous pouvez utiliser l’ancienne prothèse en
place. Si l’espace entre la collerette trachéale et la paroi muqueuse est trop important
(c’est-à-dire 3 mm ou plus), choisir une prothèse plus courte. Si l’ajustement est trop
serré, choisir une prothèse plus longue.
Remarque : Le fût de Provox Vega XtraSeal est environ 1 mm plus court que la taille
indiquée en raison de la collerette œsophagienne supplémentaire.
2.2 Remplacement antérograde avec dépassement
(figures 3.1 – 3.10)
ATTENTION : Provox Vega XtraSeal avec collerette œsophagienne élargie doit
être placée en utilisant la technique de dépassement afi n de s’assurer que la collerette
œsophagienne élargie supplémentaire et la collerette œsophagienne se déploient toutes
deux dans la lumière de l’œsophage. Dépassement signifie que l’ensemble de la prothèse
est déployée dans l’œsophage puis rétractée jusqu’à la position voulue.
Armement du système pour remplacement avec dépassement
1. Tenez le tube de chargement d’une main et, de l’autre, introduisez partiellement l’axe
d’insertion dans le tube jusqu’à ce que l’anneau bleu de la prothèse dépasse la marque
sur le tube (figure 3.1).
2. Serrez le guide entre le pouce et l’index (figure 3.2). Poussez-le plus loin dans le
tube de chargement (figure 3.3). La prothèse Provox Vega XtraSeal est prête pour
l’insertion avec dépassement.
Insertion par dépassement intentionnel
1. Sondage de la fistule TO
Tenez le Provox SmartInserter par le tube de chargement. Insérez délicatement
l’extrémité du tube de chargement. Soyez très prudent si vous rencontrez une résistance
pendant l’introduction du tube dans la fistule. Dans ce cas, l’utilisation d’un dilatateur
et/ou du lubrifiant peut faciliter l’insertion.
2. « Injection » de la prothèse
Maintenez fermement le tube de chargement dans cette position et, de l’autre main,
faites glisser l’axe d’insertion pour l’introduire complètement dans le SmartInserter
(figure 3.4). Le guide étant poussé plus loin dans le tube de chargement, l’axe est
également plus loin dans le tube de chargement et libère complètement la prothèse
phonatoire Provox Vega XtraSeal dans l’œsophage.
25
3. Retour de la prothèse phonatoire dans la fistule
Tirez le tube de chargement hors de la fistule TO (figure 3.5). Ramenez la Provox Vega
XtraSeal dans la fistule en tirant sur la collerette au moyen d’une pince hémostatique
sans griffes (figure 3.6).
4. Vérification de la position
Vérifiez que la prothèse et les collerettes sont dans la bonne position en faisant tourner
et en déplaçant la prothèse en avant et en arrière dans la fistule. Exercez une légère
traction sur la collerette trachéale pour assurer une bonne rétention de la prothèse
phonatoire (figure 3.7).
Mise en garde : Vérifiez que les deux collerettes œsophagiennes se sont totalement
déployées dans la lumière de l’œsophage. Aucune partie de la collerette œsophagienne
élargie ne doit être visible le long du fût de la prothèse phonatoire et quand on la
tourne, la prothèse doit bouger librement. Tourner la prothèse phonatoire tout en la
poussant légèrement vers l’œsophage peut aider à déplier totalement la collerette
élargie. En cas d’incertitude, utilisez une endoscopie flexible pour vérifier la bonne
position de la prothèse à l’intérieur de l’œsophage.
5. Test de fonctionnement
Pour tester le bon fonctionnement de la prothèse, faites parler le patient (figure 3.8)
et observez la prothèse pendant qu’il boit de l’eau (figure 3.9).
6. Section de l'attache de sécurité à l’aide de ciseaux
Après avoir vérifié que la prothèse est bien en place, orientez l’extrémité ovale de
la collerette trachéale vers le bas et, avec une paire de ciseaux, coupez l’attache de
sécurité sur le bord extérieur de la collerette (figure 3.10). La prothèse phonatoire
est maintenant prête à être utilisée.
2.3 Réarmement du Provox SmartInserter
(figures 4.1 – 4.6)
En cas d’échec de la première tentative d’insertion de la Provox Vega XtraSeal dans la
fistule trachéo-œsophagienne, il est possible de remettre la Provox Vega XtraSeal dans
le SmartInserter.
AVERTISSEMENT : Ne pas réarmer le SmartInserter plus de deux fois.
eg
is
te
r
ed
co
py
N’utilisez pas une prothèse phonatoire Provox Vega XtraSeal qui semble abîmée.
1. Vérifiez que la prothèse est restée attachée à l’axe d’insertion. Si ce n’est pas le cas,
sécurisez l’attache de sécurité sur l’axe d’insertion en la faisant passer par le trou
prévu à cet effet (figure 4.1).
2. Placez la prothèse phonatoire Provox Vega XtraSeal sur l’axe d’insertion, côté
trachéal vers le bas (figure 4.2). Vérifiez à l’aide du pouce si la prothèse phonatoire
est en position correcte.
3. Vérifiez que le dispositif de pliage et le guide sont toujours assemblés dans la partie
supérieure du guide. Si ce n’est pas le cas, ré-assemblez le dispositif de pliage dans le
guide (figure 4.3). Ne poussez pas le dispositif de pliage dans la partie inférieure du guide.
4. Tirez délicatement l’axe d’insertion, auquel est attachée la prothèse, dans le dispositif
de pliage jusqu’à entendre un clic net, indiquant qu’elle est en place (figure 4.4). La
collerette œsophagienne de la prothèse est maintenant à niveau avec le dispositif de
pliage.
5. La collerette œsophagienne élargie doit être placée manuellement sous les extrémités
incurvées du dispositif de pliage (figure 4.5).
REMARQUE : En cas d’omission de cette étape, le préchargement de la prothèse
phonatoire nécessitera une force excessive et risque d’endommager la prothèse.
6. Attachez le tube de chargement en haut du dispositif de pliage et du guide (figure 4.6)
et assemblez les deux parties.
nr
La prothèse phonatoire Provox Vega XtraSeal peut à présent être activée et utilisée
comme décrit à la section « Remplacement antérograde avec dépassement ».
U
3. Information du patient
3.1 Généralités
Assurez-vous que le patient comprend qu’il doit contacter le médecin en cas de :
• fuite à travers ou autour de la prothèse (toux et/ou changement de couleur du mucus) ;
• phonation difficile (effort plus important et/ou voix plus forcée) ;
• signes d’inflammation ou modifications tissulaires au niveau de la fistule TO ou du
trachéostome (douleur, rougeur, chaleur, gonflement, traces de sang sur la brosse après
utilisation).
Informez également le patient sur les points suivants :
• Après le remplacement d’une prothèse, il peut y avoir du sang dans les crachats. Ce
sang peut provenir du tissu de granulation présent sur les bords de la fistule TO.
• De petites fuites à travers ou autour de la prothèse peuvent survenir dans les semaines
qui suivent l’insertion. Souvent, le problème se résout spontanément sans qu’il soit
nécessaire de remplacer la prothèse.
• Si des fuites surviennent spontanément par la prothèse, procéder à une obturation
provisoire au moyen d’un Provox Vega Plug.
• Des séances de formation avec un clinicien expérimenté sont recommandées pour optimiser
la phonation, le débit de parole et l’intelligibilité.
3.2 Entretien de la prothèse
Apprenez au patient à nettoyer la prothèse phonatoire Provox Vega XtraSeal (fréquence
et méthode). Le nettoyage de la prothèse deux fois par jour peut prolonger sa durée de vie.
AVERTISSEMENT : Utiliser exclusivement des accessoires Provox d’origine
spécialement conçus pour nettoyer la prothèse Provox Vega.
• Le brossage de la prothèse avec Provox Brush deux fois par jour contribue à éliminer
le mucus et les restes de nourriture.
• L’irrigation de la prothèse au moyen de la poire de rinçage Provox Flush aide aussi à en
retirer les débris et le mucus, ce qui contribue à prolonger la durée de vie du dispositif.
Remarque : L’utilisation de la poire de rinçage Provox est réservée aux patients que
le prescripteur estime capables de comprendre les consignes et de les respecter sans
supervision d’un clinicien.
• La consommation quotidienne de yoghourt ou de lait battu, qui contiennent du
lactobacille, tend à réduire la prolifération de Candida.
Pour plus d’informations sur le nettoyage d’une prothèse phonatoire Provox Vega, voir
les consignes propres à chaque accessoire.
26
3.3 Accessoires
AVERTISSEMENT : Utiliser exclusivement des accessoires Provox d’origine
spécialement conçus pour la prothèse Provox Vega. Les autres accessoires risquent
de provoquer des blessures ou d’endommager la prothèse.
Accessoires facilitant l’insertion de la prothèse (pour utilisation par le
clinicien)
• Provox Dilator : Permet de passer d’une prothèse de plus petit diamètre à une prothèse
Provox de diamètre plus important.
• Provox GuideWire : Pour la mise en place d’une prothèse phonatoire Provox,
Provox2 ou Provox Vega dans une fistule trachéo-oesophagienne qui vient d’être créée
ou pour l’insertion rétrograde des prothèses.
Accessoires pour le maintien de la fonction du dispositif (à usage du
patient)
• La brosse Provox Brush / Provox Brush XL est utilisée par le patient pour nettoyer
l’intérieur de la prothèse.
• La poire de rinçage Provox Flush est un dispositif supplémentaire permettant le
rinçage de la prothèse
• Le Provox Vega Plug est un outil de secours utilisé par le patient pour arrêter
temporairement les fuites à travers la prothèse.
Autres éléments utilisables avec la prothèse phonatoire Provox
• Provox HME : Échangeur de chaleur et d’humidité, compense partiellement la perte
de la fonction nasale (qui consiste à réchauffer l’air, à l’humidifier et à restaurer la
résistance respiratoire).
• Provox FreeHands HME : Échangeur de chaleur et d’humidité associé à une valve
automatique pour trachéostome, conçu pour permettre la phonation mains libres.
• Provox LaryTube : Canule trachéale en silicone destinée à maintenir le trachéostome
ouvert et sert de support pour d’autres dispositifs de réhabilitation du système Provox.
• Provox LaryButton : Canule trachéale souple en silicone fixée par autorétention.
Elle maintient le trachéostome ouvert et sert de support pour d’autres dispositifs de
réhabilitation du système Provox.
4. Effets indésirables / Solutions aux problèmes
Risques associés à la réhabilitation avec prothèse phonatoire :
Liés à la prothèse
ed
co
py
Fuites par la valve – Des fuites par la prothèse peuvent survenir suite à la prolifération
de Candida sur le clapet de la valve ou à un détachement de l’anneau radio-opaque (siège
de la valve). Les fuites peuvent également survenir lorsque la collerette de la prothèse
n'est pas complètement déployée dans la lumière de l'œsophage ou lorsque la prothèse
est trop courte. Déterminer par endoscopie si l’un de ces phénomènes est en cause. Si la
longueur et la position de la prothèse sont correctes et que la fuite persiste après nettoyage,
il est indiqué de remplacer la prothèse.
eg
is
te
r
Prolifération de Candida – La prolifération Candida au niveau de la prothèse survient chez
la quasi-totalité des patients. La radiothérapie, la composition de la salive et les habitudes
alimentaires peuvent influencer la vitesse de détérioration du silicone par le Candida. En cas
de fuite de la prothèse ou de dysfonctionnement de la valve en raison de la prolifération de
Candida, envisager un traitement antifongique préventif.
U
nr
Compatibilité avec les antifongiques – Certaines substances chimiques peuvent
interagir avec les matériaux dont sont constitués les dispositifs ou être absorbées par
ceux-ci et libérées ultérieurement. Il convient donc d’évaluer avec beaucoup de prudence
l’utilisation de médicaments antifongiques à proximité ou sur le fonctionnement de la
prothèse phonatoire.
Des tests de laboratoire n’ont révélé qu’une faible influence négative sur la prothèse
phonatoire Provox Vega et ses composants, des antifongiques suivants :
• Nystatin
• Fluconazole
• Mikonazol
Liés à la fistule TO
Aspiration de la prothèse – La prothèse phonatoire ou d’autres composants du système de
réhabilitation de la voix peuvent être aspirés accidentellement, provoquant instantanément
haut-le-cœur, toux, suffocation ou sifflements. Comme pour n’importe quel corps
étranger, l’aspiration d’un composant peut provoquer une obstruction ou de l’infection.
Les complications sont la pneumonie, l’atélectasie, la bronchite, l’abcès pulmonaire, la
fistule broncho-pulmonaire, l’asthme... Si le patient peut respirer, la toux peut éliminer
le cors étranger. Une obstruction partielle ou complète des voies respiratoires nécessite
une intervention immédiate pour l’élimination de l’objet.
Ingestion de la prothèse – La prothèse phonatoire ou d’autres composants du système de
réhabilitation de la voix peuvent être ingérés accidentellement. Comme pour tout corps
étranger, les symptômes liés à l’ingestion de la prothèse ou d’un composant du système de
réhabilitation phonatoire dépendent de plusieurs facteurs : taille, emplacement, éventuel
degré d’obstruction et durée du séjour dans le tractus digestif. Lorsque les éléments
ingérés sont dans la partie inférieure de l’œsophage, procéder à leur extraction par
œsophagoscopie ou patienter en attente d’une évolution. Si l’objet passe spontanément
dans l’estomac, il est probable qu’il pourra transiter dans la totalité du tube digestif. En
cas d’occlusion, d’hémorragie, de perforation ou lorsque l’objet ne ressort pas du tube
digestif, recourir à l’extraction chirurgicale.
Hémorragie ou saignement au niveau de la fistule – Un léger saignement peut se
produire sur le pourtour de la fistule TO durant le remplacement de la prothèse; il
s'arrête généralement spontanément. Le risque d’hémorragie doit toutefois être évalué
avec attention avant le placement ou le remplacement de la prothèse chez les patients
sous traitement anticoagulant.
Infection et/ou œdème au niveau de la fistule trachéo-œsophagienne – L’infection, la
formation de granulation et/ou l’œdème au niveau de la fistule (par exemple en cours de
radiothérapie) peuvent augmenter la longueur de cette dernière. La prothèse peut alors
se rétracter vers l’intérieur et sous la muqueuse trachéale ou œsophagienne, ou encore,
27
l’inflammation ou la croissance excessive de la muqueuse œsophagienne peut faire
dépasser la prothèse hors de la fistule. On peut alors envisager le remplacement provisoire
de la prothèse par un modèle plus long. Des antibiotiques à large spectre, avec ou sans
corticostéroïdes, peuvent être envisagés pour traiter l’infection. Si l’infection persiste,
retirer la prothèse. Dans certains cas, on peut envisager le « stenting » de la fistule au
moyen d’un cathéter. Si la fistule se referme spontanément après le retrait de la prothèse
une nouvelle fistule doit être créée pour insérer une nouvelle prothèse.
Granulation autour de la fistule – Du tissu de granulation se forme autour de la fistule
TO dans 5 % des cas. La cautérisation électrique, chimique ou au laser de la zone de
granulation peut être envisagée.
Cicatrisation hypertrophique de la fistule – Lorsque la prothèse est relativement courte,
un bourgeonnement de la muqueuse trachéale peut apparaître sur la collerette trachéale.
Ce tissu excédentaire peut être enlevé au laser (CO2ou Nd-YAG). On peut également
utiliser une prothèse plus longue.
Protrusion/extrusion de la prothèse – Une infection de la fistule TO peut entraîner
la protrusion de la prothèse et son extrusion spontanée. Dans ce cas, retirer la prothèse
pour éviter qu’elle ne se détache et pénètre dans la trachée. La fistule TO se referme
parfois suite au retrait de la prothèse. Dans ce cas, une nouvelle fistule doit être créée
pour insérer une nouvelle prothèse.
co
py
Fuite autour de la prothèse – Des fuites peuvent survenir temporairement autour de
la prothèse puis disparaître spontanément. Souvent, elles sont dues à une prothèse trop
longue. Ce problème se résout en la replaçant par une prothèse plus courte. La fuite peut
être résolue avec une prothèse de diamètre plus grand. Cela peut également se produire
lorsque la collerette élargie de la prothèse Provox Vega XtraSeal ne s’est pas totalement
déployée dans la lumière de l’œsophage. Aucune partie de la collerette œsophagienne
élargie ne doit être visible le long du fût de la prothèse phonatoire et quand on la tourne,
la prothèse doit bouger librement. Tourner la prothèse phonatoire tout en la poussant
légèrement vers l’œsophage peut aider à déplier totalement la collerette élargie. En
cas d’incertitude, utilisez une endoscopie flexible pour vérifier la bonne position de la
prothèse à l’intérieur de l’œsophage.
Si la fuite ne disparaît pas (souvent, elle s’améliore spontanément), vous pouvez utiliser
une Provox XtraFlange. D’autres méthodes pour résoudre la fuite autour de la prothèse
phonatoire consistent à retirer provisoirement la prothèse et à insérer une canule trachéale
avec ballonnet et/ou une sonde nasogastrique pour permettre le rétrécissement de la fistule.
On peut également appliquer sous la muqueuse une suture en cordon de bourse au moyen
de matériau résorbable 3x0 autour de la fistule TO après retrait de la prothèse. Insérer
la nouvelle prothèse et serrer doucement la suture de manière à refermer les lèvres de la
fistule autour de la prothèse. Si les fuites persistent, envisager une fermeture chirurgicale
de la fistule et la création d'une nouvelle communication.
te
r
ed
Lésions tissulaires – Lorsqu’une prothèse est trop courte, trop longue ou fréquemment
poussée contre la paroi œsophagienne par la canule trachéale, le bouton de trachéostome
ou le doigt du patient, elle peut provoquer des lésions de la fistule, de la trachée et/ou de
l’œsophage. Ces cas se rencontrent avec une plus grande fréquence chez les personnes
subissant une radiothérapie. Inspectez régulièrement les conditions pour éviter des
lésions graves.
is
5. Informations complémentaires
eg
5.1 Compatibilité avec l’IRM, la radiographie et la
radiothérapie
U
nr
Les tests indiquent que la prothèse phonatoire Provox (sauf Provox ActiValve) est
compatible avec l’imagerie par résonance magnétique jusqu’à 3,0 Tesla, avec les rayons X
et avec la radiothérapie jusqu’à 70 Gy. La prothèse peut être laissée en place pour l’examen
ou pendant un traitement. Remarque : le siège du clapet de la valve, radio-opaque, est
visible aux rayons X.
5.2 Durée de vie du dispositif
La durée de vie du dispositif variant selon les circonstances biologiques propres à chacun,
il n’est pas possible de prédire la durabilité du dispositif sur de longues périodes. Il peut
arriver que le matériau soit atteint par des bactéries ou des levures nuisant à la structure
du dispositif.
5.3 Informations pour l’utilisateur
Pour une aide ou des informations supplémentaires, consultez la quatrième de couverture
de ce mode d’emploi pour les informations de contact.
28
ITALIANO
Illustrazioni
1. Protesi fonatoria Provox® Vega™ XtraSeal™
a) Informazioni sulle dimensioni (diametro e lunghezza del corpo fra le
flange)
b) Cappuccio della protesi
c) Flangia esofagea
d) Flangia tracheale
e) Linguetta di sicurezza
f ) Flap della valvola
g) Corpo della protesi
h) Alloggiamento della valvola di fluoroplastica radiopaco
i) Flangia esofagea aggiuntiva ampliata
2. Sistema SmartInserter™
a) Guida
b) Lato connessione
c) Dispositivo a clip
d) Estremità distale
e) Perno introduttore
f ) Protesi fonatoria
g) Tubo di carico
h) Marcatore di passo
i) Punta
Provox® Vega™ XtraSeal™
co
py
Le istruzioni per l’uso fornite con il presente prodotto possono essere modificate
periodicamente e devono quindi essere riesaminate prima di ogni procedura che prevede
l’uso del prodotto.
ed
Índice
U
nr
eg
is
te
r
1. Informazioni descrittive..................................................................................................................29
1.1 Finalità d’uso ...............................................................................................................................29
1.2 Descrizione del dispositivo ....................................................................................................29
1.3 CONTROINDICAZIONI.............................................................................................................30
1.4 AVVERTENZE................................................................................................................................30
1.5 PRECAUZIONI ..............................................................................................................................30
2. Istruzioni per l’uso ............................................................................................................................30
2.1 Preparazione ...............................................................................................................................30
2.2 Procedura di sostituzione anterograda utilizzando l’aggiustamento ....................30
2.3 Ricarica dell’introduttore Provox SmartInserter .............................................................31
3. Informazioni importanti per il paziente....................................................................................31
3.1 Informazioni generali ...............................................................................................................31
3.2 Manutenzione della protesi ...................................................................................................31
3.3 Accessori .......................................................................................................................................32
4. Eventi avversi/informazioni sulla risoluzione dei problemi...............................................32
5. Informazioni supplementari .........................................................................................................33
5.1 Compatibilità con la RM, la radiologia e la radioterapia..............................................33
5.2 Durata del dispositivo dopo l’impianto .............................................................................33
5.3 Informazioni sull’assistenza ai pazienti..............................................................................33
1. Informazioni descrittive
1.1 Finalità d’uso
La protesi fonatoria Provox Vega è una protesi fonatoria fissa sterile monouso indicata
per la riabilitazione fonatoria dopo la rimozione chirurgica della laringe (laringectomia).
La pulizia della protesi fonatoria in sede viene eseguita dal paziente.
L’introduttore Provox SmartInserter è un dispositivo sterile monouso progettato per
la sostituzione anterograda della protesi fonatoria Provox Vega. Questa procedura di
sostituzione viene eseguita da un medico o un professionista sanitario addestrato in
conformità con le linee guida locali o nazionali.
L’introduttore Provox SmartInserter non deve essere usato per l’inserimento della
protesi fonatoria in una fi stola appena eseguita.
1.2 Descrizione del dispositivo
Informazioni generali
Provox Vega è una valvola unidirezionale (protesi) che mantiene pervia una fistola TE
per la fonazione, riducendo al tempo stesso il rischio di ingresso di fluidi e alimenti nella
trachea. La protesi fonatoria Provox Vega non è un impianto permanente e va sostituita
periodicamente. La protesi (Figura 1) è disponibile in diversi diametri e lunghezze.
Provox Vega XtraSeal è dotata di una flangia esofagea ampliata aggiuntiva indicata per
risolvere i problemi associati alle perdite intorno alla protesi fonatoria. Il dispositivo è
costituito da gomma al silicone di grado medicale e plastica fluorurata.
29
Confezione della Provox Vega XtraSeal
La confezione della Provox Vega XtraSeal contiene i seguenti articoli:
• 1 Protesi fonatoria Provox Vega XtraSeal precaricata in uno SmartInserter monouso,
sterile (Figura 2)
• 1 Scovolino Provox Brush di misura corrispondente alla protesi fonatoria, non sterile
• 1 Manuale per il medico della Provox Vega XtraSeal
• 1 Manuale per il paziente della Provox Vega
• 1 Istruzioni per l’uso dello scovolino Provox Brush
1.3 CONTROINDICAZIONI
Non vi sono controindicazioni note per l’uso o la sostituzione di una protesi fonatoria
Provox Vega tra i pazienti che già utilizzano una riabilitazione fonetica protesica.
1.4 AVVERTENZE
La dislocazione o l’estrusione della protesi fonatoria Provox Vega dalla fistola TE è una
possibile evenienza che comporta ingestione o aspirazione della protesi, o danni tissutali.
Per altre informazioni su questi eventi, vedere la sezione Eventi avversi/informazioni
sulla risoluzione dei problemi di seguito.
Per ridurre il rischio di dislocazione/estrusione e i relativi potenziali problemi conseguenti:
• Scegliere protesi di dimensioni corrette. Un adattamento troppo stretto può causare
necrosi tissutale ed estrusione.
• Spiegare al paziente di consultare immediatamente un medico se vi sono segni di
edema tissutale e/o infiammazione/infezione.
• Se occorre, scegliere cannule per laringectomia o bottoni stomali di forma idonea per
non esercitare pressione sulla protesi, né agganciarsi alla flangia tracheale della protesi
durante l’inserimento e la rimozione della cannula per laringectomia o del bottone
stomale.
• Spiegare al paziente di utilizzare solo accessori Provox originali della misura
corrispondente (scovolino Brush, irrigatore Flush, tappo Plug) per la manutenzione e
di evitare ogni altro tipo di manipolazione.
• Il riutilizzo e il ritrattamento possono causare la contaminazione incrociata e danni al
dispositivo, e provocare lesioni ai pazienti.
1.5 PRECAUZIONI
te
r
2. Istruzioni per l’uso
ed
co
py
• Prima di posizionare o sostituire la protesi, valutare accuratamente tutti i pazienti con
disordini emorragici o i soggetti sottoposti a trattamento anticoagulante per il rischio
di sanguinamento o emorragia.
• Prima dell’uso, controllare la confezione. Non usare il prodotto se la confezione è
danneggiata o aperta.
• Usare sempre una tecnica asettica durante la manipolazione della protesi per ridurre il
rischio di infezione.
• Verificare che tutti i dispositivi di fissaggio dello stoma esterni o interni utilizzati non
esercitino alcuna pressione, né si aggancino alla flangia della protesi (ad es. dischi
adesivi HME, cannule per laringectomia, o bottoni stomali). In questo caso, c’è il
rischio di causare gravi danni tessutali e/o ingerire accidentalmente la protesi.
is
2.1 Preparazione
Scelta della misura corretta della protesi sostitutiva
nr
eg
Accertarsi di usare una protesi fonatoria Provox Vega XtraSeal di diametro e lunghezza
del corpo appropriati. Provox Vega XtraSeal è disponibile in diverse combinazioni di
lunghezza/diametro.
U
• Selezione del diametro del corpo
Il medico deve stabilire il diametro corretto della protesi appropriato per il paziente.
• Se il diametro selezionato è superiore alla precedente protesi, il tratto deve essere
dilatato utilizzando il Provox Dilator appropriato per il diametro della protesi da
inserire.
• Se si intende utilizzare una protesi con corpo di diametro inferiore, osservare e
assicurarsi che la fistola si restringa fino al diametro appropriato.
• Selezione della lunghezza del corpo
Per selezionare la lunghezza corretta, è possibile utilizzare come dispositivo di
misurazione la protesi corrente. In presenza di uno spazio eccessivo (cioè 3 mm o più)
tra la flangia tracheale della vecchia protesi e la parete mucosale, usare una protesi più
corta. Se l’assetto della protesi è eccessivamente stretto, usare una protesi più lunga.
Nota: il corpo della Provox Vega XtraSeal è circa 1 mm più corto rispetto alla misura
indicata a causa della flangia esofagea ampliata.
2.2 Procedura di sostituzione anterograda utilizzando
l’aggiustamento
(Figure 3.1 – 3.10)
ATTENZIONE: la Provox Vega XtraSeal con flangia esofagea ampliata deve essere
posizionata usando la tecnica di aggiustamento per assicurare che la flangia esofagea
ampliata aggiuntiva e la flangia esofagea si dispieghino entrambe all’interno del lume
dell’esofago. La tecnica di aggiustamento consiste nel dispiegamento dell’intera protesi
nell’esofago e quindi nella sua retrazione alla posizione desiderata.
Attivazione del sistema per la sostituzione usando l’aggiustamento
1. Tenendo con una mano il tubo di carico, utilizzare l’altra mano per spingere
parzialmente dentro di esso il perno dell’introduttore, fi nché l’anello blu della protesi
non ha oltrepassato il marcatore di passo del tubo di carico (Figura 3.1).
2. Stringere la guida tra il pollice e l’indice (Figura 3.2). Spingerla ulteriormente nel
tubo di carico (Figura 3.3). A questo punto, la protesi fonatoria Provox Vega XtraSeal
è pronta per l’inserimento con l’aggiustamento.
Inserimento della nuova protesi nella fistola: aggiustamento
1. Sondaggio della fistola TE
Impugnare il Provox SmartInserter a livello del tubo di carico. Inserire delicatamente
l’estremità del tubo di carico. Procedere con cautela se s’incontra resistenza durante
l’inserimento del tubo di carico nella fistola. In questo caso, la dilatazione e/o la
lubrificazione della fistola possono facilitare l’inserimento.
30
2. “Iniezione” della protesi
Tenere fermo il tubo di carico in questa posizione con una mano e utilizzare l’altra
mano per far avanzare il perno dell’introduttore fi nché non è completamente inserito
nello SmartInserter (Figura 3.4). Non appena la guida viene spinta ulteriormente nel
tubo di carico, il perno dell’introduttore avanza ancora rilasciando la protesi fonatoria
Provox Vega XtraSeal completamente dentro l’esofago.
3. Estrazione della protesi
Estrarre il tubo di carico dalla fistola (Figura 3.5). Ritirare la protesi fonatoria Provox
Vega XtraSeal nella fistola afferrando e tirando indietro la flangia tracheale della protesi
con una pinza emostatica atraumatica (Figura 3.6).
4. Verifica dell’accoppiamento corretto
Verificare che la protesi e le flange siano nella posizione corretta ruotando e spostando
la protesi avanti e indietro nella fistola. Applicare una leggera trazione sulla flangia
tracheale per verificare il corretto posizionamento della protesi fonatoria (Figura 3.7).
Attenzione: confermare che entrambe le flange esofagee siano state dispiegate
completamente nel lume dell’esofago. Nessuna porzione della flangia esofagea ampliata
dovrebbe essere visibile lungo il corpo della protesi fonatoria e, quando ruotata, la
protesi fonatoria dovrebbe muoversi senza alcuna resistenza. Per facilitare l’apertura
completa della flangia ampliata, ruotare la protesi fonatoria e, contemporaneamente,
premerla leggermente verso l’esofago. In caso di dubbi, usare un endoscopio flessibile
per confermare il posizionamento corretto all’interno dell’esofago.
5. Verifica del funzionamento corretto
Verificare il funzionamento corretto della protesi chiedendo al paziente di parlare
(Figura 3.8) e osservando il dispositivo mentre il paziente beve dell’acqua (Figura 3.9).
6. Taglio della linguetta di sicurezza con le forbici
Dopo avere avuto conferma del posizionamento della protesi, puntare l’estremità
ovale della flanga tracheale verso il basso e usare un paio di forbici per tagliare la
linguetta di sicurezza sul bordo esterno della flangia (Figura 3.10). A questo punto,
la protesi fonatoria è pronta per l’uso.
2.3 Ricarica dell’introduttore Provox SmartInserter
(Figure 4.1 – 4.6)
Se il primo tentativo di inserimento della protesi fonatoria Provox Vega XtraSeal nella
fistola TE non è riuscito, è possibile ricaricare la Provox Vega XtraSeal nello SmartInserter.
ATTENZIONE: non ricaricare lo SmartInserter più di 2 volte.
U
nr
eg
is
te
r
ed
co
py
Se la protesi fonatoria Provox Vega XtraSeal mostra segni di danni, non utilizzarla.
1. Verificare che la protesi sia ancora saldamente fissata al perno dell’introduttore. In caso
contrario, fissare la linguetta di sicurezza sul perno dell’introduttore facendo passare
la linguetta attraverso l’apertura di fissaggio nel perno dell’introduttore (Figura 4.1).
2. Mettere la protesi fonatoria Provox Vega XtraSeal con il lato tracheale in basso
sulla parte superiore del perno dell’introduttore (Figura 4.2). Utilizzare il pollice
per garantire che la protesi fonatoria sia posizionata correttamente.
3. Verificare che il dispositivo a clip e la guida siano ancora montati nella posizione
superiore della guida. In caso contrario, rimontare il dispositivo a clip nella guida
(Figura 4.3). Non spingere il dispositivo a clip nella posizione inferiore della guida.
4. Tirare delicatamente il perno dell’introduttore con la protesi agganciata nel dispositivo
a clip fi nché non s’innesta emettendo un secco clic (Figura 4.4). A questo punto, la
flangia esofagea è a livello del dispositivo a clip.
5. La flangia esofagea ampliata deve essere posizionata manualmente sotto le punte
ricurve del dispositivo a clip (Figura 4.5).
NOTA: se questo passaggio non viene eseguito, per precaricare la protesi fonatoria
sarà necessario applicare una forza eccessiva e ciò potrebbe danneggiare la protesi.
6. Fissare il tubo di carico alla parte superiore del dispositivo a clip/guida (Figura 4.6)
e lasciare che le due parti si innestino tra di loro con uno scatto.
A questo punto la protesi fonatoria Provox Vega XtraSeal è pronta per l’attivazione e può
essere utilizzata come descritto nella sezione “Procedura di sostituzione anterograda
utilizzando l’aggiustamento”.
3. Informazioni importanti per il paziente
3.1 Informazioni generali
Verificare che il paziente comprenda che deve contattare il medico curante nei
seguenti casi.
• C’è una perdita attraverso la protesi o intorno ad essa (tosse e/o variazione di colore
della mucosa)
• La fonazione diventa difficile (maggiore fatica e/o suoni vocali più forzati)
• Ci sono segni di infiammazione o alterazioni tissutali nella regione della fistola o dello
stoma (dolore, eritema, calore, tumefazione, tracce di sangue sullo scovolino dopo la
pulizia)
Inoltre, informare il paziente di quanto segue.
• Dopo la sostituzione della protesi si possono osservare tracce di sangue nell’espettorato.
Ciò può derivare dalla presenza di tessuto di granulazione sui margini della fistola TE.
• Talvolta, può verificarsi una lieve perdita attraverso la protesi o intorno ad essa nelle
prime settimane dopo l’inserimento di una nuova protesi. Questa condizione si risolve
spesso spontaneamente senza richiedere l’immediata sostituzione della protesi.
• In caso di perdita spontanea attraverso la protesi, è possibile effettuare un blocco
temporaneo con il tappo Provox Vega Plug.
• Sono raccomandate sessioni di dizione con un medico addestrato, allo scopo di
acquisire un suono della voce ottimale, un linguaggio fluente, e un’intelligibilità
migliore.
3.2 Manutenzione della protesi
Spiegare al paziente quando e come pulire la protesi fonatoria Provox Vega XtraSeal.
La pulizia della protesi almeno due volte al giorno può aiutare a prolungare la durata
del dispositivo.
ATTENZIONE: per la pulizia della protesi, usare solo accessori Provox originali
progettati per l’uso con la Provox Vega.
• La pulizia della protesi con lo scovolino Provox Brush due volte al giorno aiuta a
rimuovere il muco e i residui di cibo dal dispositivo.
• L’irrigazione della protesi con l’irrigatore Provox Flush aiuta inoltre a rimuovere da
questa i detriti e il muco contribuendo ad aumentare la durata del dispositivo.
31
Nota: l’uso dell’irrigatore Provox Flush è indicato solo per i pazienti che, a giudizio
del medico che prescrive il dispositivo, hanno dimostrato la capacità di comprendere e
seguire costantemente le istruzioni per l’uso senza supervisione clinica.
• Alcune misure dietetiche, come l’assunzione quotidiana di yogurt o siero di latte
contenenti lattobacilli, sono considerate utili per contrastare l’iperproliferazione della
Candida.
Per informazioni dettagliate relative alla pulizia dei prodotti Provox Vega, consultare le
istruzioni di ciascun accessorio.
3.3 Accessori
ATTENZIONE: usare solo accessori Provox originali progettati per l’uso con la
Provox Vega. Altri accessori possono causare lesioni al paziente o malfunzionamento
del prodotto.
Ausili per facilitare l’inserimento della protesi (per l’uso da parte del
medico)
• Provox Dilator: facilita la sostituzione di protesi con corpo di diametro minore con
protesi fonatorie Provox di diametro maggiore.
• Provox GuideWire: per l’inserimento di una protesi fonatoria Provox, Provox2 o
Provox Vega in una fistola TE appena eseguita o per la sostituzione retrograda di una
protesi fonatoria fissa Provox.
Ausili per la manutenzione del dispositivo (per l’uso da parte del paziente)
• Provox Brush/Provox Brush XL sono gli scovolini usati dal paziente per pulire la
parte interna della protesi.
• Provox Flush è uno strumento di pulizia supplementare che permette di irrigare la
protesi.
• Provox Vega Plug è uno strumento di pronto soccorso che il paziente può usare per
bloccare temporaneamente eventuali perdite attraverso la protesi.
Altri prodotti utilizzabili con le protesi fonatorie Provox
co
py
• Provox HME: scambiatore di calore e di umidità che ripristina parzialmente le
funzioni nasali perdute (riscaldamento, umidificazione, resistenza respiratoria).
• Provox FreeHands HME: scambiatore di calore e di umidità combinato con una
valvola automatica per tracheostoma, progettato per la fonazione a mani libere.
• Provox LaryTube: cannula tracheale di silicone progettata per contrastare il
restringimento dello stoma, alloggiando al tempo stesso gli altri dispositivi di
riabilitazione del sistema Provox.
• Provox LaryButton: cannula tracheale autobloccante morbida di silicone progettata
per contrastare il restringimento dello stoma, alloggiando al tempo stesso gli altri
dispositivi di riabilitazione del sistema Provox.
4. Eventi avversi/informazioni sulla risoluzione
dei problemi
ed
I seguenti sono i possibili rischi associati con la riabilitazione fonatoria protesica.
te
r
Correlati alla protesi
U
nr
eg
is
Perdita attraverso la valvola: le perdite attraverso la protesi possono essere associate a
iperproliferazione della Candida sul lembo valvolare o dislocazione dell’anello radiopaco
(alloggiamento della valvola). Possono anche verificarsi se la flangia esofagea della protesi
non è perfettamente dispiegata nel lume dell’esofago, o se la protesi è troppo corta.
Effettuare l’esame endoscopico per stabilire se si è verificato uno di questi fenomeni.
Se la protesi è correttamente posizionata e della giusta lunghezza, e se la pulizia della
protesi non risolve la perdita attraverso di essa, è indicata la sua sostituzione.
Iperproliferazione della Candida: l’iperproliferazione della Candida nella protesi avviene
nella maggior parte dei pazienti. La radioterapia, il contenuto salivare e le abitudini alimentari
possono influenzare la rapidità con cui la Candida aggredisce il materiale siliconico. Si può
considerare il trattamento con agenti antimicotici come misura preventiva se l’iperproliferazione
della Candida causa perdite attraverso la protesi o insufficienza della valvola.
Compatibilità con i farmaci antimicotici: una varietà sconosciuta di sostanze chimiche
può influenzare immediatamente le proprietà del materiale che costituisce il dispositivo, o
essere assorbita dal materiale e conseguentemente rilasciata più tardi. Quindi, l’introduzione
di agenti antimicotici o di farmaci direttamente dentro la protesi fonatoria, o nelle sue
immediate vicinanze, deve essere valutata con cautela.
I test di laboratorio mostrano solo un’influenza negativa minore sulla funzione della
protesi fonatoria Provox Vega e dei relativi componenti quando si utilizzano i seguenti
farmaci antimicotici:
• Nistatina
• Fluconazolo
• Miconazolo
Correlati alla fistola
Aspirazione della protesi: l’aspirazione accidentale della protesi fonatoria, o di altri
componenti del sistema di riabilitazione fonatoria, è una possibile evenienza. I sintomi
immediati possono includere conati di vomito, tosse, soffocamento o respiro sibilante.
Come per ogni altro corpo estraneo, le complicanze dell’aspirazione di un componente
possono essere l’ostruzione o l’infezione. Le complicanze possono includere polmonite,
atelettasia, bronchite, ascesso polmonare, fistola broncopolmonare e asma. Se il paziente
è in grado di respirare, la tosse può rimuovere il corpo estraneo. L’ostruzione parziale o
completa delle vie aeree richiede l’intervento immediato per la rimozione dell’oggetto.
Ingestione della protesi: l’ingestione accidentale della protesi fonatoria, o di altri
componenti del sistema di riabilitazione fonatoria, è una possibile evenienza. Come per
ogni altro corpo estraneo, i sintomi causati dall’ingestione della protesi o da componenti del
sistema di riabilitazione fonatoria dipendono ampiamente dalle dimensioni, la posizione,
il grado di ostruzione (se presente) e dal perdurare dell’ostruzione. I componenti ingeriti
che sono rimasti nell’esofago inferiore possono essere rimossi mediante esofagoscopia
o tenuti sotto osservazione per un breve periodo. L’oggetto può passare spontaneamente
nello stomaco, e i corpi estranei che entrano nello stomaco attraversano solitamente il
tratto intestinale. La rimozione chirurgica dei corpi estranei nel tratto intestinale va
considerata nei casi di ostruzione intestinale, sanguinamento, perforazione o quando
l’oggetto non attraversa il tratto intestinale.
32
Emorragia/sanguinamento della fistola: durante la sostituzione della protesi può
verificarsi un leggero sanguinamento dai margini della fistola TE che si risolve di solito
spontaneamente. I pazienti sotto trattamento anticoagulante vanno tuttavia valutati con
cautela per il rischio di emorragia prima dell’inserimento o della sostituzione della protesi.
Infezione e/o edema della fistola TE: infezione, formazione di granulazione e/o edema
della fistola (ad es., durante la radioterapia) possono aumentare la lunghezza del tratto
di fistola. Ciò può causare lo scivolamento della protesi all’interno e sotto la mucosa
tracheale o esofagea. In alternativa, l’infiammazione o la crescita eccessiva della mucosa
esofagea possono causare la protrusione della protesi dalla fistola. In questo caso, si
consiglia di sostituire temporaneamente la protesi con un’altra dal corpo più lungo. Il
trattamento dell’infezione può richiedere l’uso di antibiotici ad ampio spettro, con o
senza corticosteroidi. Se l’infezione non si risolve con gli antibiotici e/o l’intervento
corticosteroideo in presenza della protesi, quest’ultima va rimossa. In alcuni casi, si può
prendere in considerazione la canalizzazione della fistola con un catetere. Se la fistola si
chiude spontaneamente dopo la rimozione della protesi, può essere necessario rieseguire
la fistola per inserire una nuova protesi.
Granulazione circostante la fistola: è stata documentata la formazione di tessuto di
granulazione attorno alla fistola TE con un’incidenza del 5%. Considerare eventualmente
la cauterizzazione elettrica, chimica o laser dell’area di granulazione.
Cicatrizzazione ipertrofica circostante la fi stola: il rigonfiamento della mucosa
tracheale sopra la flangia tracheale è una possibile evenienza se la protesi è relativamente
corta. Questo tessuto in eccesso può essere rimosso usando un laser (CO2 o NdYAG). In
alternativa, è possibile usare una protesi con corpo più lungo.
Protrusione/estrusione della protesi: la protrusione della protesi e successiva estrusione
spontanea è un’evenienza talvolta osservata durante l’infezione della fi stola TE. È
necessario rimuovere la protesi per evitare la sua dislocazione nella trachea. La fistola
può chiudersi spontaneamente dopo la rimozione della protesi. Può essere necessario
rieseguire la fistola per inserire una nuova protesi.
eg
is
te
r
ed
co
py
Perdita circostante la protesi: la perdita transitoria attorno alla protesi è una possibile
evenienza, e può migliorare spontaneamente. La ragione più comune è una protesi troppo
lunga, e la soluzione consiste nell’inserirne una più corta. Anche l’inserimento di una
protesi di diametro differente (superiore a quello precedente) può risolvere la perdita.
La perdita si può verificare anche quando la flangia ampliata della protesi Provox Vega
XtraSeal non è stata dispiegata completamente all’interno del lume dell’esofago. Nessuna
porzione della flangia esofagea ampliata dovrebbe essere visibile lungo il corpo della protesi
fonatoria e, quando ruotata, la protesi fonatoria dovrebbe muoversi senza alcuna resistenza.
Per facilitare l’apertura completa della flangia ampliata, ruotare la protesi fonatoria e,
contemporaneamente, premerla leggermente verso l’esofago. In caso di dubbi, usare un
endoscopio flessibile per confermare il posizionamento corretto all’interno dell’esofago.
Se la perdita non migliora (considerato che spesso ciò avviene spontaneamente) è
possibile usare una Provox XtraFlange. Altri metodi per risolvere il problema della
perdita attorno alla protesi fonatoria consistono nella rimozione temporanea della protesi
e nell’inserimento di una cannula tracheale cuffiata e/o di un sondino di alimentazione
nasogastrico per consentire il restringimento della fistola. In alternativa, è possibile
applicare nella sottomucosa attorno alla fistola TE una sutura a borsa di tabacco con
materiale assorbibile 3x0 dopo la rimozione della protesi. Occorre quindi inserire la nuova
protesi stringendo delicatamente la sutura in modo da chiudere attorno al dispositivo
le pareti della fistola. Se la perdita circostante la protesi è intrattabile, possono essere
necessarie misure più conservative, la chiusura chirurgica della fistola e la sua successiva
riesecuzione.
U
nr
Danno tissutale: se la protesi è troppo corta, troppo lunga, o viene spinta spesso contro
la parete dell’esofago a causa di una cannula tracheale, un bottone stomale, o il dito del
paziente, possono verificarsi lesioni alla sede di fistola, ai tessuti tracheali e/o esofagei.
Nei pazienti sottoposti a radioterapia, ciò può capitare più facilmente. Esaminare
regolarmente le condizioni per evitare danni gravi.
5. Informazioni supplementari
5.1 Compatibilità con la RM, la radiologia e la radioterapia
Le protesi fonatorie Provox sono state testate e risultano compatibili, eccetto la Provox
ActiValve, con la diagnostica per immagini RM (testata fi no a 3,0 Tesla), le radiografie
e la radioterapia (testata fi no a 70 Gy). La protesi può essere lasciata nella fistola TE
durante l’esame o la sessione di terapia. Nota: l’alloggiamento radiopaco della valvola
è visibile sulle radiografie.
5.2 Durata del dispositivo dopo l’impianto
In base alle circostanze biologiche individuali, la vita utile del dispositivo varia ed è
impossibile prevederne l’integrità a lungo termine. Il materiale del dispositivo viene
influenzato, per esempio, da batteri e lieviti e la sua integrità strutturale può deteriorare
nel tempo.
5.3 Informazioni sull’assistenza ai pazienti
Per ulteriore assistenza o maggiori informazioni, fare riferimento alla quarta di copertina
delle istruzioni per l’uso per le informazioni di contatto.
33
ESPAÑOL
Imágenes
1. Prótesis de voz Provox® Vega™ XtraSeal™
a) Información sobre el tamaño (diámetro del vástago y longitud entre los
rebordes)
b) Capuchón de la prótesis
c) Reborde esofágico
d) Reborde traqueal
e) Asa de seguridad
f ) Hoja de la válvula
g) Vástago de la prótesis
h) Asiento de la válvula de fluoroplástico radiopaco
i) Reborde esofágico agrandado adicional
2. Sistema SmartInserter™
a) Guía
b) Lado de conexión
c) Dispositivo plegable
d) Punta distal
e) Aguja de inserción
f ) Prótesis de voz
g) Tubo de carga
h) Marca
i) Punta
Provox® Vega™ XtraSeal™
co
py
Es posible que las instrucciones de uso que acompañan a este producto se modifiquen
cada cierto tiempo, por lo cual deberán consultarse antes de realizar cada intervención
en la cual se use el producto.
Imágenes
U
nr
eg
is
te
r
ed
1. Información general ........................................................................................................................34
1.1 Uso previsto .................................................................................................................................34
1.2 Descripción del dispositivo....................................................................................................34
1.3 CONTRAINDICACIONES .........................................................................................................35
1.4 ADVERTENCIAS...........................................................................................................................35
1.5 PRECAUCIONES ..........................................................................................................................35
2. Instrucciones de uso ........................................................................................................................35
2.1 Preparativos .................................................................................................................................35
2.2 Procedimiento de sustitución anterógrada mediante overshooting .....................35
2.3 Recarga del Provox SmartInserter .......................................................................................36
3. Información importante para el paciente................................................................................36
3.1 Información general .................................................................................................................36
3.2 Mantenimiento de la prótesis ...............................................................................................36
3.3 Accesorios ....................................................................................................................................37
4. Acontecimientos adversos/información sobre el manejo de los problemas..............37
5. Información adicional .....................................................................................................................38
5.1 Compatibilidad con la RMN, las radiografías y la radioterapia .................................38
5.2 Vida útil del dispositivo ...........................................................................................................38
5.3 Información de asistencia al usuario ..................................................................................38
1. Información general
1.1 Uso previsto
La prótesis de voz Provox Vega es una prótesis vocal permanente, estéril y de un solo
uso, indicada en la rehabilitación de la voz tras la resección quirúrgica de la laringe
(laringectomía). La limpieza de la prótesis de voz mientras esté insertada debe realizarla
el paciente.
El Provox SmartInserter es un dispositivo estéril de un solo uso diseñado para la
colocación anterógrada de la prótesis de voz Provox Vega. Este procedimiento debe
realizarlo un facultativo o profesional médico con la adecuada formación de acuerdo
con las disposiciones locales o nacionales.
El Provox SmartInserter no debe utilizarse para la inserción de una prótesis de voz
en un orificio de punción recién hecho.
1.2 Descripción del dispositivo
Generalidades
Provox Vega es una válvula unidireccional (prótesis) que mantiene abierto el orificio
de punción TE para permitir hablar, al mismo tiempo que reduce el riesgo de que
los líquidos o la comida pasen a la tráquea. La prótesis de voz Provox Vega no es un
implante permanente, por lo que requiere sustituciones periódicas. La prótesis (fig. 1)
se encuentra disponible en diferentes diámetros y en varias longitudes. Provox Vega
XtraSeal presenta un reborde esofágico agrandado adicional diseñado para solucionar
problemas de fugas alrededor de la prótesis de voz. El dispositivo está hecho de silicona
y fluoroplástico de grado médico.
34
Envase de Provox Vega XtraSeal
El envase de Provox Vega XtraSeal contiene los siguientes elementos:
• 1 prótesis de voz Provox Vega XtraSeal estéril, precargada en un sistema SmartInserter
de un solo uso (fig. 2)
• 1 Provox Brush del tamaño correspondiente a la prótesis de voz y no estéril
• 1 manual del facultativo
• 1 manual del paciente
• 1 manual con las instrucciones de uso del Provox Brush
1.3 CONTRAINDICACIONES
No hay contraindicaciones conocidas para la utilización o sustitución de una prótesis de
voz Provox Vega en pacientes que ya utilicen prótesis para la rehabilitación de la voz.
1.4 ADVERTENCIAS
Puede producirse desplazamiento o expulsión de la prótesis de voz Provox Vega del
orificio de punción TE, con la consiguiente ingesta, aspiración o daño tisular. Para más
información sobre estos supuestos, consulte la sección Acontecimientos adversos/
información sobre el manejo de los problemas más adelante.
Para reducir el riesgo de desplazamiento/expulsión y sus potenciales secuelas:
• Seleccionar el tamaño de prótesis adecuado. Un ajuste muy apretado puede producir
necrosis tisular y expulsión.
• Informe al paciente de que consulte a un médico inmediatamente si aparece cualquier
signo de edema tisular y/o inflamación/infección.
• En caso de utilizarlos, elija tubos de laringectomía o anillos de estoma con una forma
adecuada que no ejerzan presión sobre la prótesis ni enganchen el reborde traqueal de
la prótesis durante la inserción y retirada de dichos tubos o anillos.
• Informe al paciente para que utilice sólo los accesorios Provox originales del tamaño
correspondiente (Brush, Flush, Plug) para el mantenimiento de la prótesis y que evite
cualquier otro tipo de manipulación.
• La reutilización y el reprocesamiento pueden provocar contaminación cruzada y el
deterioro del dispositivo, lo que podría provocar lesiones al paciente.
1.5 PRECAUCIONES
co
py
• Estudie cuidadosamente el caso de cualquier paciente con trastornos de la coagulación
o en tratamiento anticoagulante, por el riesgo de sangrado o hemorragia, antes de la
colocación o sustitución de la prótesis.
• Revise el envase antes de su utilización. No use el producto si el envase está dañado o
abierto.
• Utilice siempre una técnica aséptica cuando maneje la prótesis, para reducir el riesgo
de infección.
• Asegúrese de que cualquier dispositivo de fijación del estoma externo o interno que
se utilice no presione ni se enganche al reborde de la prótesis (p. ej., placas basales de
HME, tubos de laringectomía o anillos del estoma). De lo contrario se podrían producir
daños tisulares graves y/o aspiración accidental de la prótesis.
ed
2. Instrucciones de uso
te
r
2.1 Preparativos
is
Selección del tamaño de prótesis de sustitución adecuado
nr
eg
Asegúrese de utilizar una prótesis de voz Provox Vega XtraSeal de la longitud y el
diámetro de vástago adecuados. Provox Vega XtraSeal está disponible en distintas
combinaciones de longitud/diámetro.
U
• Selección del diámetro del vástago
El facultativo determinará el diámetro adecuado de la prótesis para cada paciente.
• Si el diámetro elegido es mayor que el de la prótesis anterior deberá utilizarse el
Provox Dilator correspondiente para dilatar el tracto hasta el diámetro de la prótesis
que se va a colocar.
• Si se inserta una prótesis con un diámetro de vástago menor, observe y asegúrese de
que el orificio de punción se contraiga hasta el diámetro adecuado.
• Selección de la longitud del vástago
Para seleccionar la longitud correcta, puede utilizar la prótesis actual como herramienta
de medición. Si quedase demasiado espacio (es decir, 3 mm/~0,12 pulgadas o más)
entre el reborde traqueal de la prótesis vieja y la pared de la mucosa, se deberá utilizar
una prótesis más corta. Si la prótesis estuviese demasiado apretada, se debe utilizar una
prótesis más larga.
Nota: El vástago de la Provox Vega XtraSeal es aproximadamente 1 mm más corto que
el tamaño indicado debido al reborde esofágico agrandado.
2.2 Procedimiento de sustitución anterógrada mediante
overshooting
(Figs. 3.1–3.10)
PRECAUCIÓN: Provox Vega XtraSeal con reborde esofágico agrandado deberá colocarse
con la técnica de overshooting con el fi n de garantizar que el reborde esofágico agrandado
adicional y el reborde esofágico se desplieguen dentro del esófago. «Overshooting»
significa que la totalidad de la prótesis se despliega en el esófago y, a continuación, se
retrae hasta la posición prevista.
Activación del sistema para la sustitución con overshooting
1. Sujete con una mano el tubo de carga y con la otra introduzca parcialmente la aguja
de inserción en el tubo de carga hasta que el anillo azul de la prótesis haya pasado
la marca del tubo de carga (fig. 3.1).
2. Apriete la guía entre los dedos pulgar e índice (fig. 3.2). Empújela más hacia dentro
del tubo de carga (fig. 3.3). La prótesis de voz Provox Vega XtraSeal estará lista para
su inserción con overshooting.
Inserción de la nueva prótesis en el lugar de la punción - overshooting
1. Exploración del orificio de la punción TE
Sujete el Provox SmartInserter en el tubo de carga. Introduzca suavemente la punta
del tubo de carga. Proceda con suavidad si encuentra resistencia durante la inserción
del tubo de carga en el orificio de punción. En estos casos la dilatación y/o lubricación
del orificio de punción puede facilitar la inserción.
35
2. «Inyección» de la prótesis
Sujete con una mano estable el tubo de carga en esta posición y, con la otra, avance
la aguja de inserción hasta que esté completamente insertada en el SmartInserter
(fig. 3.4). A medida que la guía vaya introduciéndose en el tubo de carga, la aguja de
inserción avanzará y dejará la prótesis de voz Provox Vega XtraSeal completamente
dentro del esófago.
3. Tracción de la prótesis hacia atrás
Tire del tubo de carga hacia fuera del orificio de la punción (fig. 3.5). Empuje la prótesis
de voz Provox Vega XtraSeal en el orificio de punción, agarrando y tirando del reborde
traqueal de la prótesis con un hemostato sin dientes (fig. 3.6).
4. Comprobación del ajuste adecuado
Compruebe si la prótesis y los rebordes están en el sitio adecuado girando y moviendo
la prótesis hacia atrás y hacia delante en el orificio de punción. Aplique una ligera
tracción en el reborde traqueal para garantizar una retención adecuada de la prótesis
de voz (fig. 3.7).
Precaución: Confi rme que ambos rebordes esofágicos se hayan desplegado por
completo dentro del esófago. Ninguna parte del reborde esofágico agrandado podrá
ser visible a lo largo del vástago de la prótesis de voz y, cuando se gire la prótesis de
voz, esta deberá moverse con libertad. Si gira la prótesis de voz al mismo tiempo que
la empuja ligeramente hacia al esófago, ayudará a desplegar por completo el reborde
agrandado. En caso de no estar seguro, utilice un endoscopio flexible para confi rmar
que la colocación dentro del esófago sea la adecuada.
5. Comprobación del funcionamiento adecuado
Compruebe que la prótesis funciona adecuadamente pidiendo al paciente que hable
(fig. 3.8) y observando la prótesis mientras el paciente bebe agua (fig. 3.9).
6. Corte del asa de seguridad con unas tijeras
Cuando haya confi rmado que la prótesis está en su sitio, coloque el extremo oval
del reborde traqueal señalando hacia abajo y utilice unas tijeras para cortar el asa
de seguridad del borde exterior del reborde (fig. 3.10). Ahora, la prótesis de voz está
lista para usarse.
2.3 Recarga del Provox SmartInserter
(Figs. 4.1 – 4.6)
Si el primer intento de insertar la prótesis de voz Provox Vega XtraSeal en el orificio
de punción TE no tiene éxito, se puede volver a cargar la Provox Vega XtraSeal en el
SmartInserter.
PRECAUCIÓN: No recargue el SmartInserter más de dos veces.
U
nr
eg
is
te
r
ed
co
py
Si la prótesis de voz Provox Vega XtraSeal muestra cualquier signo de daño, no la utilice.
1. Asegúrese de que la prótesis sigue bien unida a la aguja de inserción. En caso contrario,
asegure el asa de seguridad en la aguja de inserción dirigiendo el asa de seguridad
a través del orificio de fijación en la aguja de inserción (fig. 4.1).
2. Coloque la prótesis de voz Provox Vega XtraSeal encima de la aguja de inserción,
con el lado traqueal hacia abajo (fig. 4.2). Con el pulgar compruebe que la prótesis
de voz esté bien colocada.
3. Compruebe que el dispositivo plegable y la guía sigan encajadas en la posición
superior de la guía. En caso contrario, vuelva a montar el dispositivo plegable en la
guía (fig. 4.3). No empuje el dispositivo plegable a la posición inferior de la guía.
4. Suavemente, empuje la aguja de inserción con la prótesis unida dentro del dispositivo
plegable, hasta que oiga claramente un chasquido al llegar a su lugar (fig. 4.4). El
reborde esofágico de la prótesis se encontrará ahora en el mismo nivel que el dispositivo
plegable.
5. El reborde esofágico agrandado deberá colocarse de forma manual bajo las puntas
curvadas del dispositivo plegable (fig. 4.5).
NOTA: Si se omite este paso, la precarga de la prótesis de voz requerirá una fuerza
excesiva y esto podría dañar la prótesis de voz.
6. Coloque el tubo de carga en la parte superior del dispositivo plegable/guía (fig. 4.6),
de modo que las dos partes encajen haciendo un chasquido.
Ahora, la prótesis de voz Provox Vega XtraSeal está lista para su activación y puede
usarse como se describe en la sección «Procedimiento de sustitución anterógrada
mediante overshooting».
3. Información importante para el paciente
3.1 Información general
Asegúrese de que el paciente comprende que debe ponerse en contacto con el
facultativo si:
• Nota alguna fuga a través o alrededor de la prótesis (tos y/o cambio en el color del
moco).
• Nota dificultad para hablar (requiere mayor esfuerzo y/o la voz suena más forzada).
• Hay cualquier signo de inflamación o cambio tisular en la región de la punción o del
estoma (dolor, enrojecimiento, calor, inflamación, restos de sangre en el cepillo tras el
cepillado).
También debe informar al paciente de que:
• Tras la sustitución de la prótesis puede que presente restos de sangre en el esputo.
Es probable que provenga del tejido de granulación situado en los bordes de la
punción TE.
• En ocasiones, durante las primeras semanas tras la inserción de una nueva prótesis
puede presentarse una fuga leve a través o alrededor de la prótesis. Esta situación suele
resolverse de forma espontánea y no requiere sustitución inmediata de la prótesis.
• Si se produjese una fuga de forma espontánea a través de la prótesis, se puede conseguir
un bloqueo temporal con un Provox Vega Plug.
• Se recomienda acudir a sesiones de entrenamiento foniátrico con un facultativo
especializado, para conseguir un sonido de voz óptimo, una forma de hablar fluida y un
habla inteligible.
3.2 Mantenimiento de la prótesis
Indique al paciente cuándo y cómo limpiar la prótesis de voz Provox Vega XtraSeal. La
limpieza de la prótesis al menos dos veces al día puede ayudar a prolongar la vida útil
del dispositivo.
PRECAUCIÓN: Para limpiar la prótesis Provox Vega sólo se deben utilizar los
accesorios originales Provox indicados para tal efecto.
• El cepillado de la prótesis con el cepillo Provox Brush dos veces al día ayuda a retirar
el moco y los restos de comida de la prótesis.
36
• El lavado de la prótesis con Provox Flush también ayuda a limpiar los residuos y el
moco de la prótesis, lo cual ayuda a prolongar la vida útil del dispositivo.
Nota: Provox Flush está indicado para que lo usen sólo los pacientes que, según
evaluación del facultativo que prescriba el dispositivo, hayan demostrado ser capaces
de comprender y seguir adecuadamente las instrucciones de uso sin supervisión de
ningún facultativo.
• Se considera que ciertas pautas dietéticas, como la ingesta diaria de yogur o leche con
lactobacilos, pueden ser útiles frente al crecimiento excesivo de Candida.
Para obtener información detallada sobre cómo limpiar una Provox Vega, consulte las
instrucciones de cada accesorio.
3.3 Accesorios
PRECAUCIÓN: Sólo deben utilizarse los accesorios originales Provox indicados
para su uso con Provox Vega. Otros accesorios podrían dañar al paciente o podrían
alterar la función del producto.
Accesorios para facilitar la inserción de la prótesis (para uso del facultativo)
• Provox Dilator: ayuda a convertir una prótesis con un diámetro de vástago pequeño en
una prótesis de voz Provox de mayor diámetro.
• Provox GuideWire: para la colocación de una prótesis de voz Provox, Provox2 o
Provox Vega en una punción TE recién hecha, o para el cambio retrógrado de una
prótesis de voz Provox permanente.
Accesorios para mantener la función del dispositivo (para uso del paciente)
• El paciente debe utilizar el Provox Brush/Provox Brush XL para limpiar el interior
de la prótesis.
• Provox Flush es un dispositivo de limpieza adicional que permite lavar la prótesis.
• Provox Vega Plug es una herramienta de primeros auxilios que puede utilizar el
paciente y que bloquea temporalmente las fugas a través de la prótesis.
Otros productos complementarios que pueden utilizarse con las
prótesis de voz Provox
co
py
• Provox HME: intercambiador de calor y humedad, que restaura parcialmente las
funciones nasales perdidas (calentar, humidificar, ofrecer resistencia a la respiración).
• Provox FreeHands HME: intercambiador de calor y humedad combinado con una
válvula de traqueostoma automática, diseñado para permitir el habla sin utilizar las
manos.
• Provox LaryTube: cánula traqueal de silicona diseñada para evitar que se contraigan
los estomas, al mismo tiempo que sujeta otros dispositivos de rehabilitación del
sistema Provox.
• Provox LaryButton: cánula traqueal de autorretención, hecha de silicona blanda,
diseñada para evitar la contracción de los estomas al mismo tiempo que sujeta otros
dispositivos de rehabilitación del sistema Provox.
ed
4. Acontecimientos adversos/información sobre
el manejo de los problemas
Asociados a la prótesis
is
te
r
A continuación se exponen los posibles riesgos asociados a la rehabilitación vocal
con prótesis:
U
nr
eg
Fuga a través de la válvula – Se puede producir fuga a través de la válvula en asociación
con el sobrecrecimiento de Candida en la hoja de la válvula o el desplazamiento del anillo
radiopaco (asiento de la válvula). También puede ocurrir si el reborde esofágico de la
prótesis no está completamente solapado en el esófago o si la prótesis es demasiado corta.
Se debe hacer una exploración endoscópica para determinar si se produce cualquiera de
estos fenómenos. Si la prótesis se encuentra en la posición correcta y tiene la longitud
adecuada, y la fuga a través de la prótesis no se resuelve con la limpieza de la misma,
estaría indicada la sustitución de dicha prótesis.
Sobrecrecimiento de Candida – En casi todos los pacientes se produce sobrecrecimiento de
Candida en la prótesis. La radioterapia, el contenido de la saliva y los hábitos dietéticos pueden
influir en la rapidez con la que Candida puede afectar al material de silicona. El tratamiento
con fármacos antifúngicos podría considerarse una medida preventiva si el sobrecrecimiento
de Candida causase alguna fuga a través de la prótesis u otra incompetencia de la válvula.
Compatibilidad con los antifúngicos – Distintas sustancias químicas desconocidas
podrían influir inmediatamente en las propiedades del material que forma el dispositivo
o podrían ser absorbidas por dicho material para ser liberadas posteriormente. Por lo
tanto, la introducción de fármacos antifúngicos u otros fármacos directamente o en la
proximidad de la prótesis de voz debe evaluarse cuidadosamente.
Las pruebas de laboratorio han mostrado sólo una pequeña influencia negativa sobre
la función de la prótesis de voz Provox Vega y sus componentes cuando se administran
los siguientes fármacos antifúngicos:
• Nistatina
• Fluconazol
• Miconazol
Asociados a la punción
Aspiración de la prótesis – Se puede producir una aspiración accidental de la prótesis
de voz u otros componentes del sistema de rehabilitación vocal. Los síntomas inmediatos
serían arcadas, tos, asfi xia o dificultad para respirar. Como ocurre con otros cuerpos
extraños, las complicaciones por la aspiración de un componente pueden causar obstrucción
o infección. Entre las complicaciones se incluye neumonía, atelectasia, bronquitis, absceso
pulmonar, fístula broncopulmonar y asma. Si el paciente puede respirar, la tos puede
ayudar a expulsar el cuerpo extraño. La obstrucción de la vía aérea, parcial o completa,
requiere la intervención inmediata para retirar el objeto.
Ingesta de la prótesis – Se puede producir una ingesta accidental de la prótesis de voz u
otros componentes del sistema de rehabilitación vocal. Como ocurre con cualquier otro
cuerpo extraño, los síntomas causados por la ingesta de la prótesis o los componentes del
sistema de rehabilitación vocal dependen en gran medida del tamaño, localización, grado
de obstrucción (si la hay) y tiempo transcurrido desde dicha ingesta. Los componentes
ingeridos que permanezcan en la parte inferior del esófago pueden extraerse mediante
esofagoscopia o pueden observarse durante un breve periodo de tiempo. El objeto puede
37
pasar espontáneamente al estómago; los cuerpos extraños que pasan al estómago suelen
pasar después al tracto intestinal. Se debe considerar la retirada quirúrgica de los cuerpos
extraños en el tracto intestinal cuando se produce obstrucción intestinal, sangrado o
perforación, o cuando el objeto no logra salir del tracto intestinal.
Hemorragia/sangrado en el lugar de la punción – Se puede producir un ligero sangrado
de los bordes de la punción TE durante la sustitución de la prótesis, y generalmente se
resuelve de manera espontánea. Sin embargo, en los pacientes que reciben tratamiento
anticoagulante se debe evaluar cuidadosamente el riesgo de hemorragia antes de la
colocación o sustitución de la prótesis.
Infección y/o edema de la punción TE – La aparición de infección y la formación de
granulación y/o edema en el lugar de la punción (p. ej., durante la radioterapia) puede
aumentar la longitud del tracto del orificio de punción. Esto puede hacer que la prótesis
sea arrastrada hacia el interior y debajo de la mucosa traqueal o esofágica. Por otra parte,
la inflamación o el sobrecrecimiento de la mucosa esofágica podrían hacer que la prótesis
sobresalga del orificio de punción. En ese caso es recomendable la sustitución temporal de
la prótesis por una prótesis con un vástago más largo. Para el tratamiento de la infección
se puede considerar la administración de antibióticos de amplio espectro, con o sin
corticosteroides. Si la infección no se resuelve con la intervención de los antibióticos y/o los
corticosteroides en presencia de la prótesis, se debe proceder a la extracción de la misma. En
algunos casos se puede considerar mantener abierto el orificio de la punción con un catéter.
Si el orificio de la punción se cerrase de forma espontánea tras la retirada de la prótesis,
podría ser necesario volver a hacer la punción para la inserción de una nueva prótesis.
Granulación alrededor del orificio de punción – Se ha observado formación de tejido
de granulación alrededor del orificio de punción TE con una incidencia del 5 %. En este
caso se puede considerar la cauterización eléctrica, química o con láser en el área de
granulación.
Cicatriz hipertrófica alrededor del orificio de la punción – Si la prótesis es relativamente
corta se puede producir una protrusión de la mucosa traqueal sobre el reborde traqueal.
Este tejido excesivo puede retirarse utilizando un láser (CO2 o NdYAG). Como alternativa,
se puede utilizar una prótesis con un vástago más largo.
Protrusión/expulsión de la prótesis – En ocasiones se observa protrusión de la prótesis,
y la consiguiente expulsión posterior, en caso de infección del orificio de punción TE.
Es necesario retirar la prótesis para evitar el desplazamiento hacia la tráquea. El orificio
de punción puede cerrarse espontáneamente tras la retirada de la prótesis. Podría ser
necesario volver a hacer la punción para la inserción de una nueva prótesis.
U
nr
eg
is
te
r
ed
co
py
Fuga alrededor de la prótesis – Se puede producir una fuga transitoria alrededor
de la prótesis, asociada a una mejoría espontánea. El motivo más habitual es que la
prótesis sea demasiado larga, lo cual se resuelve insertando una prótesis más corta. Una
prótesis de otro diámetro (mayor) también podría resolver la fuga. Esto también puede
ocurrir cuando el reborde agrandado del Provox Vega XtraSeal no se haya desplegado
por completo en el esófago. Ninguna parte del reborde esofágico agrandado podrá ser
visible a lo largo del vástago de la prótesis de voz y, cuando se gire la prótesis de voz, esta
deberá moverse con libertad. Si gira la prótesis de voz al mismo tiempo que la empuja
ligeramente hacia al esófago, ayudará a desplegar por completo el reborde agrandado. En
caso de no estar seguro, utilice un endoscopio flexible para confi rmar que la colocación
dentro del esófago sea la adecuada.
Si la situación de la fuga no mejora (lo que a menudo ocurre de forma espontánea),
puede usarse Provox XtraFlange. Otros métodos para solucionar fugas alrededor de la
prótesis de voz son la extracción temporal de la prótesis y la inserción de una cánula
traqueal con manguito o una sonda de alimentación nasogástrica para permitir la
contracción del orificio de punción. Otra alternativa es la aplicación submucosa de una
sutura en bolsa de tabaco con hilo 3x0 absorbible alrededor del orificio de la punción TE
tras la retirada de la prótesis. Tras insertar una nueva prótesis, la sutura debe apretarse
suavemente, cerrando las paredes del orificio de punción alrededor de la prótesis. Si la
fuga alrededor de la prótesis no pudiese tratarse, podrían ser necesarias medidas más
conservadoras, el cierre quirúrgico del orificio de punción y posteriormente la realización
de una nueva punción.
Daño tisular – Si la prótesis fuese demasiado corta, demasiado larga o si se empujase
frecuentemente contra la pared esofágica con una cánula traqueal, un anillo para el estoma
o el dedo del paciente, se podría producir un daño en el tejido esofágico y/o traqueal del
orificio de la punción. En pacientes que reciben radioterapia esto podría ocurrir con más
frecuencia, por lo que se debe evaluar su estado regularmente para evitar un daño grave.
5. Información adicional
5.1 Compatibilidad con la RMN, las radiografías y la
radioterapia
Se han hecho estudios con las prótesis de voz Provox y se ha observado que, excepto la
Provox ActiValve, son compatibles con las técnicas de imagen por resonancia magnética
(evaluada hasta 3,0 Tesla), radiografía y radioterapia (evaluada hasta 70 Gy). La prótesis
puede dejarse en el orificio de punción TE durante la sesión de exploración/tratamiento.
Hay que tener en cuenta que el asiento de la válvula radiopaco es visible en las radiografías.
5.2 Vida útil del dispositivo
La vida útil del dispositivo puede variar dependiendo de las circunstancias biológicas
individuales y no es posible predecir la integridad del dispositivo para un periodo de
tiempo prolongado. El material del dispositivo se verá afectado por bacterias y hongos
y la integridad estructural del mismo acabará deteriorándose.
5.3 Información de asistencia al usuario
Para obtener más ayuda o información, consulte la información de contacto en la
contraportada de las instrucciones de uso.
38
PORTUGUÊS
Ilustrações
1. Prótese fonatória Provox® Vega™ XtraSeal™
a) Informação sobre os tamanhos (diâmetro e comprimento da haste entre
flanges)
b) Cobertura da prótese
c) Flange esofágica
d) Flange traqueal
e) Fita de segurança
f ) Aba da válvula
g) Haste da prótese
h) Encaixe da válvula fluoroplástico radiopaco
i) Flange esofágica alargada adicional
2. Sistema SmartInserter™
a) Guia
b) Lado de ligação
c) Dispositivo de Dobra
d) Ponta distal
e) Pino de Inserção
f ) Prótese fonatória
g) Tubo de carga
h) Marcador escalonado
i) Ponta
Provox® Vega™ XtraSeal™
co
py
As instruções de utilização que acompanham este produto podem ser revistas
periodicamente e, portanto, devem ser consultadas antes de cada procedimento que
envolva a utilização do produto.
ed
Índice
U
nr
eg
is
te
r
1. Descrição ..............................................................................................................................................39
1.1 Utilização prevista ......................................................................................................................39
1.2 Descrição do dispositivo ..........................................................................................................39
1.3 CONTRA-INDICAÇÕES .............................................................................................................40
1.4 ADVERTÊNCIAS............................................................................................................................40
1.5 PRECAUÇÕES................................................................................................................................40
2. Instruções de utilização ...................................................................................................................40
2.1 Preparação ....................................................................................................................................40
2.2 Procedimento de substituição anterógrada utilizando a inserção
total da prótese no esófago....................................................................................................40
2.3 Recarga do Provox SmartInserter .........................................................................................41
3. Informações importantes para o doente ..................................................................................41
3.1 Informações gerais .....................................................................................................................41
3.2 Manutenção da prótese ...........................................................................................................41
3.3 Acessórios......................................................................................................................................42
4. Eventos adversos/Informações sobre a resolução de problemas ....................................42
5. Outras informações ...........................................................................................................................43
5.1 Compatibilidade com ressonância magnética, raio-X e radioterapia .....................43
5.2 Período de vida do dispositivo ..............................................................................................43
5.3 Informações para a assistência ao utilizador ....................................................................43
1. Descrição
1.1 Utilização prevista
A prótese fonatória Provox Vega é uma prótese fonatória interna, estéril, de uso único,
destinada à reabilitação de voz após remoção cirúrgica da laringe (laringectomia). A
limpeza da prótese fonatória é feita pelo Doente enquanto permanecer colocada.
O Provox SmartInserter é um dispositivo estéril de uso único para a substituição
anterógrada da prótese fonatória Provox Vega. Este procedimento de substituição é
levado a cabo por um médico ou por um profissional médico formado de acordo com as
directrizes locais ou nacionais.
O Provox SmartInserter não se destina a ser utilizado para inserção de uma prótese
fonatória num orifício de punção acabado de fazer.
1.2 Descrição do dispositivo
Geral
A Provox Vega é uma válvula de uma via (prótese) que mantém o orifício de punção TE
aberto para a fala, reduzindo ao mesmo tempo o risco de entrada de fluidos e alimentos
para dentro da traqueia. A prótese fonatória Provox Vega não é um implante permanente e
necessita de substituição periódica. A prótese (Fig. 1) está disponível em diferentes diâmetros
e em vários comprimentos. A Provox Vega XtraSeal tem uma flange esofágica alargada
adicional que se destina a resolver os problemas de fugas em torno da prótese fonatória.
O dispositivo é feito de borracha de silicone e plástico fluorado de categoria médica.
39
Embalagem de Provox Vega XtraSeal
A embalagem do Provox Vega XtraSeal contém os seguintes itens:
• 1 Prótese fonatória Provox Vega XtraSeal, pré-carregada num SmartInserter de
utilização única, estéril (Fig. 2)
• 1 Provox Brush (escova) de um tamanho correspondente à prótese fonatória, não estéril
• 1 Manual do Clínico do Provox Vega XtraSeal
• 1 Manual do Doente do Provox Vega
• 1 Instruções de Utilização da Provox Brush
1.3 CONTRA-INDICAÇÕES
Não existem contra-indicações conhecidas para a utilização ou substituição da prótese
fonatória Provox Vega em doentes que já estejam a utilizar reabilitação da voz.
1.4 ADVERTÊNCIAS
Poderá ocorrer desalojamento ou extrusão da prótese fonatória ProvoxVega do orifício
de punção TE e subsequente ingestão, aspiração ou danos nos tecidos. Para mais
informações sobre estes eventos, consultar a secção Eventos adversos/Informações
sobre a resolução de problemas abaixo.
Para reduzir o risco de desalojamento/extrusão e suas potenciais sequelas:
• Seleccione o tamanho de prótese adequado. Uma prótese muito apertada pode provocar
necrose dos tecidos e extrusão.
• Dê instruções ao doente para consultar um médico imediatamente se houver algum
sinal de edema e/ou inflamação/infecção no tecido.
• Se utilizado, opte por tubos de laringectomia ou botões de estoma com um formato
adequado que não exerçam pressão sobre a prótese nem prendam na flange traqueal da
prótese durante a inserção e remoção do tubo de laringectomia ou botão de estoma.
• Dê instruções ao doente para utilizar unicamente acessórios genuínos Provox do
tamanho correspondente (Brush, Flush, Plug) para a manutenção e evitar todos os
outros tipos de manipulação.
• A reutilização e o reprocessamento podem causar contaminação cruzada e danificar o
dispositivo, o que poderá provocar lesões no doente.
1.5 PRECAUÇÕES
co
py
• Examine cuidadosamente qualquer doente com perturbações hemorrágicas ou que
esteja a fazer terapêutica com anticoagulantes quanto ao risco de sangramento ou
hemorragia antes da colocação ou substituição da prótese.
• Inspeccione a embalagem antes de usar. Não utilize o produto se este estiver danificado
ou aberto.
• Utilize sempre uma técnica asséptica quando manusear a prótese para reduzir o risco
de infeção.
• Certifique-se de que quaisquer dispositivos de fixação externos ou internos do estoma
utilizados não exercem pressão nem prendem na flange da prótese (por exemplo, discos
de base HME, tubos de laringectomia ou botões de estoma). Isto pode provocar lesões
graves nos tecidos e/ou a ingestão acidental da prótese.
ed
2. Instruções de utilização
te
r
2.1 Preparação
is
Escolher o tamanho certo da prótese de substituição
nr
eg
Certifique-se de que utiliza a prótese fonatória Provox Vega XtraSeal com o diâmetro e
comprimento de haste adequados. A Provox Vega XtraSeal está disponível em diferentes
combinações de comprimento/diâmetro.
U
• Selecionar o diâmetro da haste
O clínico deve determinar o diâmetro adequado da prótese apropriada para o doente.
• Se o diâmetro seleccionado for maior do que a prótese anterior, o tracto deve
ser dilatado utilizando o Provox Dilator apropriado ao diâmetro da prótese a ser
inserida.
• Se for inserida uma prótese com um diâmetro de haste menor, observe e certifiquese de que a punção encolhe até ao diâmetro adequado.
• Selecionar o comprimento da haste
Para seleccionar o comprimento correcto, pode usar a prótese actual como dispositivo
de medição. Se houver espaço a mais (isto é, 3 mm / ~0,12 polegadas, ou mais) entre
a Flange Traqueal da antiga prótese e a parede mucosa, deve usar-se uma prótese mais
pequena. Se a prótese ficar muito apertada, deve usar-se uma prótese mais curta.
Nota: A haste da Provox Vega XtraSeal é cerca de 1 mm mais pequena do que o tamanho
indicado devido à flange esofágica alargada.
2.2 Procedimento de substituição anterógrada utilizando
a inserção total da prótese no esófago
(Fig. 3.1 – 3.10)
ATENÇÃO: A Provox Vega XtraSeal com flange esofágica alargada tem de ser colocada
utilizando a técnica de inserção total no esófago para garantir que a flange esofágica
alargada adicional e a flange esofágica são ambas colocadas no interior do lúmen esofágico.
A inserção total da prótese no esófago significa que toda a prótese é colocada no esófago
e depois recuada para a posição pretendida.
Ativação do sistema para substituição utilizando a inserção total da
prótese no esófago
1. Com uma mão no tubo de carga, empurre o pino de inserção com a outra mão
parcialmente para dentro do tubo de carga, até o anel azul da prótese ter passado o
marcador escalonado no tubo de carga (Fig. 3.1).
2. Aperte a Guia entre o polegar o indicador (Fig. 3.2). Empurre mais para dentro do tubo
de carga (Fig. 3.3). A prótese fonatória Provox Vega XtraSeal está agora preparada
para inserção com introdução excessiva.
Inserção da prótese nova no orifício de punção - Introdução excessiva
1. Sondagem do orifício de punção TE
Segure no Provox SmartInserter pelo Tubo de Carga. Introduza delicadamente a
ponta do tubo de carga. Proceder com cuidado se encontrar resistência durante a
inserção do tubo de carga dentro do orifício de punção. Neste caso, a dilatação e/ou
lubrificação da punção podem facilitar a inserção.
40
2. “Injecção” da prótese
Mantenha o tubo de carregamento estável nesta posição e use a outra mão para fazer
avançar o pino de inserção até estar totalmente inserido no SmartInserter (Fig. 3.4).
À medida que a Guia vai sendo introduzida no Tubo de Carga, o Pino de Inserção
avança mais para dentro do Tubo de Carga, libertando a prótese fonatória Provox
Vega XtraSeal completamente dentro do esófago.
3. Puxar a prótese para trás
Puxe o Tubo de Carga para fora do orifício de punção (Fig. 3.5). Puxe a prótese fonatória
Provox Vega XtraSeal para trás, para dentro do orifício de punção, agarrando e puxando
a flange traqueal da prótese com uma pinça hemostática não dentada (Fig. 3.6).
4. Verificação do encaixe correcto
Examine se a prótese e as flanges estão na posição adequada, rodando e movendo
a prótese para trás e para a frente na punção. Aplique uma ligeira tração na flange
traqueal para garantir a retenção adequada da prótese fonatória (Fig. 3.7).
Atenção: Confi rme que ambas as flanges esofágicas foram totalmente colocadas no
lúmen do esófago. Nenhuma parte da flange alargada deverá ser visível ao longo da
haste da prótese fonatória, devendo esta prótese, quando rodada, mover-se livremente.
A rotação da prótese fonatória ao mesmo tempo que a empurra ligeiramente em
direção ao esófago pode ajudar a que a flange alargada se desdobre na totalidade. Em
caso de incerteza, utilize a endoscopia flexível para confi rmar a colocação correta
no interior do esófago.
5. Testar para ver se está a funcionar correctamente
Teste se a prótese está a funcionar correctamente pedindo ao doente para falar
(Fig. 3.8) e observando a prótese enquanto o doente bebe água (Fig. 3.9).
6. Corte a Fita de Segurança com a tesoura
Quando for confi rmado que a prótese está colocada, posicione a extremidade oval da
flange traqueal de modo a que fique a apontar para baixo e corte a fita de segurança
no bordo externo da flange com uma tesoura (Fig. 3.10). A prótese fonatória está
agora pronta para utilização.
2.3 Recarga do Provox SmartInserter
(Fig. 4.1 – 4.6)
Se a primeira tentativa para inserir a prótese fonatória Provox Vega XtraSeal no orifício
de punção TE não foi bem sucedida, é possível recarregar a Provox Vega XtraSeal no
SmartInserter.
ATENÇÃO: Não recarregar o SmartInserter mais de 2 vezes.
U
nr
eg
is
te
r
ed
co
py
Se a prótese fonatória Provox Vega XtraSeal apresentar algum sinal de danos, não a utilize.
1. Certifique-se de que a prótese continua bem presa ao Pino de Inserção. Caso contrário,
fi xe a Fita de Segurança sobre o Pino de Inserção, conduzindo a Fita de Segurança
através do Orifício de Fixação no Pino de Inserção (Fig. 4.1).
2. Coloque a prótese fonatória Provox Vega XtraSeal com o lado traqueal para baixo
em cima do Pino de Inserção (Fig. 4.2). Utilize o polegar para certificar-se de que a
prótese fonatória está devidamente posicionada.
3. Certifique-se de que o Dispositivo de Dobra e a Guia continuam montados na posição
superior da Guia. Se não for o caso, volte a montar o dispositivo de dobragem dentro
do guia (Fig. 4.3). Não empurre o Dispositivo de Dobra na posição inferior da Guia.
4. Puxe cuidadosamente o Pino de Inserção com a prótese agarrada para dentro do
Dispositivo de Dobra até ouvir um estalido distinto indicando que encaixou no lugar
(Fig. 4.4). A Flange Esofágica da prótese está agora nivelada com o Dispositivo de
Dobra.
5. A flange esofágica alargada tem de ser posicionada manualmente abaixo das pontas
curvadas do dispositivo de dobragem (Fig. 4.5).
NOTA: Se este passo for omitido, o pré-carregamento da prótese fonatória exigirá
demasiada força e poderá danificar a prótese fonatória.
6. Prenda o Tubo de Carga à parte de cima do Dispositivo de Dobra/Guia. (Fig. 4.6) e
deixe as duas partes encaixarem uma na outra.
A prótese fonatória Provox Vega XtraSeal está agora pronta para ativação e pode
ser utilizada, tal como foi descrito na secção “Procedimento de substituição
anterógrada utilizando a inserção total da prótese no esófago”.
3. Informações importantes para o doente
3.1 Informações gerais
Certifique-se de que o doente percebe que tem que contactar o seu clínico se:
• Houver fuga através da prótese ou à volta desta (tosse e/ou mudança da cor do muco)
• A fala se tornar mais difícil (esforço maior e/ou voz soa mais esforçada)
• Houver sinais de inflamação ou mudanças nos tecidos no local da punção ou na região
do estoma (dor, vermelhidão, calor, inchaço, vestígios de sangue na escova depois de
escovar)
Informe ainda o doente que:
• Depois de uma substituição da prótese se poderão encontrar vestígios de sangue na
expectoração. Pode dever-se ao tecido de granulação nos rebordos da punção TE.
• Ocasionalmente, poderá haver uma fuga ligeira através da prótese ou à volta desta
nas primeiras semanas depois da inserção de uma nova prótese. Tal resolve-se
frequentemente de forma espontânea e não requer substituição imediata da prótese.
• Se ocorrer uma fuga espontânea através da prótese, poderá fazer-se um bloqueio
temporário com um Provox Vega Plug.
• Aconselham-se sessões de treino da fala com um clínico formado para aquisição de som de
voz óptimo, discurso fluente e óptima inteligibilidade.
3.2 Manutenção da prótese
Informe o doente sobre quando e como limpar a prótese fonatória Provox Vega XtraSeal.
A limpeza da prótese pelo menos duas vezes por dia pode ajudar a prolongar a vida útil
do dispositivo.
ATENÇÃO: Utilize apenas acessórios genuínos Provox destinados a serem utilizados
com a Provox Vega quando limpar a prótese.
• Escovar a prótese com a Provox Brush duas vezes por dia ajudará a remover o muco e
restos de comida da prótese.
• Lavar a prótese com o Provox Flush ajuda também a limpar os resíduos e muco da
prótese, o que contribui para aumentar a vida útil do dispositivo.
Nota: O Provox Flush destina-se a ser utilizado unicamente por doentes cuja avaliação
feita pelo médico que prescreve o dispositivo, os tenha considerado aptos a perceber e
a seguir consistentemente as instruções de utilização sem supervisão clínica.
41
• Algumas medidas relacionadas com o regime alimentar, como a ingestão diária
de iogurte ou soro de leite coalhado, são consideradas úteis contra o crescimento
excessivo de Candida.
Para obter informação mais detalhada sobre a limpeza da Provox Vega, consulte as
instruções de utilização para cada acessório.
3.3 Acessórios
ATENÇÃO: Utilize apenas acessórios genuínos Provox destinados a serem utilizados
com a Provox Vega. Outros acessórios poderão provocar lesões no doente ou mau
funcionamento do produto.
Acessórios para facilitar a inserção da prótese (para uso do clínico)
• Provox Dilator: Ajuda a converter uma prótese com uma haste de diâmetro mais
pequeno numa prótese fonatória Provox com um diâmetro maior.
• Provox GuideWire: para colocação de uma prótese fonatória Provox, Provox2 ou
Provox Vega numa punção TE acabada de fazer ou para substituição retrógrada de uma
prótese fonatória interna Provox.
Acessórios para manutenção da função do dispositivo (para uso do doente)
• Provox Brush / Provox Brush XL é utilizada pelo doente para limpar o interior da
prótese.
• Provox Flush é um dispositivo de limpeza adicional que permite lavar a prótese.
• Provox Vega Plug é uma ferramenta de primeiros socorros para uso pelo doente que
bloqueia temporariamente fugas através da prótese.
Outros produtos suplementares que podem ser usados com a prótese
de voz Provox
• Provox HME: O Permutador de Calor e Humidade restaura parcialmente funções
nasais perdidas (aquecimento, humidificação, resistência respiratória).
• Provox FreeHands HME: Um Permutador de Calor e Humidade combinado com
uma válvula de traqueostoma automática, concebido para permitir a fala mãos livres.
• Provox LaryTube: Uma cânula traqueal de silicone que se destina a apoiar estomas
que estão a atrofiar, retendo simultaneamente outros dispositivos de reabilitação do
Provox System.
• Provox LaryButton: Uma cânula traqueal de silicone flexível e de auto-retenção
que se destina a apoiar estomas que estão a atrofiar, retendo simultaneamente outros
dispositivos de reabilitação do Provox System.
co
py
4. Eventos adversos/Informações sobre a
resolução de problemas
O que se segue são riscos possíveis associados à reabilitação de voz com prótese:
Relacionados com a prótese
eg
is
te
r
ed
Fuga através da válvula – A fuga através da prótese pode ocorrer associada ao crescimento
excessivo de Candida na aba da válvula ou desalojamento do anel radiopaco (sede da
válvula). Pode também ocorrer se a flange esofágica da prótese não for totalmente
desenvolvida no lúmen do esófago ou se a prótese for demasiado curta. Deverá fazer-se
um exame endoscópico para determinar se houve ocorrência de algum destes fenómenos.
Se a prótese estiver na posição correcta e se tiver o comprimento certo, e se a limpeza
da prótese não resolver a fuga através da prótese, é indicada a substituição da prótese.
U
nr
Crescimento excessivo de Candida – O crescimento excessivo de Candida na prótese ocorre
em quase todos os doentes. A radioterapia, o conteúdo salivar e os hábitos alimentares podem
influenciar a rapidez com que a Candida pode afectar o material de silicone. O tratamento com
agentes antifúngicos pode ser considerado como uma medida de prevenção se o crescimento
excessivo de Candida provocar fugas através da prótese ou outra incompetência da válvula.
Compatibilidade com medicamentos antifúngicos – Uma variedade desconhecida
de substâncias químicas pode influenciar imediatamente as propriedades materiais do
dispositivo ou pode ser absorvida pelo material e subsequentemente libertada mais tarde.
Por conseguinte, a introdução de medicamentos ou fármacos antifúngicos directamente
na prótese fonatória ou perto desta deve ser cuidadosamente analisada.
Testes laboratoriais demonstram apenas influência negativa menor sobre a função
da prótese fonatória Provox Vega e dos componentes quando se utilizam os seguintes
medicamentos antifúngicos:
• Nistatina
• Fluconazol
• Miconazol
Relacionados com o orifício de punção
Aspiração da prótese – Pode ocorrer aspiração acidental da prótese fonatória ou de
outros componentes do sistema de reabilitação de voz. Os sintomas imediatos podem
incluir vómitos, tosse, sufocação ou pieira. Tal como acontece com qualquer outro corpo
estranho, as complicações de aspiração de um componente podem causar obstrução ou
infecção. As complicações podem incluir pneumonia, atelectasia, bronquite, abcesso
pulmonar, fístula broncopulmonar e asma. Se o doente conseguir respirar, a tosse pode
remover o corpo estranho. A obstrução parcial das vias aéreas ou a obstrução completa
das vias aéreas requer intervenção imediata para remover o objecto.
Ingestão da prótese – Pode ocorrer ingestão acidental da prótese fonatória ou de outros
componentes do sistema de reabilitação de voz. Tal como acontece com qualquer outro
corpo estranho, os sintomas causados pela ingestão da prótese ou componente do sistema
de reabilitação de voz dependem largamente do tamanho, da localização, do grau de
obstrução (se houver) e de há quanto tempo existe. Os componentes ingeridos que
permaneceram na parte inferior do esófago podem ser retirados por esofagoscopia ou
observados durante um curto período de tempo. O objecto pode passar espontaneamente
para o estômago; os corpos estranhos que passam para o estômago geralmente passam
através do tracto intestinal. Terá que se considerar a remoção cirúrgica de corpos estranhos
no tracto intestinal quando há ocorrência de obstrução intestinal, hemorragia, ocorrência
de perfuração ou o objecto não consegue passar através do tracto intestinal.
42
Hemorragia/Sangramento do orifício de punção – Poderá ocorrer uma ligeira hemorragia
nos rebordos do orifício de punção TE durante a substituição da prótese e geralmente
resolve-se espontaneamente. Os doentes a fazer terapêutica com anticoagulantes devem no
entanto ser cuidadosamente avaliados quanto ao risco de hemorragia antes da colocação
ou substituição da prótese.
Infecção e/ou edema do orifício de punção TE – Infecção, formção de granulação e/
ou edema do orifício de punção (por exemplo, durante radioterapia) podem aumentar
o comprimento do tracto do orifício de punção. Isto pode fazer com que a prótese seja
arrastada para dentro, sob a mucosa traqueal ou esofágica. Ou inflamação ou crescimento
excessivo da mucosa esofágica pode fazer com que a prótese fique saliente em relação ao
orifício de punção. A substituição temporária da prótese por uma prótese com uma haste
mais comprida é nesse caso aconselhável. O tratamento com antibiótico de largo espectro
com ou sem corticosteróides pode ser considerado para tratamento da infecção. Se a
infecção não se resolver com antibióticos e/ou intervenção de corticosteróides na presença
da prótese, a prótese deve ser retirada. Em alguns casos poderá considerar-se o stenting
do orifício de punção com um cateter. Se o orifício de punção fechar espontaneamente
a seguir à remoção da prótese, poderá ser necessário repetir o orifício de punção para
inserção de uma nova prótese.
Granulação à volta do orifício de punção – Foi comunicada a formação de tecido
de granulação à volta do orifício de punção TE, com uma incidência de 5%. Poderá
considerar-se a cauterização eléctrica, química ou a laser da área de granulação.
Cicatrização hipertrófica à volta do orifício de punção – Poderá ocorrer proeminência
da mucosa traqueal sobre a flange traqueal se a prótese for relativamente curta. Este
tecido em excesso pode ser eliminado com um laser (CO2 ou NdYAG). Em alternativa,
poderá utilizar-se uma prótese com uma haste mais comprida.
Protrusão/extrusão da prótese – A protrusão da prótese e subsequente extrusão espontânea
é por vezes observada durante a infecção do orifício de punção TE. É necessário retirar
a prótese para evitar o desalojamento para dentro da traqueia. O orifício de punção pode
fechar espontaneamente a seguir à remoção da prótese. Poderá ser necessário repetir o
orifício de punção para inserção de uma nova prótese.
eg
is
te
r
ed
co
py
Fuga em torno da prótese – Pode ocorrer fuga transitória à volta da prótese e pode
melhorar espontaneamente. A razão mais comum é o comprimento excessivo da prótese,
o que se resolve introduzindo uma prótese mais curta. Uma prótese com outro diâmetro
(maior) pode também resolver a fuga. Poderão também ocorrer fugas quando a flange
alargada da Provox Vega XtraSeal não foi totalmente colocada dentro do lúmen esofágico.
Nenhuma parte da flange alargada deverá ser visível ao longo da haste da prótese fonatória,
devendo esta prótese, quando rodada, mover-se livremente. A rotação da prótese fonatória
ao mesmo tempo que a empurra ligeiramente em direção ao esófago pode ajudar a que
a flange alargada se desdobre na totalidade. Em caso de incerteza, utilize a endoscopia
flexível para confi rmar a colocação correta no interior do esófago.
Se a fuga não melhorar (o que muitas vezes ocorre espontaneamente), poderá utilizar-se
uma Provox XtraFlange. Outros métodos para resolver a fuga em torno da prótese
fonatória são a remoção temporária da prótese e a inserção de uma cânula traqueal com
“cuff” e/ou tubo de alimentação nasogástrico para permitir que a punção encolha. Em
alternativa, poderá aplicar-se uma sutura em bolsa de tabaco com material absorvente
3x0, submucosamente, à volta da punção TE após remoção da prótese. A nova prótese
deve ser inserida e a sutura deve ser apertada com cuidado, encerrando as paredes do
orifício de punção à volta da prótese. Se a fuga à volta da prótese for persistente, poderão
ser necessárias medidas mais conservadoras, fecho cirúrgico do orifício de punção e
subsequente repetição da punção.
U
nr
Lesões dos tecidos – Se a prótese for demasiado curta, demasiado comprida ou for
frequentemente empurrada contra a parede esofágica por uma cânula traqueal, botão de
estoma, ou dedo do doente, os tecidos do orifício de punção, traqueais e/ou esofágicos
podem sofrer lesões. Nos doentes que estão a fazer radioterapia isto pode acontecer mais
facilmente. Inspeccione regularmente as condições para evitar lesões graves.
5. Outras informações
5.1 Compatibilidade com ressonância magnética, raio-X e
radioterapia
As próteses fonatórias Provox foram testadas, tendo sido consideradas compatíveis,
à excepção de Provox ActiValve, com exames de ressonância magnética (testado até
3,0 Tesla), raio-x e radioterapia (testado até 70 Gy). A prótese pode ser deixada na punção
traqueoesofágica durante a sessão de exame/terapêutica. Note que a sede da válvula
radiopaca é visível a raio-x.
5.2 Período de vida do dispositivo
O período de vida do dispositivo pode variar consoante as circunstâncias biológicas
individuais, e não é possível prever a integridade do dispositivo ao longo de um período
de tempo maior. O material do dispositivo será afectado por, por exemplo, bactérias e
leveduras, e a integridade estrutural do dispositivo acabará por se deteriorar.
5.3 Informações para a assistência ao utilizador
Para obter ajuda ou informações adicionais, consulte a informação de contacto na
contracapa destas instruções de utilização.
43
SVENSKA
Illustrationer
1. Provox® Vega™ röstventil
a) Storleksinformation (diameter på ventilskaft och längd mellan flänsarna)
b) Ventilskydd
c) Esofagusfläns
d) Trakealfläns
e) Säkerhetsstropp
f ) Ventillock
g) Ventilskaft
h) Ventilsäte av röntgentät fluorplast
i) Extra, förstorad esofagusfläns
2. SmartInserter™-systemet
a) Guide
b) Korg
c) Vikningsenhet
d) Distal spets
e) Införare
f ) Röstventil
g) Laddningsrör
h) Stegmarkering
i) Spets
Provox® Vega™ XtraSeal™
co
py
Den bruksanvisning som medföljer produkten kan med jämna mellanrum uppdateras
och ska därför läsas igenom före varje ingrepp där produkten används.
Innehåll
U
nr
eg
is
te
r
ed
1. Beskrivning..........................................................................................................................................44
1.1 Användningsområde ...............................................................................................................44
1.2 Beskrivning av ventilen ...........................................................................................................44
1.3 KONTRAINDIKATIONER ..........................................................................................................45
1.4 VARNINGAR ..................................................................................................................................45
1.5 FÖRSIKTIGHETSÅTGÄRDER ....................................................................................................45
2. Bruksanvisning...................................................................................................................................45
2.1 Förberedelser ..............................................................................................................................45
2.2 Byte med anterograd insättning med överskjutning ...................................................45
2.3 Ladda om Provox SmartInserter ..........................................................................................46
3. Viktig patientinformation ..............................................................................................................46
3.1 Allmän information...................................................................................................................46
3.2 Skötsel av röstventil ..................................................................................................................46
3.3 Tillbehör ........................................................................................................................................46
4. Problem/felsökning .........................................................................................................................47
5. Ytterligare information ...................................................................................................................48
5.1 Kompatibilitet med MRT-, röntgen- och strålbehandling ..........................................48
5.2 Röstventilens livslängd............................................................................................................48
5.3 Kontaktinformation ..................................................................................................................48
1. Beskrivning
1.1 Användningsområde
Provox Vega röstventil är en steril, icke återanvändbar och stationär ventil för
röstrehabilitering efter att struphuvudet opererats bort (laryngektomi). Patienten rengör
röstventilen medan den sitter på plats.
Provox SmartInserter är ett sterilt införingsverktyg av engångstyp för byte av Provox
Vega röstventil framifrån. Utbytesförfarandet utförs av läkare eller annan utbildad
medicinsk personal i enlighet med lokala eller nationella riktlinjer.
Provox SmartInserter är inte avsett att användas vid insättning av röstventil vid
operationstillfället.
1.2 Beskrivning av ventilen
Allmänt
Provox Vega är en envägsventil som håller en TE-fistel öppen för tal, samtidigt som
den minskar risken för att vätska och mat hamnar i trakea. Provox Vega röstventil är
inte ett permanent implantat utan måste bytas med regelbundna intervall. Röstventilen
(figur 1) fi nns i olika diametrar och längder. Provox Vega XtraSeal har en extra, förstorad
esofagusfläns som är avsedd att avhjälpa problem med läckage runt röstventilen. Ventilen
är tillverkad av silikon och fluorplast av medicinsk kvalitet.
44
Provox Vega-förpackningen XtraSeal
Provox Vega XtraSeal-förpackningen innehåller följande delar:
• 1 Provox Vega XtraSeal röstventil, förpackad i en SmartInserter för engångsbruk, steril
(figur 2)
• 1 Provox Brush i en storlek som passar röstventilen, icke-steril
• 1 läkarmanual för Provox Vega XtraSeal
• 1 patientmanual för Provox Vega
• 1 manual för Provox Brush
1.3 KONTRAINDIKATIONER
Det fi nns inga kända kontraindikationer mot att använda eller byta ut en Provox Vega
röstventil hos patienter som redan använder röstrehabilitering med röstventil.
1.4 VARNINGAR
Om Provox Vega röstventilen lossnar eller rubbas ur sitt läge från TE-fisteln kan det
leda till att ventilen sväljs, aspireras eller att vävnadsskada uppkommer. Ytterligare
information om detta fi nns i avsnittet Problem/Felsökning nedan.
Gör så här för att minska risken att ventilen rubbas eller lossnar:
• Välj rätt storlek på röstventilen. En röstventil som sitter för trångt kan orsaka
vävnadsnekros och stötas ut.
• Instruera patienten att omedelbart kontakta läkare vid tecken på svullnad och/eller
inflammation/infektion.
• Om LaryTube eller LaryButton används, bör man välja en lämplig modell som inte
trycker på röstventilen eller hakar fast i röstventilens trakealfläns vid insättning och
borttagning av LaryTube eller LaryButton.
• Instruera patienten att endast använda Provox originaltillbehör i korrekt storlek (Brush,
Flush, Plug) vid rengöring och undvika all annan manipulering av röstventilen.
• Återanvändning och ombearbetning kan orsaka korskontamination och skador på
produkten, vilket kan orsaka skada på patienten.
1.5 FÖRSIKTIGHETSÅTGÄRDER
co
py
• Utvärdera noggrant patienter med blödningsrubbningar eller patienter som använder
blodförtunnande mediciner med avseende på risken för blödningar innan röstventilen
sätts in eller byts ut.
• Kontrollera förpackningen före användning. Använd inte produkten om förpackningen
är skadad eller öppnad.
• Hantera alltid röstventilen aseptiskt för att minska infektionsrisken.
• Se till att externa eller interna stomatillbehör inte trycker på eller hakar fast i
röstventilens fläns (t ex HME-plåster, LaryTube eller LaryButton). Detta kan leda till
allvarlig vävnadsskada och/eller oavsiktlig sväljning av röstventilen.
2. Bruksanvisning
2.1 Förberedelser
ed
Välja rätt storlek vid byte av röstventil
te
r
Se noga till att använda en Provox Vega XtraSeal röstventil med lämplig skaftdiameter
och längd. Provox Vega XtraSeal fi nns i olika kombinationer av längd och diameter.
nr
eg
is
• Att välja skaftdiameter
Läkaren ska avgöra vilken diameter på ventilen som är lämplig för patienten.
• Om den valda diametern är större än den tidigare ventilen måste området dilateras genom
användning av Provox Dilator till korrekt diameter för den ventil som ska sättas in.
• Om en ventil med mindre skaftdiameter förs in, kontrollera att fisteln krymper till
lämplig diameter.
U
• Att välja skaftlängd
För att välja rätt längd kan man använda den befintliga ventilen som mall. Om
spelrummet mellan trakealflänsen och mukosa väggen är för stort (t ex mer än 3 mm)
rekommenderas en kortare ventil. Om ventilen inte har något spelrum alls ska en längre
ventil användas.
OBS! Skaftet på Provox Vega XtraSeal är ca 1 mm kortare än storleken indikerar, på
grund av den förstorade esofagusflänsen.
2.2 Byte med anterograd insättning med överskjutning
(Figur 3.1–3.10)
VAR FÖRSIKTIG! Provox Vega XtraSeal med förstorad esofagusfläns ska placeras
med överskjutning för att säkra att båda esofagusflänsarna vecklar ut sig inuti esofagus
lumen. Överskjutning innebär att hela röstventilen förs in i esofagus och sedan återförs
till avsedd position.
Aktivering av systemet för byte med överskjutning
1. Håll laddningsröret med ena handen och för in införaren delvis i laddningsröret med
den andra handen till dess att ventilens blå ring passerar laddningsrörets stegmarkering
(figur 3.1).
2. Kläm ihop korgen mellan tummen och pekfi ngret (figur 3.2), och för den längre in i
laddningsröret (figur 3.3). Provox Vega XtraSeal röstventil är nu färdig för insättning
med överskjutning.
Insättning av den nya ventilen i fisteln – överskjutning
1. Sondering av TE-fisteln
Håll Provox SmartInserter i laddningsröret. För försiktigt in laddningsrörets spets.
Fortsätt med försiktighet om du känner motstånd när du för in laddningsröret i fisteln.
I detta fall kan dilatering och/eller smörjning av fisteln underlätta insättningen.
2. ”Införing” av ventilen
Håll laddningsröret stadigt i detta läge och använd den andra handen för att föra
införaren framåt tills den är helt inne i SmartInserter (figur 3.4). När guiden trycks
längre in i laddningsröret kommer införaren att kunna skjutas längre in, vilket leder
till att Provox Vega XtraSeal röstventil frigörs helt i esofagus.
3. Dra tillbaka ventilen
Dra laddningsröret rakt ut ur fisteln (figur 3.5). Dra tillbaka Provox Vega XtraSeal
röstventil till fisteln genom att greppa och dra i ventilens trakealfläns med en slät peang
(figur 3.6).
4. Kontrollera placeringen
Kontrollera att röstventilen och flänsarna sitter rätt genom att vrida ventilen och
föra den fram och tillbaka i fisteln. Dra lätt i trakealflänsen för att kontrollera att
röstventilen sitter kvar (figur 3.7).
45
Var försiktig: Kontrollera att båda esofagusflänsarna har vecklat ut sig helt i esofagus
lumen. Ingen del av den förstorade esofagusflänsen bör synas längs röstventilens
skaft, och när röstventilen roteras ska den röra sig utan motstånd. Man kan hjälpa
den förstorade esofagusflänsen att veckla ut sig helt genom att rotera röstventilen
och samtidigt trycka den lätt mot esofagus. Vid osäkerhet, använd flexibel endoskopi
för att säkerställa korrekt placering inuti esofagus.
5. Kontrollera ventilens funktion
Kontrollera att ventilen fungerar som den ska genom att be patienten tala (figur 3.8)
och observera ventilen när patienten dricker vatten (figur 3.9).
6. Klipp av säkerhetsstroppen med sax
När ventilen bekräftats sitta på plats, placera trakealflänsens ovala ände nedåt och
klipp av säkerhetsstroppen på trakealflänsens ytterkant med en sax (figur 3.10).
Röstventilen är nu klar att användas.
2.3 Ladda om Provox SmartInserter
(Figur 4.1–4.6)
Om det första försöket att föra in Provox Vega XtraSeal röstventil i TE-fisteln misslyckas
är det möjligt att ladda om Provox Vega XtraSeal i SmartInsertern.
OBSERVERA: Ladda inte om SmartInsertern mer än 2 gånger.
Använd inte Provox Vega XtraSeal röstventil om den visar tecken på skada.
1. Kontrollera att ventilen fortfarande sitter säkert fastsatt på införaren. I annat fall
säkrar du säkerhetssträngen genom att föra in den genom hålet på införaren (figur 4.1).
2. Lägg Provox Vega XtraSeal röstventil med trakealsidan nedåt på införaren (figur 4.2).
Använd din tumme för att säkerställa att röstventilen är korrekt positionerad.
3. Kontrollera att vikningsenheten och styrindikatorn fortfarande är monterade i det
övre styrläget. Om inte, montera åter vikningsenheten i styrindikatorn (figur 4.3).
Tryck inte ned vikningsenheten till bottenläget på styrindikatorn.
4. För försiktigt in införaren med ventilen monterad i vikningsenheten tills du hör ett tydligt
klick (figur 4.4). Esofagusflänsen på ventilen är nu i rätt läge med vikningsenheten.
5. Den förstorade esofagusflänsen måste manuellt placeras nedanför de böjda spetsarna
på vikningsenheten (figur 4.5).
OBS! Om man hoppar över detta steg kommer förladdningen att kräva onödigt
mycket kraft, vilket kan skada röstventilen.
6. Sätt på laddningsröret på toppen av applikatorn (figur 4.6). De två delarna ska
haka ihop.
Provox Vega XtraSeal röstventil är nu redo att aktiveras och kan användas enligt
instruktionerna i avsnittet ”Byte med antergograd insättning med överskjutning”.
co
py
3. Viktig patientinformation
3.1 Allmän information
U
nr
eg
is
te
r
ed
Säkerställ att patienten förstår att han/hon måste kontakta läkare i nedanstående fall.
• Vid läckage genom eller runt ventilen (hosta och/eller ändrad färg på slem)
• Vid svårigheter att tala (ökad ansträngning och/eller rösten låter mer pressad)
• Vid tecken på inflammation eller vävnadsförändringar runt fistelområdet eller stomat
(smärta, rodnad, värme, svullnad, spår av blod på borsten efter borstning)
Informera patienten även om följande:
• Efter ventilbyte kan det förekomma spår av blod i saliven. Detta kan komma från
granulationsvävnad från TE-fistelns kanter.
• Tillfälliga lätta läckage genom eller runt ventilen kan förekomma under de första
veckorna efter att en ny ventil satts in. Detta upphör oftast av sig själv och kräver inget
omedelbart byte av ventilen.
• Om spontant läckage skulle uppstå genom ventilen kan detta stoppas med hjälp av en
Provox Vega Plug.
• Vi rekommenderar talträning med hjälp av logoped för att patienten ska få optimal röst,
flytande tal och tydlighet.
3.2 Skötsel av röstventil
Instruera patienten om när och hur Provox Vega XtraSeal röstventil ska rengöras. Ventilen
håller längre om den rengörs minst två gånger om dagen.
OBSERVERA: Använd endast Provox originaltillbehör avsedda för användning
med Provox Vega vid rengöring av ventilen.
• Borsta ventilen med Provox Brush två gånger dagligen för att ta bort slem och matrester
från ventilen.
• Genom att spola ventilen med Provox Flush blir den ren från slem, vilket kan förlänga
livslängden.
Obs! Provox Flush är endast avsedd att användas av de patienter som av läkaren som
förskriver produkten bedöms kunna förstå och följa bruksanvisning utan läkares
överinseende.
• Vissa kostråd, som dagligt intag av yoghurt eller kärnmjölk med mjölksyrabakterier,
anses hjälpa mot kraftig överväxt av candida.
Se anvisningarna för respektive tillbehör för att få mer information om hur Provox
Vega ska rengöras.
3.3 Tillbehör
OBSERVERA: Använd endast Provox originaltillbehör avsedda för användning
med Provox Vega. Andra tillbehör kan skada patienten eller göra att produkten
inte fungerar.
Tillbehör för att underlätta införandet av ventilen (används av läkare)
• Provox Dilator: Används vid byte från en ventil med mindre diameter till en Provox
röstventil med större diameter.
• Provox GuideWire: för insättning av en Provox, Provox2 eller Provox Vega röstventil
i en nyskapad TE fistel eller för retrograd byte/ersättning av en Provox röstventil.
Tillbehör för att bevara ventilens funktion (används av patient)
• Provox Brush/Provox Brush XL används av patienten för rengöring av röstventilens
insida.
• Provox Flush är ett tillbehör för renspolning av röstventilen.
• Provox Vega Plug är ett ”första hjälpen”-verktyg som patienten kan använda för att
tillfälligt täta ventilen vid läckage.
46
Andra tillbehör som kan användas tillsammans med Provox röstventiler
• Provox HME: Fukt- och värmeväxlare som delvis återställer näsans funktioner
(värme, fukt, andningsmotstånd).
• Provox FreeHands HME: En kombination av en fukt- och värmeväxlare och en
automatisk talventil som gör det möjligt att tala utan fingertryckning.
• Provox LaryTube: En trakealkanyl av silikon som är avsedd att förhindra
att trakeostomat krymper och som fungerar som en hållare för andra
rehabiliteringshjälpmedel i Provox-systemet.
• Provox LaryButton: En mjuk självhållande stomakanyl. Den är avsedd att förhindra att
trakeostomat krymper och fungerar som en hållare för andra rehabiliteringshjälpmedel
i Provox-systemet.
4. Problem/felsökning
Nedanstående problem kan uppstå vid röstrehabilitering med röstventil.
Röstventilrelaterade problem
Läckage genom ventilen – läckage genom ventilen kan uppstå vid candidaöverväxt
på ventillocket eller om den röntgentäta ringen (ventilsätet) har rubbats ur sitt läge. Det
kan även uppstå om esofagusflänsen på ventilen inte har fällts ut helt i esofaguslumen
eller om ventilen är för kort. Med hjälp av en endoskopisk undersökning kan man avgöra
om något av detta inträffat. Om röstventilen sitter korrekt och är av rätt längd, och om
rengöring av röstventilen inte löser problemet med läckage kan röstventilen behöva bytas.
Överväxt av candida – Överväxt av candida i röstventilen är ett vanligt problem och
uppträder hos de flesta patienter. Strålbehandling, saliv och matvanor kan påverka hur snabbt
candida påverkar silikonet. Behandling med svamphämmande medel kan användas som
förebyggande åtgärd om överväxten av candida leder till läckage genom röstventilen eller
på annat sätt påverkar dess funktion.
Kompatibilitet med svamphämmande medicin – Kemiska ämnen kan komma att
direkt påverka produktens material-egenskaper, eller absorberas av materialet för att
sedan avges vid senare tillfälle. Därför måste svamphämmande mediciner som appliceras
direkt på eller nära röstventilen utvärderas noga.
Laboratorietester påvisar enbart smärre negativ inverkan på Provox Vega röstventil
och komponenter vid användning av följande svamphämmande medicin:
• Nystatin
• Flukonazol
• Mikonazol
Fistelrelaterade problem
te
r
ed
co
py
Aspiration av röstventilen – Om det skulle hända att röstventilen eller någon annan
produkt från röst-rehabiliteringssystemet ofrivilligt aspireras och kommer ner i
luftvägarna kan det ge symtom som kväljningar, hosta, svårigheter att andas eller rosslande
andning. Främmande föremål i luftvägarna kan orsaka obstruktion eller infektion.
Möjliga komplikationer innefattar lunginflammation, atelektas, bronkit, lungabscess,
bronkopulmonärfistel och astma. Om patienten kan andas kan det räcka med att hosta
till kraftigt och försöka hosta upp ventilen. Vid delvis eller helt blockerade luftvägar
krävs omedelbar åtgärd för avlägsnande av det främmande föremålet.
U
nr
eg
is
Sväljning av röstventil – Det kan hända att röstventilen eller andra delar i
röstrehabiliteringssystemet sväljs oavsiktligt. Precis som med andra typer av främmande
föremål, beror graden av symptom som orsakas av att röstventilen eller andra delar i
röstrehabiliteringssystemet oavsiktligt sväljs huvudsakligen på storlek, läge, grad av
eventuell blockering samt hur lång tid det har gått sedan föremålet svaldes. Svalda delar
som har fastnat i nedre delen av matstrupen kan avlägsnas med hjälp av esofagoskopi eller
hållas under uppsikt under en kortare tid. Föremålet kan spontant fortsätta ned i magen,
och oftast passerar det även genom tarmkanalen. Föremålet måste avlägsnas kirurgiskt
om det uppstår obstruktion i tarmarna, vid blödningar, perforering eller om föremålet
inte kan passera genom tarmkanalen.
Blödning från fisteln – Lätt blödning från kanterna på TE-fisteln kan uppstå vid byte
av röstventil och upphör oftast av sig själv. Patienter som använder blodförtunnande
mediciner bör noggrant utvärderas med avseende på risken för blödningar innan
röstventilen sätts in eller byts ut.
Infektion och/eller svullnad i TE-fisteln – Infektion, ärrbildning och/eller svullnad
runt ventilen (t ex under strålningsbehandling) kan öka fistellängden. Detta kan leda
till att röstventilen dras in under slemhinnan i trakea eller esofagus. Alternativt kan en
inflammation eller en överväxt av slemhinnan i esofagus leda till att röstventilen trycks
ut ur fisteln. Vi rekommenderar att man då tillfälligt byter till en längre röstventil.
Infektionen kan behandlas med bredspektra antibiotika med eller utan kortison. Om
infektionen inte hävs med hjälp av antibiotika och/eller kortison när röstventilen är på
plats, måste röstventilen tas bort. I vissa fall kan stentning av fisteln med en kateter
övervägas. Om fisteln sluter sig spontant efter att röstventilen har avlägsnats, kan man
behöva göra en ny punktion för att sätta in en ny röstventil.
Granulation runt fisteln – Ärrbildning runt TE-fisteln har rapporterats i omkring 5 %
av fallen. Ärrvävnaden kan behandlas med kauterisering (elektrisk, kemisk eller laser).
Hypertrofisk ärrbildning runt fisteln – Om ventilen är för kort kan det hända att
trakealslemhinnan runt trakealflänsen förstoras. Denna överflödiga vävnad kan avlägsnas
med hjälp av laser (CO2 eller NdYAG). Alternativt kan en längre röstventil användas.
Protrusion/Extrusion – Uttryckt/utstött ventil – Infektioner i TE-fisteln kan leda till
att ventilen trycks ut för att sedan helt falla ut. Röstventilen måste då avlägsnas för att
den inte ska hamna i luftstrupen. Fisteln kan sluta sig spontant efter att röstventilen har
avlägsnats. En ny punktion kan då behöva göras vid insättning av en ny ventil.
Läckage runt ventilen – Tillfälligt läckage runt ventilen kan uppstå och försvinna
spontant. Den vanligaste orsaken är att röstventilen är för lång. Detta löser man genom
att sätta in en kortare ventil. En ventil med en annan (större) diameter kan också stoppa
läckaget. Det kan också uppstå när den förstorade esofagusflänsen på Provox Vega XtraSeal
inte har vecklats ut helt i esofaguslumen. Ingen del av den förstorade esofagusflänsen
bör synas längs röstventilens skaft, och när röstventilen roteras ska den röra sig utan
motstånd. Man kan hjälpa den förstorade esofagusflänsen att veckla ut sig helt genom
att rotera röstventilen och samtidigt trycka den lätt mot esofagus. Vid osäkerhet, använd
flexibel endoskopi för att säkerställa korrekt placering inuti esofagus.
47
Om läckaget inte minskar (vilket det ofta gör spontant) kan man använda en Provox
XtraFlange. Ytterligare metoder för att åtgärda läckage runt röstventilen är att tillfälligt
ta bort röstventilen och sätta in en trakealkanyl med kuff och/eller ventrikelsond för
att låta fisteln krympa. Alternativt kan en tobakspungssutur med 3/0 absorberbar sutur
läggas submuköst runt TE-fisteln efter det att röstventilen har avlägsnats. Sätt in den
nya röstventilen och dra försiktigt åt suturen, så att fisteln sluts runt röstventilen. Om
läckaget kring röstventilen inte svarar på behandlingen kan det bli nödvändigt att försluta
fisteln och därefter göra en ny punktion.
Vävnadsskador – Om röstventilen är för kort, för lång eller ofta trycks mot esofagusväggen
av en LaryTube, LaryButton eller patientens finger, kan fisteln, trakealvävnaden och/eller
esofagusvävnaden skadas. Patienter som genomgår strålbehandling har ökad tendens att
få slemhinneskador. Kontrollera vävnaderna regelbundet för att undvika allvarliga skador.
5. Ytterligare information
5.1 Kompatibilitet med MRT-, röntgen- och
strålbehandling
Provox röstventiler har testats och är (med undantag för Provox ActiValve) kompatibla
med MRT (testade upp till 3,0 Tesla), röntgen- och strålterapi (testade upp till 70 Gy).
Röstventilen kan vara kvar i TE-fisteln under undersöknings-/behandlingstillfället.
Observera att det röntgentäta ventilsätet är synligt på röntgenbilder.
5.2 Röstventilens livslängd
Röstventilens livslängd kan variera beroende på individuella biologiska omständigheter,
och det går inte att förutsäga ventilens funktion över en längre tidsperiod. Materialet i
ventilen kommer att påverkas med tiden t.ex. av bakterier och jästsvamp, och materialets
egenskaper kommer att försämras.
5.3 Kontaktinformation
U
nr
eg
is
te
r
ed
co
py
För ytterligare hjälp eller information, se baksidan av denna bruksanvisning för
kontaktinformation.
48
Ordering information
Provox Vega Prosthesis
REF
Rx
Provox Vega 17Fr 4mm
8110*
Rx
Provox Vega 17Fr 6mm
8111*
Rx
Provox Vega 17Fr 8mm
8112*
Rx
Provox Vega 17Fr 10mm
8113*
Rx
Provox Vega 17Fr 12.5mm
8114*
Rx
Provox Vega 17Fr 15mm
8115*
Rx
Provox Vega 20Fr 4mm
8120*
Rx
Provox Vega 20Fr 6mm
8121*
Rx
Provox Vega 20Fr 8mm
8122*
Rx
Provox Vega 20Fr 10mm
8123*
Rx
Provox Vega 20Fr 12.5mm
8124*
Rx
Provox Vega 20Fr 15mm
8125*
Rx
Provox Vega 22.5Fr 4mm
8130
Rx
Provox Vega 22.5Fr 6mm
8131
Rx
Provox Vega 22.5Fr 8mm
8132
Rx
Provox Vega 22.5Fr 10mm
8133
Rx
Provox Vega 22.5Fr 12.5mm
8134
Rx
Provox Vega 22.5Fr 15mm
8135
Rx
Provox Vega XtraSeal 17Fr 4mm
7770*
Rx
Provox Vega XtraSeal 17Fr 6mm
7771*
Rx
Provox Vega XtraSeal Prosthesis
Provox Vega XtraSeal 17Fr 10mm
Provox Vega XtraSeal 17Fr 12.5mm
7774*
Rx
7775*
Rx
7776*
Rx
7777*
Rx
7778*
Rx
Provox Vega XtraSeal 20Fr 10mm
7779*
Rx
Provox Vega XtraSeal 20Fr 12.5mm
7780*
Rx
Provox Vega XtraSeal 20Fr 15mm
7781*
Rx
Provox Vega XtraSeal 22.5Fr 4mm
7782
Rx
Provox Vega XtraSeal 22.5Fr 6mm
7783
Rx
Provox Vega XtraSeal 22.5Fr 8mm
7784
Rx
Provox Vega XtraSeal 22.5Fr 10mm
7785
Rx
Provox Vega XtraSeal 22.5Fr 12.5mm
7786
Rx
Provox Vega XtraSeal 22.5Fr 15mm
7787
Rx
U
nr
eg
is
Provox Vega XtraSeal 20Fr 8mm
te
r
Provox Vega XtraSeal 20Fr 4mm
Provox Vega XtraSeal 20Fr 6mm
Rx
Rx
ed
Provox Vega XtraSeal 17Fr 15mm
7772*
7773*
co
py
Provox Vega XtraSeal 17Fr 8mm
Provox Vega accessories
Provox Vega Plug 17Fr
8119*
Provox Vega Plug 20Fr
8129*
Provox Vega Plug 22.5Fr
8139
Provox Flush
8109
Provox Brush
7204
Provox Brush XL
7225
Provox Dilator
7211
Rx
Provox Dilator 17
7122*
Rx
Provox Dilator 20
7123*
Rx
Provox GuideWire
7215
Rx
* not available on all markets
Caution
United States Federal law restricts the sale, distribution and use by, or by
order of a physician or a licensed practitioner of devices identified herein
with the symbol “Rx”. The prescription-free availability of these products
outside the United States may vary from country to country.
49
co
py
ed
te
r
is
eg
nr
U
Atos Medical AB
Kraftgatan 8, P.O. Box 183, SE-242 22 Hörby, Sweden
Tel: +46 (0)415 198 00 • Fax: +46 (0)415 198 98
www.atosmedical.com • [email protected]
© Atos Medical AB, Sweden. No. 10817, Edition 201406A
Download