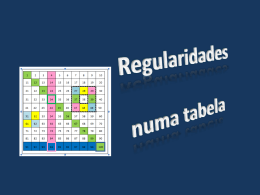
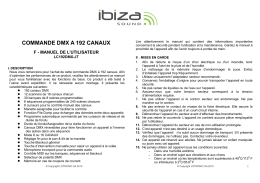
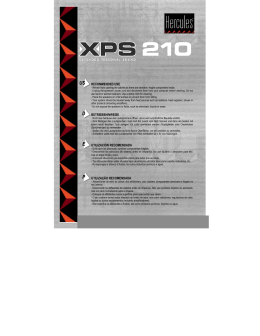
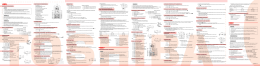
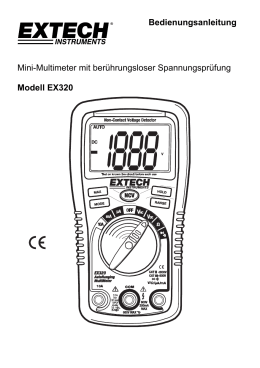
DUAL CD PLAYER DOUBLE LECTEUR CD DUAL CD SPIELER DUPLO LEITOR DE CD CDX-7 GB - USER MANUAL F - MANUEL DE L’UTILISATEUR D - BEDIENUNGSANLEITUNG PT - MANUAL DE INSTRUÇÕES © Copyright 2010 LOTRONIC SA 1 2 GB FUNCTIONS OF THE CD PLAYER 1. POWER BUTTON Press the POWER switch to turn the unit on. Press the POWER switch again to turn the unit off. 2. EJECT BUTTON Press this button to load or eject disk. Each press will open or close the disk tray. 3. JOG a) PITCH MODE In pause mode, if you turn the jog, the point at which the sound is being produced moves by a number of frames corresponding to the number of clicks. Dialling clockwise moves the point forward, dialling counter-clockwise moves the point backward. In play mode, the jog increases or decreases the speed of the song. (clockwise: increase, counterclockwise: decrease) b) SEARCH MODE Turn the jog to select the scanning direction and speed. c) SCRATCH MODE Use this jog to scratch effect. 4. JOG MODE Press this button to select the PITCH, SEARCH or SCRATCH. 5. PLAY MODE Press this button to select the CD, USB stick or SD card. 6. CUE BUTTON Pressing the CUE button during play provides a return to the position at which play was started. 7. PLAY / PAUSE BUTTON Each time you press the PLAY / PAUSE button, the operation changes from play to pause or from pause to play. 8. BRAKE BUTTON Press this button to open the BRAKE effect. 9. REV. BUTTON Press this button to open the REV. effect. 10. IN BUTTON Press this button to set the beginning of the loop. 11. OUT BUTTON Press this button to set the end point of the loop. 12. RELOOP BUTTON Press this button to repeat the last loop. 13. FOLDER BUTTON Press this button to select the folder or the track. 14. TRACK POT Use this pot to select the previous track or next track. 15. CONTINUE / SINGLE BUTTON Press this button to switch between the SINGLE and CONTINUE play mode. The selected mode is indicated on the LCD. In SINGLE mode, after each track, the unit will stop the reading. In CONT. mode, the unit will read all tracks and then stop. 16. LOCK BUTTON Press this button to lock the pitch fader. 17. PITCH BEND - BUTTON The pitch will drop while the PITCH BEND – button is pressed and return to the original pitch when it is released. 18. PITCH BEND + BUTTON The pitch will increase while the PITCH BEND + button is pressed and return to the original when it is released. 19. PITCH BUTTON Press this button to select the 4%, 8% or 16%. 20. TIME BUTTON Use this button to choose the time mode: elapsed time, remaining time or total remaining time. 21. PITCH CONTROL Use this fader to increase or decrease the speed of the track. 22. LCD DISPLAY 23. DIN SOCKET Connect all the sockets using the DIN cable provided with the CD player. Connect the play 1 with the part 1 of the controller and the player 2 with the part 2 of the controller. 3 24. AC POWER Connect to the power supply. 25. LINE OUT This socket is the audio output for CD player. Connect to the line input of the mixer. Specifications Anti-Shock Buffer Memory .......................................................................................10 seconds Audio response......................................................................................< 2 dB (20Hz – 20KHz) D/V converter................................................................................................................... 24 bits Frequency response............................................................................................20Hz – 20KHz Harmonic distortion .........................................................................................................< 0.3% Signal / noise ratio .............................................................................................................85 dB Dynamic.............................................................................................................................80 dB Cross talk...........................................................................................................................60 dB Output level .........................................................................................................................1.5V Load impedance ................................................................................................. more than 47K Speed edge (PITCH)....................................................................................................+ / - 16% Power supply ........................................................................................................115 / 230 Vac Electric products must not be put into household waste. Please bring them to a recycling centre. Ask your local authorities or your dealer about the way to proceed. F FONCTIONS DU LECTEUR CD 1. POWER Appuyez sur le bouton POWER pour mettre l’appareil sous et hors tension. 2. BOUTON EJECT Appuyez sur ce bouton pour insérer ou éjecter un CD. A chaque pression le tiroir s’ouvre ou se ferme. 3. MOLETTE JOG a) MODE PITCH Si vous tournez la molette en mode Pause, le point de production du son avance du nombre de trames qui correspond au nombre de clics. Tournez vers la droite pour avancer ou vers la gauche pour reculer. En mode de lecture, la molette augmente ou diminue la vitesse de la musique b) MODE RECHERCHE Tournez la molette pour sélectionner le sens et la vitesse de recherche. c) MODE SCRATCH Utilisez la molette pour créer un effet scratch. 4. MODE JOG Appuyez sur ce bouton pour sélectionner PITCH, SEARCH ou SCRATCH. 5. MODE LECTURE Appuyez sur ce bouton pour sélectionner le CD, la clé USB ou la carte SD. 6. BOUTON CUE Appuyez sur la touche CUE pendant la lecture pour revenir au point de début de la lecture. 7. BOUTON PLAY / PAUSE A chaque pression sur la touche PLAY/PAUSE, le lecteur bascule entre le mode de lecture et le mode Pause. 8. BOUTON BRAKE Appuyez sur cette touche pour activer l’effet BRAKE (freinage). 9. BOUTON REV. Appuyez sur cette touche pour activer la lecture inversée. 10. BOUTON IN Appuyez sur ce bouton pour marquer le début d’une boucle (loop). 11. BOUTON OUT Appuyez sur ce bouton pour marquer la fin d’une boucle. 12. BOUTON RELOOP Appuyez pour répéter la dernière boucle. 13. BOUTON F OLDER Appuyez pour sélectionner un dossier ou un titre. 14. BOUTON TRACK 4 Tournez ce bouton pour sélectionner le titre précédent ou suivant. 15. BOUTON CONTINUE / SINGLE Appuyez pour basculer entre le mode de lecture unique (single) et continu (continue). Le mode sélectionné s’affiche sur le LCD. En mode SIGNLE, le lecteur s’arrête à la fin de chaque titre. En mode CONT., le lecteur lit tous les titres et s’arrête. 16. BOUTON LOCK Appuyez pour verrouiller le fader Pitch. 17. BOUTON PITCH BEND La tonalité (pitch) baisse pendant que la touche PITCH BEND- est appuyée et revient à la vitesse normale lorsqu’il est relâché. 18. BOUTON PITCH BEND + La tonalité (pitch) augmente pendant que la touche PITCH BEND+ est appuyée et revient à la vitesse normale lorsqu’il est relâché. 19. BOUTON PITCH Appuyez pour sélectionner la variation 4%, 8% ou 16%. 20. BOUTON TIME Sélectionnez le mode d’affichage du temps: temps écoulé, temps restant ou temps restant total. 21. PITCH CONTROL Augmentez ou baissez la vitesse de lecture du titre. 22. AFFICHEUR LCD 23. FICHE DIN Branchez toutes les fiches DIN sur le lecteur CD au moyen des cordons DIN fournis. Branchez le lecteur 1 sur la partie 1 de l’unité de commande et le lecteur 2 sur la partie 2 de la commande. 24. FICHE SECTEUR Branchez la fiche sur le secteur. 25. Sortie LINE OUT Cette fiche est la sortie audio du lecteur CD. Branchez-la sur l’entrée de ligne d’une table de mixage. Caractéristiques techniques Mémoire anti-chocs ................................................................................................10 secondes Réponse Audio ......................................................................................< 2 dB (20Hz – 20KHz) Convertisseur D/A ........................................................................................................... 24 bits Bande passante...................................................................................................20Hz – 20KHz Distorsion harmonique ....................................................................................................< 0.3% Rapport signal/bruit ...........................................................................................................85 dB Dynamique ........................................................................................................................80 dB Cross talk...........................................................................................................................60 dB Niveau de sortie...................................................................................................................1.5V Impédance de charge....................................................................................... Supérieur à 47K Variation de vitesse (PITCH)........................................................................................+ / - 16% Alimentation..........................................................................................................115 / 230 Vac NOTE IMPORTANTE : Les produits électriques ne doivent pas être mis au rebut avec les ordures ménagères. Veuillez les faire recycler là où il existe des centres pour cela. Consultez les autorités locales ou votre revendeur sur la façon de les recycler. D FUNKTIONEN DES CD SPIELERS 1. POWER TASTE Auf die POWER Taste drücken, um das Gerät ein- und auszuschalten. 2. EJECT TASTE Diese Taste drücken, um eine CD einzulegen oder auszuwerfen. 3. JOG a) PITCH MODUS Wenn das Jog Rad im Pausenbetrieb gedreht wird, geht die Stelle, an der der Ton produziert wird, um so viele Frames weiter, wie das Rad klickt. Nach rechts drehen, um vorwärts zu gehen und nach links, um zurück zu gehen. Im Abspielbetrieb erhöht oder verringert das Rad die Abspielgeschwindigkeit. 5 b) SUCHMODUS Mit dem Rad die Suchrichtung und –geschwindigkeit wählen. c) SCRATCH MODUS Mit dem Jograd einen Scratch Effekt erzeugen. 4. JOG MODUS Auf die Taste drücken, um PITCH, SEARCH oder SCRATCH zu wählen. 5. ABSPIELBETRIEB Mit dieser Taste zwischen CD, USB Stick oder SD Karte wählen. 6. CUE TASTE Wenn die CUE Taste während des Abspielens gedrückt wird, geht der Spieler wieder zu der Stelle, von der das Abspielen gestartet wurde. 7. PLAY / PAUSE TASTE Bei jedem Druck auf die Taste wechselt die Betriebsart zwischen Abspielen und Pause. 8. BRAKE TASTE Mit dieser Taste den BRAKE Effekt aktivieren. 9. REV. TASTE Mit dieser Taste des REVERSE Effekt aktivieren. 10. IN TASTE Auf diese Taste drücken, um den Anfangspunkt einer Schleife festzulegen. 11. OUT TASTE Auf diese Taste drücken, um den Endpunkt einer Schleife festzulegen. 12. RELOOP TASTE Auf diese Taste drücken, um die letzte Schleife zu wiederholen. 13. FOLDER TASTE Mit dieser Taste eine Mappe oder einen Titel wählen. 14. TRACK KNOPF Mit diesem Drehknopf den vorangegangenen oder folgenden Titel wählen. 15. CONTINUE / SINGLE TASTE Mit dieser Taste zwischen einmaligem (SINGLE) und laufendem (CONTINUE) Abspielen wählen. Die gewählte Betriebsart erscheint auf dem Display. Im SINGLE Betrieb stoppt der Player nach jedem Titel, im CONTINUE Betrieb werden alle Titel abgespielt und dann stoppt der Player. 16. LOCK TASTE Mit dieser Taste den PITCH Schieberegler sperren. 17. PITCH BEND - TASTE Die Abspielgeschwindigkeit verringert sich, solange die PITCH BEND – Taste gedrückt wird und geht wieder auf normale Geschwindigkeit zurück, sobald die Taste losgelassen wird. 18. PITCH BEND + TASTE Die Abspielgeschwindigkeit erhöht sich, solange die PITCH BEND + Taste gedrückt wird und geht wieder auf normale Geschwindigkeit zurück, sobald die Taste losgelassen wird. 19. PITCH TASTE Auf die Taste drücken, um zwischen 4%, 8% oder 16%. 20. TIME TASTE Mit dieser Taste die Zeitanzeige wählen, abgelaufene Spielzeit, Restspielzeit des Titels oder gesamte Restspielzeit 21. PITCH CONTROL Mit diesem Regler die Abspielgeschwindigkeit des Titels erhöhen oder verringern. 22. LCD DISPLAY 23. DIN BUCHSE Alle Buchsen mit den mitgelieferten DIN Kabeln verbinden. Schließen Sie Spieler 1 an Teil 1 des Bedienteils und Spieler 2 an Teil 2 des Bedienteils an. 24. NETZVERSORGUNG An eine Netzsteckdose anschließen. 25. LINE OUT Dies ist der Audioausgang des CD Spielers, der an den Line Eingang eines Mischpults angeschlossen wird. Technische Daten Anti-Shock Speicher..............................................................................................10 Sekunden Audio Response ....................................................................................< 2 dB (20Hz – 20KHz) D/A Wandler .................................................................................................................... 24 Bits Frequenzbereich..................................................................................................20Hz – 20KHz Harmonische Verzerrung ................................................................................................< 0.3% Signal / Rauschabstand ....................................................................................................85 dB Dynamik.............................................................................................................................80 dB Crosstalk............................................................................................................................60 dB 6 Ausgangspegel....................................................................................................................1.5V Lastimpedanz ........................................................................................................Mehr als 47K Geschwindigkeitsveränderung (PITCH) .......................................................................+ / - 16% Versorgung ...........................................................................................................115 / 230 Vac WICHTIGER HINWEIS: Elektrogeräte gehören nicht in den Hausmüll. Sie müssen in speziellen Betrieben recycelt werden. Bringen Sie sie zu einer speziellen Entsorgungsstelle für Elektrokleingeräte (Wertstoffhof)! PT FUNÇÕES DO LEITOR DE CD 1. BOTÃO POWER Pressione o botão POWER para ligar a unidade. Pressione o botão POWER outra vez para desligar a unidade. 2. BOTÃO EJECT Pressione este botão para carregar ou ejectar o disco. Cada vez que pressionar o botão irá abrir ou fechar a unidade de CD. 3. JOG a) MODO PITCH Se rodar o jog em modo Pause, o ponto em que o som está a ser reproduzido move-se por uma série de frames que correspondem ao número de cliques. Se a marcação for feita da esquerda para a direita o ponto move-se para a frente. No sentido oposto move-se para trás. No modo Play, o jog aumenta ou diminui a velocidade da canção. (Esquerda para a direita: aumenta, direita para a esquerda: diminui) b) MODO SEARCH Gire o Jog para escolher a direcção e velocidade do scan. c) MODO SCRATCH Use o jog para efeito scratch. 4. MODO JOG Pressione este botão para seleccionar PITCH, SEARCH ou SCRATCH. 5. MODO PLAY Pressione este botão para seleccionar CD, USB ou cartão SD. 6. BOTÃO CUE Ao pressionar o botão CUE durante a reprodução, poderá retornar à posição em que a reprodução foi iniciada. 7. BOTÃO PLAY / PAUSE Cada vez que pressionar o botão PLAY / PAUSE, a reprodução muda de play para pause ou de pause para play. 8. BOTÃO BRAKE Pressione este botão para activar o efeito Brake. 9. BOTÃO REV. Pressione este botão para activar o efeito REV. 10. BOTÃO IN Pressione este botão para marcar o inicio de um loop. 11. BOTÃO OUT Pressione este botão para marcar o fim de um loop. 12. BOTÃO RELOOP Pressione este botão para repetir o último loop. 13. BOTÃO FOLDER Pressione este botão para seleccionar a pasta ou faixa. 14. BOTÃO TRACK Use este botão para seleccionar a próxima faixa ou a faixa anterior. 15. BOTÃO CONTINUE / SINGLE Pressione este botão para seleccionar entre o modo de reprodução SINGLE e CONTINUE. O modo seleccionado é indicado no LCD. Após a pesquisa de cada faixa no modo SINGLE, a unidade irá parar a leitura. No modo CONT., a unidade irá ler todas as faixas e depois parar. 16. BOTÃO LOCK Pressione este botão para trancar o pitch fader. 7 17. BOTÃO - PITCH BEND O pitch irá diminuir enquanto o botão PITCH BEND - estiver pressionado e irá voltar à posição original quando for libertado. 18. BOTÃO + PITCH BEND 19. O pitch irá aumentar enquanto o botão PITCH BEND + estiver pressionado e irá voltar à posição original quando for libertado. 20. BOTÃO PITCH Pressione para escolher 4%, 8% ou 16%. 21. BOTÃO TIME Use este botão para escolher o modo de tempo: elapsed time(tempo decorrido), remaining time(tempo restante) ou total remaining time(tempo restante total). 22. CONTROLO PITCH Use este fader para aumentar ou diminuir a velocidade da faixa. 23. DISPLAY LCD 24. FICHA DIN Ligue todas as fichas usando o cabo DIN fornecido com o leitor de CD. Ligue o leitor 1 com a parte 1 do controlador e o leitor 2 com a parte 2 do controlador. 25. ENERGIA AC Liga a fonte de alimentação. 26. SAÍDA LINE Esta ficha é a saída áudio do leitor CD. Liga a entrada line da mesa de mistura. Especificações Memória Buffer Anti-Choque................................................................................. 10 segundos Resposta Áudio .....................................................................................< 2 dB (20Hz – 20KHz) Conversor D/V ................................................................................................................. 24 bits Frequência...........................................................................................................20Hz – 20KHz Distorção de Harmónicas ................................................................................................< 0.3% Relação Sinal / Ruído........................................................................................................85 dB Dinâmica............................................................................................................................80 dB Cross talk...........................................................................................................................60 dB Nível de Saída .....................................................................................................................1.5V Impedância de carga.............................................................................................. mais de 47K PITCH...........................................................................................................................+ / - 16% Voltagem ..............................................................................................................115 / 230 Vac Produtos eléctricos não deverão ser postos em contentores de lixo caseiros. Por favor, deposite-os em contentores para reciclagem. Questione as autoridades locais ou onde adquiriu o produto sobre como deverá proceder. © Copyright 2010 LOTRONIC SA 8
Download