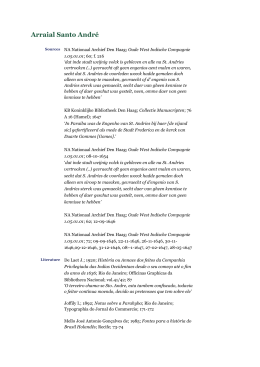
ANLEITUNGEN externer EINZEL-/DOPPELKANALEMPFÄNGER RFM 1 RFM 2
ISTRUZIONI
INSTRUCTIONS
INSTRUCTIONS
INSTRUCCIONES
INSTRUÇÕES
INSTRUCTIES
ANLEITUNGEN
Die Empfänger RFM 1 (Einzelkanal ) und RFM 2 (Doppelkanal) sind zum automatischen Lernen der Sendercodes DIP sowie Rolling-Code vorbereitet (der
erste gelernte Code legt fest, ob dieser Empfänger DIP Codes oder Rolling-code lernen wird).INSTALLATION. Nachdem man den externen Empfänger
Modell.RFM 1-RFM 2 .an einer für den guten Empfang des Funksignals geeigneten Stelle angebracht hat, folgende Klemmenverbindungen herstellen: Speisung - Auf
die Polung (falls Gs) und den Spannungswert achten (falls 12V den Schaltdraht W1 schließen). Antenne - Auf den warmen Pol(8) und das Geflecht achten(9).
Beim Anschließen der Klemmen der Relaisausgänge bei Kanal 1 auf den Ausgang Arbeitskontakt bzw. Ruhekontakt achten.
CODES LEREN:
Als de stroom naar de ontvanger voor de eerste keer ingeschakeld wordt, gaat de rode led branden om aan te geven dat de ontvanger gereed is om een afstandsbediening te leren (ongeacht of het een Dip- of een Rolling code is, waarbij het type code automatisch herkend wordt). Nu kunt u op één van de toetsen van een
zender drukken (1-2-3 of 4). Als de code geleerd is, geeft de ontvanger een commando aan de regeleenheid. Zonder opnieuw op de toets CH1 te drukken kunnen
andere afstandsbedieningen van hetzelfde type worden geleerd, waarbij de ene op de andere volgt. Nadat de laatste afstandsbediening geleerd is, moet u wachten
(ongeveer 6 seconden) totdat de led uitgaat, hetgeen aangeeft dat het systeem het leren tx verlaten heeft en gereed is om op normale wijze te werken.
LET OP: nadat de eerste code geleerd is, accepteert het systeem alleen codes van dat type (d.w.z. als de eerste code een Rolling code is, moeten ook alle andere
codes Rolling codes zijn). Als de opslag in het geheugen daarentegen betrekking heeft op zenders met DIP-switches, is het voldoende slechts één afstandsbediening
te leren.
RFM 1 • RFM 2
GEHEUGEN WISSEN: als u een fout gemaakt heeft of als de codes volledig gewist moeten worden moet u op de toets CH1 drukken (de rode led gaat branden) en
moet u hem ingedrukt houden totdat de led weer uitgaat. Wanneer de toets wordt losgelaten knippert de led één keer (dat wil zeggen dat het geheugen leeg is) en gaat
vervolgens weer branden om aan te geven dat het systeem gereed is om een nieuwe afstandsbediening te leren (ongeacht of het een DIP- of een Rolling code is).
Läßt man bei der Doppelkanalversion (RFM 2) 1 Taste der Fernbedienung lernen (die den Kanal 1 belegt) lernt das System automatisch die 2. Taste der Fernbedienung
( die den Kanal 2 belegt). Lernt man auf Kanal 1 die Taste 2 der Fernbedienung, werden sich beim Drücken dieser Taste beide Kanäle öffnen.
LERNEN DER FERNBEDIENUNGEN OHNE ZUGRIFF AUF DAS STEUERGERÄT Durch gleichzeitiges Drücken der Tasten 1 und 2 :
Nachdem man das System auf manuelle Weise eine Fernbedienung lernen ließ (durch Betätigung der Taste CH1) läßt sich das Selbstlernen weiterer Fernbedienungen
derselben Familie aktivieren: Hierzu gleichzeitig 2 Sekunden lang auf die Tasten 1 und 2 des bereits gelernten Senders drücken, dann wird bei Betätigung der Taste
einer neuen Fernbedienung diese selbstgelernt. Die Überprüfung ist dadurch gegeben, daß sich das Tor durch das Lernen bewegt.
•
ATTENZIONE: L’apparecchio è previsto esclusivamente per collegamenti a bassissima tensione di sicurezza.Il collegamento con
circuiti a tensione pericolosa può provocare pericolo. – WARNING: The control unit is intended exclusively for very low-voltage
safety connections. Connection to high-voltage circuits may create a danger. – ATTENTION: L’appareil est prévu exclusivement
pour des raccordements à très basse tension de sécurité. Le raccordement à des circuits ayant une tension dangereuse peut
entraîner des risques. – ATENCIÓN: El aparato se ha previsto exclusivamente para conexión con tensiones muy bajas de
seguridad. La conexión con circuitos de tensión diferente puede provocar situaciones de peligro. – ATENÇÃO! O aparelho só tem
capacidade para suportar ligações de baixíssima tensão de segurança. A ligação com circuitos de tensão perigosa pode provocar
perigo. – LET OP: het apparaat is uitsluitend voorzien voor aansluitingen op zeer lage veiligheidsspanning. De aansluiting op
circuits met gevaarlijke spanning kan gevaar met zich meebrengen. – ACHTUNG: Das Gerät ist nur für Verbindungen mit sehr
niedriger Sicherheitsspannung vorgesehen. Die Verbindung mit Kreisen gefährlicher Spannung kann eine Gefahr verursachen.
se 12V chiudere jumper SW1
•
if 12V close the jumper SW1
•
si 12V fermer jumper SW1
•
si es 12V cerrar jumper SW1
•
se de 12V fechar o jumper SW1
•
indien 12 V moet de jumper SW1
worden gesloten
•
falls 12V den Schaltdraht SW1
schließen
Il costruttore non può considerarsi responsabile per danni causati da usi erronei e/o irragionevoli. • The manufacturer cannot be
held responsible for damage caused by improper and/or irrational use. • Le constructeur décline toute responsabilité pour des
dommages dérivant de mauvaises utilisations et/ou d’utilisations illégitimes. • Der Hersteller kann nicht als haftbar für durch
falsche und/oder unvernünftige Anwendungen verursachte Schäden betrachtet werden. • El fabricante declina toda responsabilidad debido a daños causados por un uso incorrecto o indebido. • O fabricante não pode ser considerado responsável por
danos provocados por utilização errada e/ou indevida do equipamento.
OPENOUT s.r.l.
Via Monsignor Zocchetta, 44 - 21010 BESNATE (VA)
Tel. 0331.27.59.11 - Fax 0331.27.59.80
E-mail: [email protected]
ISTRRFM
La Openout si riserva il diritto di apportare modifiche in qualsiasi momento e senza preavviso alcuno • Openout reserves the rights to
modify the items without prior notice. • La societé Openout se réserve le droit de modifier les caractéristiques techniques de ses produits
à tout moment et sans préavis. • Openout behält sich vor, in jedem beliebiden Moment Änderungen ohne vorherige Ankündingung durchzuführen. • La Openout se reserva el derecho de realizar modicaciones en cualquier momento sin previo aviso. • A Openout reserva-se
o direito de fazer alterções em qualquer altura, sem dar previamente qualquer aviso.
CARATTERISTICHE TECNICHE
TECHNICAL CHARACTERISTICS
CARACTERISTIQUES TECHNIQUES
Alimentazione
12/24V ac/dc
Assorbimento
15mA in stand-by
Frequenza FM
433.92 Mhz
Codici memorizzabili
max 200
N° canali
1o2
Portata contatto
0,5A 24V
Temperatura d’esercizio -20°C +70°C
12/24V ac/dc
Power supply
Absorption
15mA in standby
Frequency FM
433.92 Mhz
Storable codes
max 200
No.of channels
1o2
Contact capacity
0,5A 24V
Operating temperature -20°C +70°C
12/24V ac/dc
Alimentation
Absoprtion
15mA en position d’attente
Frequence FM
433.92 Mhz
Codes stockables
200 max
N° canaux
1 au 2
Capacité contact
0,5A 24V
Témperature de service –20°C +70°C
ISTRUZIONI RICEVITORE esterno MONO/BI
CANALE RFM 1 RFM 2
INSTRUCTIONS FOR SINGLE/TWO-CHANNEL
EXTERNAL RECEIVER (RFM 1/ARFM 2)
INSTRUCTIONS RECEPTEUR extérieur MONO/BI
CANAL RFM 1 RFM 2
INSTRUCCIONES RECEPTOR exterior MONO/BI
CANAL RFM 1 RFM 2
INSTRUÇÕES DO RECEPTOR exterior MONO/BI
CANAL RFM 1 RFM 2
INSTRUCTIES externe EEN-/TWEEKANAALSONTVANGER RFM 1 RFM 2
I ricevitori RFM 1 (monocanale ) e RFM 2 (bicanale)
sono predisposti per apprendere in automatico i codici dei trasmettitori sia a DIP che Rolling-Code (il
primo codice appreso determina se questo ricevitore
apprenderà codici a DIP o Rolling-code).
The receivers RFM 1 (single-channel ) and RFM 2
(two-channel) can automatically learn the transmitter
codes, both DIP SWITCH and Rolling-Code (the first
code learned determines if that receiver will learn DIP
SWITCH codes or Rolling-codes).
Les récepteurs RFM 1 (monocanal) et RFM 2 (bicanal)
sont prévus pour apprendre en automatique les codes
des émetteurs tant à DIP qu’à Rolling-Code (le premier
code appris détermine si ce récepteur apprendra les
codes à DIP ou Rolling-code).
Los receptores RFM 1 (monocanal ) y RFM 2
(bicanal) están predispuestos para aprender
automáticamente los códigos de los transmisores
tanto de DIP como Rolling-Code (el primer código
aprendido determina si este receptor aprenderá códigos DIP o Rolling-code).
Os receptores RFM 1 (monocanal ) e RFM 2 (bicanal)
estão preparados para captar automaticamente os
códigos dos transmissores, quer a DIP, quer RollingCode (o primeiro código apreendido determina se este
receptor vai captar códigos de DIP ou Rolling-code).
De ontvangers RFM 1 (eenkanaals) en RFM 2
(tweekanaals) zijn in staat om automatisch de codes
van de zenders te leren, zowel DIP- als rolling codes
(de eerste code die geleerd wordt bepaalt of de ontvanger DIP- of rolling codes leert).
ISTALLAZIONE
Dopo aver posizionato il ricevitore esterno mod.
RFM1/RFM 2 in posizione più appropriata per un
miglior ricevimento del segnale radio,collegare ai
morsetti: l’alimentazione facendo attenzione alla
polarita (se CC 1=GND 2= +V) e al valore della tensione (se 12V chiudere jumper SW1), l’antenna
facendo attenzione al polo caldo (8) e alla calza ( 9 )
e collegando i morsetti delle uscite relè facendo
attenzione per il canale 1 dell’uscita NA ( 4 ) (normalmente aperto ) o NC (3) (normalmente chiuso).
INSTALLATION
After positioning the external receiver, model RFM 1RFM 2, in the most suitable position for best reception
of the radio signal, connect: the power supply terminal paying attention to polarity (if DC) and the voltage
value (if 12V close the jumper W1). The antenna terminal, being careful with the hot pole(8) and the braid
(9). The relay output terminals taking care with channel 1 of the N.O. (normally open)(4) or N.C. (normally closed) (3) output.
INSTALLATION
Après avoir positionné le récepteur extérieur mod
RFM1 -RFM 2..sur la position la plus appropriée pour
une meilleure réception du signal radio, raccorder aux
bornes: l’alimentation en faisant attention à la polarité
(si CC) et à la valeur de la tension (si 12V fermer
jumper W1), l’antenne en faisant attention au pôle
chaud(8) et à la gaine(9). Les sorties relais en faisant
attention pour le canal 1 de la sortie NO(4) (normalement ouvert ) ou NF(3) (normalement fermé)
INSTALAÇÃO
Depois de ter colocado o receptor exterior mod RFM 1RFM 2 na melhor posição para receber o sinal rádio,
ligar aos terminais: a alimentação, tendo o cuidado de
verificar as polaridades (se cc) e o valor da tensão (se
de 12V fechar o jumper W1), a antena, prestando
atenção ao pólo quente(8) e ao entrançado(9) e ligando os terminais das saídas a relé, prestando atenção
ao canal 1 da saída NA(4) (normalmente aberto ) ou
NC(3) (normalmente fechado).
CODE LEARNING:
When powering the receiver for the first time,
check that the red LED is on to indicate that the
receiver is ready to learn a remote control (whether
DIP SWITCH or ROLLING-CODE with automatic
recognition of the type). One of the keys of a transmitter can now be pressed (1, 2, 3 or 4). When the
code has been learned a command is given to the
control unit. Without pressing the CH1 key again, further remote controls of the same family can be
learned, one after the other. After learning the last
remote control, wait for the LED to go off (about 6 seconds) indicating that the system has exited TX learning and is ready to operate normally.
ENREGISTREMENT DES CODES :
En alimentant pour la première fois le récepteur, le
voyant lumineux rouge s’allume pour indiquer que le
récepteur est prêt à enregistrer une télécommande,
(indifféremment du code DIP ou Rolling-Code avec
reconnaissance automatique du type). Maintenant il est
possible d’appuyer sur l’une des touches d’un Emetteur
(1-2-3 ou 4). Une fois le code enregistré, le récepteur
envoie une commande à l’unité. Sans appuyer de nouveau sur la touche CH1, il est possible d’enregistrer
d’autres télécommandes de la même famille l’une
après l’autre. Après l’enregistrement de la dernière télécommande, il faut attendre que le voyant lumineux
s’éteigne (environ 6 secondes) ce qui indique que le
système est sorti de l’enregistrement tx et qu’il est prêt
à fonctionner en mode normal.
INSTALLATIE
Nadat de externe ontvanger mod.RFM 1-RFM 2 in
een de meest geschikte positie is gezet om het
radiosignaal te ontvangen, moeten de aansluitingen
gemaakt worden op de klemmen: de voeding; let op de
polariteiten (indien op gelijkspanning) en op de spanningswaarde (indien 12 V moet de jumper W1 worden gesloten), de antenne; let op de warme pool(8)
en de kous(9) en moeten de klemmen van de relaisuitgangen worde verbonden; let voor kanaal 1 op de uitgang NO(4) (arbeidscontact) of NC(3) (rustcontact).
APPRENDIMENTO CODICI :
Alimentando per la prima volta il ricevitore,si verifica che il led rosso è acceso per indicare che il
ricevitore è pronto ad apprendere un telecomando
,(indifferentemente codice DIP o Rolling-Code con
riconoscimento automatico del tipo). Ora si può premere uno dei tasti di un Trasmettitore (1-2-3 o 4). A
codice appreso il ricevitore dà un comando alla centralina. Senza ripremere il tasto CH1 è possibile
apprendere ulteriori telecomandi della stessa
famiglia uno di seguito all’altro. Dopo l’apprendimento dell’ultimo telecomando,bisogna attendere lo
spegnimento del led (circa 6 secondi) ad indicare che
il sistema è uscito dall’apprendimento tx ed è pronto
per funzionare in modo normale.
ATTENZIONE : dopo aver appreso il primo codice il
sistema accetterà soltanto quella famiglia di codici (se
il primo è Rolling tutti gli altri dovranno essere
Rolling).Se la memorizzazione riguarda invece
trasmettitori a DIP-switch,basta apprendere un solo
telecomando.
CANCELLAZIONE della MEMORIA: in caso di
errore o quando si deve fare la cancellazione totale
dei codici occorre premere il pulsante CH1 (il led
rosso si accende ) e occorre mantenerlo premuto sino
a quando il led si spegne nuovamente.Al rilascio del
pulsante il led dà un lampeggio (che indica memoria
vuota) e poi si riaccende indicando che il sistema è
pronto per apprendere di nuovo un
telecomando(indifferentemente codice DIP o RollingCode). Nella versione bicanale (RFM 2) facendo
apprendere il 1° tasto del telecomando (che si
posiziona sul canale 1) il sistema apprende in automatico il 2° tasto del telecomando( che si posiziona
sul canale 2). Se si apprende sul canale 1 il tasto 2
del telecomando, premendo questo tasto si apriranno
tutti e due i canali.
APPRENDIMENTO TELECOMANDI SENZA
ACCEDERE ALLA CENTRALINA: Tramite la premuta contemporanea dei tasti 1 e 2 :
Dopo aver fatto apprendere al sistema un telecomando in modo manuale (premendo il tasto CH1) è possibile abilitare l’auto apprendimento di altri telecomandi della stessa famiglia,premendo assieme il
tasto 1 e 2 del trasmettitore già appreso, per 2 secondi,dopo di che premendo il tasto di un telecomando
nuovo lo si auto apprende, la verifica viene data dal
fatto che l’apprendimento dà un comando alla centralina.
WARNING: After learning the first code, the system
will accept only that family of codes (if the first is
Rolling all the other must be Rolling). If learning is for
DIP SWITCH transmitters, only one remote control
needs to be learned.
MEMORY RESET: If a mistake is made or if all the
codes need to be deleted, press the CH1 key (the red
LED comes on) and hold it pressed down until the
LED goes off again. When the key is released, the
LED flashes (indicating that the memory is empty)
and then comes back on, and the system is ready to
learn a new remote control (whether DIP SWITCH or
ROLLING-CODE). With the two-channel version
(RFM 2) learning 1nd key of the remote control (which
is positioned on channel 1) the system automatically
learns the 2nd key of the remote control (which is
positioned on channel 2). If learning key 2 of the
remote control on channel 1, both channels will open
when this key is pressed.
REMOTE CONTROL LEARNING WITHOUT
ACCESSING THE CONTROL UNIT: By simultaneously pressing the keys 1 and 2:
After letting the system learn a remote control in
manual mode (by pressing the key CH1), self-learning
of other remote controls of the same family can be
enabled by simultaneously pressing (for 2 seconds)
the keys 1 and 2 of the transmitter already learned.
Subsequently, when pressing the key of a new remote
control it is self-learned. Learning has been successful when it moves the gate.
ATTENTION : après avoir enregistré le premier code le
système n’acceptera plus que cette famille de codes (si
le premier est Rolling tous les autres devront être
Rolling). Si par contre la mémorisation concerne les
Emetteurs à DIP-switch, il suffit d’enregistrer une seule
télécommande.
SUPPRESSION de la MEMOIRE : en cas d’erreur ou
lorsque l’on doit supprimer tous les codes, il faut appuyer sur la touche CH1 (le voyant lumineux rouge s’allume) et il faut le maintenir enfoncé jusqu’à ce que le
voyant s’éteigne de nouveau. Lorsqu’on relâche la
touche le voyant lumineux clignote une fois (ce qui
indique que la mémoire est vide), puis il s’allume de
nouveau signalant ainsi que le système est prêt à
enregistrer de nouveau une télécommande (indifféremment du code DIP ou Rolling-Code). Dans la version
bicanal (RFM 2 ) en faisant apprendre 1ème touche de
la télécommande (qui se positionne sur le canal 1), le
système apprend en automatique la 2ème touche de la
télécommande (qui se positionne sur le canal 2). Si l’on
apprend sur le canal 1 la touche 2 de la télécommande,
en appuyant sur cette touche les deux canaux s’ouvriront.
APPRENTISSAGE TELECOMMANDES SANS
ACCEDER A L’UNITE: En appuyant en même temps
sur les touches 1 et 2 :
Après avoir fait apprendre au système une télécommande en mode Manuel (en appuyant sur la touche
CH1) il est possible d’habiliter l’apprentissage automatique d’autres télécommandes de la même famille, en
appuyant en même temps sur la touche 1 et 2 de
l’émetteur déjà appris, pendant 2 secondes, après quoi
en appuyant sur la touche d’une nouvelle télécommande elle s’apprend automatiquement. La vérification
est faite lorsque l’apprentissage fait actionner la grille.
INSTALACION
Después de haber posicionado el receptor externo
mod RFM 1-RFM 2..en la posición más apropiada
para la recepción de la señal radio, conectar a los
bornes: la alimentación teniendo cuidado con las
polaridades (si CC) y al valor de la tensión (si es 12V
cerrar jumper W1), la antena teniendo cuidado con
el polo caliente(8) y con la precinta(9) y conectar los
bornes de las salidas relé teniendo cuidado con el
canal 1 de la salida NA(4) (normalmente abierto) o
NC(3) (normalmente cerrado).
APRENDIZAJE DE LOS CÓDIGOS:
Al alimentar por primera vez el receptor, el led
rojo se enciende para indicar que el receptor se
encuentra listo para el aprendizaje de un mando a
distancia (con código DIP o Rolling-code, indistintamente, con reconocimiento automático del tipo).
Luego, pulsar una de las teclas de un transmisor (12-3 o 4). Una vez se ha aprendido el código, el receptor transmite un código a la centralita. Sin volver a
pulsar la tecla CH1, es posible aprender más mandos
a distancia de la misma familia uno detrás del otro.
Tras el aprendizaje del último mando a distancia, se
debe esperar que el led se apague (aproximadamente 6 segundos) para que indique que el sistema
ha efectuado el aprendizaje tx y se encuentra listo
para su funcionamiento normal.
ATENCIÓN: tras haber aprendido el primer código el
sistema sólo aceptara esa familia de códigos (si el
primero es Rolling todos los demás deben ser
Rolling). Si la memorización sólo concierne únicamente a los transmisores Dip-Switch, basta aprender
un único mando a distancia.
BORRADO de la MEMORIA: en caso de error o
cuando se deben borrar totalmente los códigos hay
que pulsar la tecla CH1 (el led rojo se enciende) y hay
que mantenerlo pulsado hasta que el led se apague
de nuevo. Al soltar la tecla el led parpadea (que indica memoria vacía) y luego se vuelve a encender indicando que el sistema se encuentra listo para aprender nuevamente un mando a distancia (con código
DIP o Rolling indistintamente). En la versión bicanal
(RFM 2 ) haciendo aprender el 1° tecla del mando a
distancia (que se posiciona en el canal 1) el sistema
aprende automáticamente la 2° tecla del mando a
distancia (que se posiciona en el canal 2). Si se
aprende en el canal 1 la tecla 2 del mando a distancia, al pulsar esta tecla se abrirán los dos canales.
APRENDIZAJE DE MANDOS A DISTANCIA SIN
ACCEDER A LA CENTRALITA: Mediante la presión simultánea de las teclas 1 y 2:
Una vez que el sistema ha aprendido un mando a distancia de forma manual (pulsando la tecla CH1) es
posible habilitar el aprendizaje de otros mandos a distancia de la misma familia, accionando al mismo
tiempo las teclas 1y 2 del trasmisor que ya ha aprendido los mandos durante 2 segundos; luego al pulsar
la tecla de un mando a distancia nuevo se efectúa el
autoaprendizaje. Esta operación se comprueba gracias al hecho de que el aprendizaje hace mover la
cancela.
CAPTAÇÃO DOS CÓDIGOS:
Alimentando o receptor pela primeira vez, verificase que o led vermelho está aceso a indicar que o
receptor está pronto para captar um telecomando
(indistintamente código DIP ou Rolling-Code, com
reconhecimento automático do tipo). Pode-se agora
premir um dos botões de um dos Transmissores (1-23- ou 4). Após captação do código, o receptor envia um
comando à central de gestão. Sem voltar a premir o
botão CH1 é possível captar outros telecomandos da
mesma família, um a um, sucessivamente. Após captação do último telecomando, é necessário aguardar
que o led apague (cerca de 6 segundos) a indicar que
o sistema saiu da fase de captação tx e está pronto
para começar a funcionar no modo normal.
ATENÇÃO! Após captação do primeiro código, o sistema aceitará apenas os códigos da mesma família do
primeiro (se o primeiro código for Rolling, os outros
deverão ser todos Rolling). No entanto, se a memorização disser respeito a transmissores a DIP-switch,
bastará captar apenas um telecomando.
CANCELAMENTO da MEMÓRIA: em caso de erro ou
no caso de se ter de fazer o cancelamento total dos
códigos, é necessário premir o botão CH1 (o led vermelho acende) e mantê-lo premido até o led voltar a
apagar. Ao tirar o dedo do botão, o led pisca uma vez
(facto que indica que a memória está vazia) e depois
voltará a acender a indicar que o sistema está pronto
para captar de novo a presença de um telecomando
(quer ele funcione a DIP, quer a Rolling-Code). Após a
captação do último telecomando, é necessário
aguardar que o led apague (cerca de 6 segundos),
facto que indica que o sistema saiu da fase de captação tx, e está pronto para começar a funcionar no
modo normal. Na versão bicanal (RFM 2), ao fazer
captar o 1° botão do telecomando (que se posiciona no
canal 1) o sistema capta automaticamente o 2° botão
do telecomando (que se posiciona no canal 2). Se se
captar o botão 2 no canal 1, ao premir este botão
ambos os canais se abrem.
CAPTAÇÃO DOS TELECOMANDOS SEM ACEDER
À CENTRAL DE GESTÃO: Mediante pressão
simultânea das teclas 1 e 2 :
Depois de ter feito com que o sistema captasse um
telecomando no modo manual (pressionando a tecla
CH1), pode-se activar a auto captação de outros telecomandos da mesma família, pressionando simultaneamente as teclas 1 e 2 do transmissor já captado,
durante dois segundos. A seguir, pressionando o botão
de um telecomando novo, o sistema capta-o automaticamente. A verificação de que o processo se realiza
efectivamente desta maneira é dada pelo facto de que
a captação provoca a movimentação do portão.
LERNEN DER CODES:
Wenn man den Empfänger zum ersten Mal speist,
wird die rote LED aufleuchten und somit anzeigen,
daß der Empfänger zum Lernen einer Fernbedienung
bereit ist, (DIP oder Rolling-Code mit automatischer
Erkennung des Typs). Jetzt kann man eine der Tasten
eines Senders (1-2-3 oder 4) betätigen. Wenn der
Code gelernt wurde, gibt der Empfänger dem
Steuergerät einen Befehl. Ohne erneute Betätigung
der Taste CH1 können eine nach der anderen weitere
Fernbedienung derselben Familie gelernt werden.
Nach dem Lernen der letzten Fernbedienung muß
man so lange warten, bis die LED erlischt (circa 6
Sekunden). Somit wird angezeigt, daß das System
vom Sender- Lernen abgesprungen und zum
Normalbetrieb bereit ist.
ACHTUNG: Nachdem das System den ersten Code
gelernt hat, wird es nur diese Codefamilie akzeptieren
(falls der erste ein Rolling ist, müssen die anderen
auch Rolling sein). Betrifft die Speicherung hingegen
Sender mit DIP-Schalter, genügt das Lernen einer
Fernbedienung.
LÖSCHEN AUS DEM SPEICHER: Wenn man einen
Fehler gemacht hat oder die Codes völlig gelöscht
werden müssen, den Druckknopf CH1 betätigen (die
rote LED leuchtet auf) und so lange gedrückt halten,
bis die LED wieder erlischt. Beim Loslassen des
Druckknopfes gibt die LED ein Blinkzeichen (Speicher
leer), leuchtet dann wieder und zeigt somit an, daß das
System bereit ist, wieder eine Fernbedienung zu lernen (egal ob DIP oder Rolling-Code). In de
tweekanaalsversie (RFM 2) leert het systeem, door 1e
toets van de afstandsbediening te laten leren (die zich
op kanaal 1 positioneert) automatisch de 2e toets van
de afstandsbediening (die zich op kanaal 2 positioneert). Als op kanaal 1 toets 2 van de afstandsbediening geleerd wordt, gaan beide kanalen open als op
deze toets gedrukt wordt.
LEREN VAN AFSTANDSBEDIENINGEN ZONDER
TOEGANG TOT DE REGELEENHEID: Door het
gelijktijdig indrukken van de toetsen 1 en 2:
nadat u het systeem handmatig een afstandsbediening heeft laten leren (door op de toets CH1 te
drukken) kan het automatisch leren van andere afstandsbedieningen van hetzelfde type worden vrijgegeven door de toetsen 1 en 2 van de al geleerde
zender tegelijkertijd 2 seconden lang in te drukken,
waarna een toets automatisch geleerd wordt wanneer
hij ingedrukt wordt. Dit is te controleren door het hek te
laten bewegen na het leren van de bediening.
Download