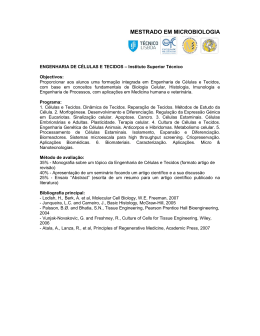
Rev Inst Ciênc Saúde
2005 abr-jun; 23(2): 151-5
Uma nova técnica de moldagem funcional para maxilas edentadas com
tecido flácido anterior, através de injeção de silicone
A new functional impression technique by method of injecting silicone
rubber material, proposed for edentate maxillas presenting anterior
flabby tissue
Atlas Edson Moleros Nakamae*
Regina Tamaki*
Flávio Augusto Pereira Gomes**
Tatiana de Carvalho Guarnieri**
Ricardo Jun Furuyama***
Roger Nishyama***
Resumo
A retenção antero-posterior de próteses totais para maxilas edentadas, que apresentam tecido flácido anterior, não tem apresentado resultados satisfatórios, independente da técnica de
moldagem utilizada. Acreditando ser fundamental eleger uma técnica de moldagem de acordo
com as diferentes compressibilidades da mucosa, uma técnica de moldagem funcional foi desenvolvida para maxilas edentadas que apresentam tecido flácido anterior. Após a moldagem
preliminar com godiva, são confeccionados um modelo anatômico e uma moldeira individual
com câmara de alívio na área correspondente ao tecido flácido. A moldagem é realizada em três
passos: 1) A impressão é feita com silicone, objetivando adaptar a moldeira e dela remover qualquer ponto de interferência, deslocando o tecido flácido. 2) A câmara é esvaziada e uma segunda moldagem é realizada, copiando o tecido flácido sem pressão. 3) A câmara é esvaziada uma
segunda vez, o molde é adaptado com uma pressão média e nesta condição, o silicone é injetado dentro da câmara, copiando o tecido flácido túrgido. A retenção conseguida com esta técnica alcança um grau satisfatório, uma vez que o silicone injetado reproduz o tecido flácido, que
se tornou mais túrgido com a compressão nos tecidos adjacentes e o conseqüente deslocamento de sangue para a região anterior, como ficará quando a prótese for usada fisiologicamente, e
não deformado nem em repouso.
Palavras-chave: Prótese total – Técnica de moldagem odontológica – Materiais para moldagem odontológica – Perda óssea alveolar
Abstract
The anteroposterior retention of the denture for edentate maxillas presenting anterior flabby
tissue has not been satisfactory, nevertheless the impression technique employed. It is
imperative to elect an impression making technique according to different mucosa’s compressibility. A functional impression making technique has been developed for edentate maxillas presenting anterior flabby tissue. After preliminary impression made by compound, a stone cast and an
individual tray is made. A block-out over corresponding flabby tissue leads to a chamber of relief
of this area. The functional molding is made in three steps. 1) The impression is made with silicone material, aiming to fit the tray and to outline any interference point of the tray, displacing the
flabby tissue. 2) The chamber is emptied and a second impression is made, recording the flabby
tissue without pressure. 3) The chamber is emptied for the second time, the molding is fitted with
mild pressure and in this condition, and silicone material is injected into the chamber, recording
the turgid flabby tissue. The retention achieved with this technique meets a satisfactory standard
once the silicone rubber material injected reproduces the flabby tissue, which becomes more
turgid under the compression of the circa-adjacent tissues. This fulfillment arises from the blood
flow pressure into the flabby tissue (anterior area). This technique focuses on the anteroposterior
retention of the upper denture. This kind of retention is achieved not from recording the flabby
tissue on a deformed condition nor from a rest one, but primarily by the fact that the flabby tissue
is reproduced in a turgid form, such as it becomes as the denture will be physiologically used.
Key words: Complete denture – Dental impression technique – Dental impression materials –
Alveolar bone loss
* Professor(a) Doutor(a) da Disciplina de Prótese Total do Departamento de Prótese da Faculdade de Odontologia da Universidade de São Paulo (FOUSP).
E-mail:[email protected]
** Aluno(a) de Pós-Graduação, nível Doutorado, do Departamento de Prótese da FOUSP.
*** Aluno de Pós-Graduação, nível Mestrado, do Departamento de Prótese da FOUSP.
152
Introdução
Estudos realizados com pacientes edentados superiores e parcialmente edentados inferiores, que foram
reabilitados com próteses totais e próteses parciais removíveis, respectivamente, indicam que 24% destes
apresentam características similares8 como a perda óssea anterior do processo alveolar superior, extrusão das
tuberosidades maxilares, assim como dos dentes anteriores inferiores, hiperplasia papilar no palato duro e
reabsorção óssea sob a base das próteses parciais removíveis. De acordo com Thiel et al.8 (1996), a expressão “Síndrome da Combinação” é usada para descrever a convergência destes achados, os quais também
são encontrados em pacientes com próteses totais superiores e próteses totais implanto-retidas (overdentures)10. Esta situação conduz a um aumento na força
funcional dos contatos anteriores e pode causar
reabsorção do processo alveolar ântero-superior, o que
torna a área da mucosa espessa e flácida, permitindo
movimentos laterais e a conseqüente perda de retenção, principalmente na área do selado posterior.
Há numerosas opções para resolver o problema, mas
todas elas envolvem o desenvolvimento de um esquema oclusal que proteja a região maxilar anterior da
pressão excessiva em oclusão cêntrica e habitual.
Tecidos fibromucosos sem movimentos tangenciais
podem ser parcialmente comprimidos, dentro de um limiar biológico, para permitir uma grande eficiência
mastigatória em uma contração muscular isométrica.
Outra vantagem desta compressão fisiológica é a grande estabilidade da prótese durante a função. Por outro
lado, estes tecidos apresentam movimentos tangenciais
que podem ser aliviados1, 3-5,7,9,11,13, para não sofrerem deformação.
Fatores externos como o desenho da moldeira e o
material selecionado, podem controlar a pressão durante a moldagem3-12. Isto é demonstrado por uma técnica
de moldagem em dois passos para mucosas altamente
flácidas e deslocáveis5: uma janela na moldeira individual envolve todos os tecidos e, após a impressão fisiológica das bordas usando godiva de impressão tipo I e
o restante da moldeira coberta usando pasta de óxido
de zinco-eugenol, toda a pasta extravasada pela janela
é removida para permitir a aplicação de gesso de impressão sobre a mucosa com uma espátula. Desta forma, é obtida uma moldagem estática do tecido flácido e
móvel. Outros materiais podem substituir a pasta de óxido de zinco-eugenol, como o silicone e a mercaptana,
que tem características de moldagem idênticas, embora
mais caros.
Quando uma prótese total superior oclui com dentes
anteriores inferiores por um longo período, devido à ausência de suporte posterior, a dissipação da pressão na
região anterior promove uma excessiva reabsorção da
crista do osso alveolar, levando à sua substituição por
tecido mole. Em resposta à distribuição imprópria da
carga oclusal, ocorre uma ruptura do selamento, seguida pela perda de retenção. Conseqüentemente, é fundamental eleger uma técnica de moldagem que permita
variações de acordo com a compressibilidade da mucosa. Para cumprir este requisito, uma técnica de moldagem funcional foi desenvolvida para maxilas edentadas que apresentam tecido flácido anterior, e será apresentada a seguir.
Métodos
Previamente à descrição da técnica de moldagem
funcional, é explicada a moldagem anatômica, devido
ao fato de que do modelo obtido dessa moldagem é
que se origina a moldeira individual, usada na moldagem funcional apresentada. A técnica utilizada é a preconizada pela Disciplina de Prótese Total da Faculdade
de Odontologia da Universidade de São Paulo –
Universidade de São Paulo (FOUSP), que utiliza godiva
de impressão tipo II em placas conduzidas a um banho
de água a 60°C. Quando o material é uniformemente
plastificado, é disposto na moldeira previamente selecionada de maneira a cobrir todas as bordas e é levado
centralizado à boca do paciente. Então, é feita uma
compressão simultânea, seguida de uma tração de lábios e bochechas. O molde é removido, lavado em
água fria, seco e analisado (Figura 1). Se aprovado, é
preenchido com gesso tipo II (100g de gesso para 50
cc de água) sobre vibração. Após a cristalização do
gesso, o modelo de estudo é removido em água quente
(± 60°C) e convenientemente recortado e delimitado
usando um lápis cópia.
Para limitar a cobertura da prótese que representa a área
envolvida pela futura prótese, é importante reconhecer
algumas estruturas anatômicas como o freio labial superior
e as inserções dos músculos bucinadores, que devem ser
contornados de forma a evitar o deslocamento da moldeira
pela sua contração. Uma linha de 3 a 4 mm abaixo da
inserção da fibromucosa móvel é unida à linha previamente
contornada e contínua para a parte posterior onde envolve
as tuberosidades maxilares. O último passo é traçar uma
linha a 2 mm sobre o palato mole. A porção anterior,
correspondente ao tecido flácido, também é delimitada
para posteriormente ser feito um alívio (Figura 2).
Para fazer a moldeira individual, é utilizado o método
proposto pela Disciplina de Prótese Total da FOUSP. O
modelo de estudo é aliviado com cera rosa nº 7, tornandose expulsivo o suficiente para permitir a remoção da
moldeira sem danificá-lo. A muralha anterior pode ser feita
com a mesma cera (Figura 3) e então o modelo está
pronto para receber uma fina camada de isolante para
resina. Manipula-se a resina acrílica (15 cc de pó de
resina acrílica auto-polimerizável incolor, saturada pelo
líquido da resina acrílica auto-polimerizável, em um recipiente de vidro), espera-se pela fase plástica e o material é disposto sobre o modelo com uma espátula nº 36
e com o dedo indicador molhado no monômero, de
maneira a obter uma espessura uniforme de ± 2 mm. Um
cabo medindo 1 x 0,5 x 1 cm (largura x espessura x altura) é adaptado sobre a região anterior, na linha média,
com uma inclinação de 60° para o lado vestibular (Figura
4). Uma vez terminado o processo de polimerização, a
moldeira é recortada com fresas para resina acrílica e
Nakamae AEM, Tamaki R, Gomes FAP, Guarnieri T de C, Furuyama RJ, Nishyama R. Uma nova técnica de moldagem funcional para
maxilas edentadas com tecido flácido anterior, através de injeção de silicone. Rev Inst Ciênc Saúde 2005 abr-jun; 23(2):151-5.
153
Figura 1. Moldagem anatômica
Figura 2. Delimitação da cobertura da prótese e dos tecidos moles
Figura 3. Bloqueio de cera na região correspondente do tecido mole
anterior
Figura 4. Moldeira individual em resina acrílica com a muralha de cera
Figura 5. Primeira camada de silicone de condensação
Figura 6. Pronta para carregar a segunda camada para moldagem
Nakamae AEM, Tamaki R, Gomes FAP, Guarnieri T de C, Furuyama RJ, Nishyama R. Uma nova técnica de moldagem funcional para
maxilas edentadas com tecido flácido anterior, através de injeção de silicone. Rev Inst Ciênc Saúde 2005 abr-jun; 23(2):151-5.
154
Figura 7. Injeção de silicone de condensação através da perfuração
palatina da moldeira individual
Figura 8. Técnica de moldagem funcional através da injeção de silicone
concluída
polida com tiras abrasivas nº 120 montadas em um
mandril para peça de mão.
Então, posiciona-se a moldeira na boca do paciente,
ajustando-a cuidadosamente, procurando por eventuais
pontos que podem causar injúrias à mucosa, visualizando também áreas isquêmicas, que podem impedir a
correta adaptação da moldeira. Após os ajustes necessários, a moldeira de resina acrílica pode receber uma
camada de adesivo sobre toda a sua extensão interna e
0,5 cm na sua superfície externa, de modo que haja
adesão do material de impressão à moldeira. A moldagem utilizando silicone é realizada em três passos: o
primeiro serve para ajustar a moldeira ao rebordo; o segundo, para concluir a moldagem do mesmo; e o terceiro, para reproduzir o tecido flácido por injeção.
Moldagem funcional: 1) Manipulam-se dez centímetros de pasta base (silicone de condensação) com a
mesma quantidade de pasta catalisadora (pasta ativadora para silicone de condensação) até que seja alcançado um estado uniforme. Dispensa-se o material dentro
da moldeira e leva-se à boca. Mantendo dois dedos (dedos indicador e médio) na região de pré-molares, uma
pressão bilateral e uniforme permite o escoamento. A
moldeira deve ser mantida no lugar e, momentos antes
da presa, determinada clinicamente quando o material
não mais gruda na luva, mas ainda pode ser modelado,
inicia-se a tração dos lábios com o objetivo de reproduzir o seu selado periférico. Após a cura, remove-se a
moldagem da boca e são feitos os desgastes necessários na resina utilizando-se brocas nas áreas sem silicone, as quais expõem sobre-extensões da moldeira
(Figura 5); 2) pincelar uma nova camada de adesivo nos
pontos falhos e, utilizando-se um instrumento afiado,
remover o material correspondente à região anterior,
incluindo a muralha de cera (Figura 6). Cuidadosamente,
procede-se às perfurações com broca esférica de metal
nº 8 para peça de mão, uma no lado vestibular da região
anterior com o objetivo de permitir a injeção do material,
e outra no lado palatino para permitir o escoamento e
assim diminuir a pressão sobre o tecido flácido2,6.7.9.13.
Ambas as perfurações podem ser obstruídas com cera
utilidade e a moldeira pode ser carregada novamente
com dez centímetros de cada pasta do material de
moldagem elástico, repetindo os procedimentos descritos para a primeira moldagem. Remove-se o material
da região anterior e as ceras das perfurações e mantémse a moldeira assentada sobre o rebordo com alguma
pressão a fim de deixar o tecido flácido mais túrgido; 3)
Com a ajuda de uma seringa plástica para impressão,
injetam-se 5 centímetros de silicone pela perfuração
palatina, enquanto o silicone flui pela perfuração
vestibular (Figura 7). Neste passo, o silicone injetado
reproduz o tecido flácido, que se torna mais túrgido com
a compressão dos tecidos adjacentes. Esta condição
resulta da pressão causada pelo fluxo sanguíneo para o
tecido flácido (região anterior) (Figura 8).
Conclusão
Esta técnica não incorre em riscos para o paciente e
para a equipe. As dificuldades são a sua complexibilidade e a habilidade necessária para ser realizada. Outro aspecto negativo a ser apontado é o tempo de trabalho maior, e conseqüentemente o aumento de custo.
Sua contribuição mais importante da técnica é o aumento da retenção ântero-posterior da prótese superior, já
que estes casos de tecido flácido anterior desafiam ainda hoje os protesistas.
Nakamae AEM, Tamaki R, Gomes FAP, Guarnieri T de C, Furuyama RJ, Nishyama R. Uma nova técnica de moldagem funcional para
maxilas edentadas com tecido flácido anterior, através de injeção de silicone. Rev Inst Ciênc Saúde 2005 abr-jun; 23(2):151-5.
155
Referências
1. Bolouri A, McKinney TW. Two-stage impression
making for complete dentures over loose mobile
supporting tissues. Compend Cont Educ Dent
1989; 10(4): 196-200.
8. Kelly E. Changes caused by a mandibular
removable partial denture opposing a maxillary
complete denture. J Prosthet Dent 1972; 27: 14050.
2. Collet HA. Final impressions for complete
dentures. J Prosthet Dent 1970; 23(3): 250-64.
9. Klein IE, Broner AS. Complete denture secondary
impression technique to minimize distortion of
ridge and border tissues. J Prosthet Dent 1985;
54(5):660-4.
3. Frank RP. Analysis of pressures produced during
maxillary edentulous impression procedures.
J Prosthet Dent 1969; 4: 400-13.
4. Frank RP. Controlling pressures during complete
denture impressions. Dent CIin North Am 1970;
14: 453-70.
5. Hobkirk JA. A colour atlas of complete dentures.
Netherlands: Wolfe; 1985. p. 15-29.
6. Jamieson CH. A Complete denture impression
technique. J Prosthet Dent 1954; 4: 17-29.
7. Kawabe S. Kawabe’s complete dentures. St Louis:
Ishiyaku Euroamerica; 1992. p. 15-35.
10. Thiel CP, Evans DB, Burnett RR. Combination
syndrome associated with a mandibular implantsupported overdenture: a clinical report.
J Prosthet Dent 1996; 75: 107-13.
11. Tucker KM. Relining complete dentures with the
use of a functional impression. J Prosthet Dent
1966; 16: 1054-7.
12. Weng BX, Khlevnoy V. Pressure control for denture
impressions. Oral Health 1995; 85(11):21-7.
13. Wolff JL. Dual impression technique for complete
dentures. Dent Survey 1975; 51(2): 24-8.
Recebido em 16/9/2004
Aceito em 13/12/2004
Nakamae AEM, Tamaki R, Gomes FAP, Guarnieri T de C, Furuyama RJ, Nishyama R. Uma nova técnica de moldagem funcional para
maxilas edentadas com tecido flácido anterior, através de injeção de silicone. Rev Inst Ciênc Saúde 2005 abr-jun; 23(2):151-5.
Rev Inst Ciênc Saúde
2005 abr-jun; 23(2): 157-61
A new functional impression technique by method of injecting silicone
rubber material, proposed for edentate maxillas presenting anterior
flabby tissue
Atlas Edson Moleros Nakamae*
Regina Tamaki*
Flávio Augusto Pereira Gomes**
Tatiana de Carvalho Guarnieri**
Ricardo Jun Furuyama***
Roger Nishyama***
Abstract
The anteroposterior retention of the denture for edentate maxillas presenting anterior flabby
tissue has not been satisfactory, nevertheless the impression technique employed. It is
imperative to elect an impression making technique according to different mucosa’s compressibility. A functional impression making technique has been developed for edentate maxillas presenting anterior flabby tissue. After preliminary impression made by compound, a stone cast and an
individual tray is made. A block-out over corresponding flabby tissue leads to a chamber of relief
of this area. The functional molding is made in three steps. 1) The impression is made with silicone material, aiming to fit the tray and to outline any interference point of the tray, displacing the
flabby tissue. 2) The chamber is emptied and a second impression is made, recording the flabby
tissue without pressure. 3) The chamber is emptied for the second time, the molding is fitted with
mild pressure and in this condition, and silicone material is injected into the chamber, recording
the turgid flabby tissue. The retention achieved with this technique meets a satisfactory standard
once the silicone rubber material injected reproduces the flabby tissue, which becomes more
turgid under the compression of the circa-adjacent tissues. This fulfillment arises from the blood
flow pressure into the flabby tissue (anterior area). This technique focuses on the anteroposterior
retention of the upper denture. This kind of retention is achieved not from recording the flabby
tissue on a deformed condition nor from a rest one, but primarily by the fact that the flabby tissue
is reproduced in a turgid form, such as it becomes as the denture will be physiologically used.
Key words: Complete denture – Dental impression technique – Dental impression materials –
Alveolar bone loss
Introduction
Studies regarding superior edentate and inferior
partial edentate patients, who where rehabilitated by
complete dentures and removable partial prostheses,
respectively, indicated that 24% presented similar
characteristics 8 such as anterior bone loss of the
superior alveolar process, extrusion of maxillary
tuberosities, as well as the anteroinferior teeth,
papillary hyperplasia on the hard palate and bone
resorption under the removable partial prostheses’
bases. According to Thiel et al. 8 (1996), the phrase
"Combination Syndrome" is used to describe the
convergence of these ailments. These ailments are
also found in superior complete denture and inferior
implant-supported overdenture users11. This situation
leads to an increase in the force of anterior functional
c o n ta ct s , a n d can caus e resorption of the
anterosuperior alveolar process, which makes the
area’s mucosa thick and flaccid, allowing lateral
movement and consequent retention loss, mainly of
the post dam area.
There are numerous options to solve this problem, but
all of them involve the development of an occlusal
scheme that protects the anterior maxillary region from
excessive pressure in both centric and habitual
positions.
Fibro mucosal tissues without tangential movements
may be partially compressed in a biologic threshold to
enable greater masticator efficiency in an isometric
muscular contraction. Another advantage of this
physiologic compression is the greater stability of the
prosthesis during function. On the other hand, those
tissues presenting tangential movements must be
relieved1,3-5,7,9,11,13, in order to not become deformed.
Outer factors such as the tray’s design and the
material selected can control the pressure during the
impression making3,12. This is demonstrated by a twosteps impression making technique for highly flabby
and displaceable mucosa5: a window in the individual
tray involves all this tissue and, after the physiologic
impression of the borders using type I impression
* PhD, Professor, Discipline Complete Denture, School of Dentistry, Universidade de São Paulo (USP). E-mail: [email protected]
** Graduate Student, Doctor’s Degree, Discipline Complete Denture, School of Dentistry, USP.
*** Graduate Student, Master’s Degree, Discipline Complete Denture, School of Dentistry, USP.
158
compound and the rest of the denture coverage using
zinc oxide-eugenol paste, all of the outer paste through
the window is removed in order to allow the application
of impression plaster over the mucosa with a spatula.
Therefore, a static impression of the flabby and
moveable tissue is obtained. Other materials can be
used to replace the zinc oxide-eugenol paste, such as
silicone and mercaptan, which have identical
impression characteristics, although more expensive.
When a superior complete denture occludes with
anteroinferior natural teeth for a long period, due to the
absence of posterior support, the load dissipation on
the anterior region promotes an excessive resorption of
the alveolar bone crest, leading to its replacement by
soft tissue. In response to the non-proper distribution of
the occlusive load, a rupture of the sealing occurs
followed by a retention loss. Hence, it is imperative to
elect an impression making technique that allows
variations according to the mucosa’s compressibility.
To accomplish this requirement, a functional
impression making technique has been developed for
edentate maxillas presenting anterior flabby tissue, as
follows.
Methods
Prior to the description of the functional impression
making technique itself, it is primary to explain the
anatomic one, due to the fact that the model obtained
by this impression originates the individual tray used for
the functional impression making as to be presented.
The technique adopted is the pre-cognized by
Complete Denture Discipline of the FOUSP (Faculdade
de Odontologia da Universidade de São Paulo), which
utilizes type II impression compound in plates taken to
the compound water bath heater half-filled of water at
60°C. When the material is uniformly softened, it is
disposed over the previously selected tray in a manner
to cover all borders, while taken into the patient’s mouth
centralized. Then, a simultaneous bilateral compression
is carried out, followed by a lips’cheeks’ traction. The
impression is then removed, washed in cold water,
dried and analyzed (Figure 1). If approved, the
impression is filled with plaster type II (100 g of plaster
to 50 cc of water) under vibration. After plaster
crystallization, the study cast is removed in hot water (±
60°C) and conveniently trimmed and delimited using the
ink pencil.
For limiting the denture coverage that represents the
area involved by the future prosthesis, it is important to
recognize anatomic structures such as the superior lip
frenum and the buccinator muscle insertion, which must
be contoured in order to avoid the displacement of the
tray by their contractions. A 3 to 4 mm line beyond the
insertion of the moveable fibromucosa links the previous
contoured lines and continues to the posterior portion,
where it involves the maxillary tuberosity. The last step is
to trace a line that goes 2 mm over soft palate. The
anterior portion, corresponding to the flabby tissue, is
also delimited to be later blocked out (Figure 2).
To make the individual tray, the method proposed by
the Complete Denture Discipline of the FOUSP, is
described in the sequence. The study cast has to be
relieved with rose wax nº 7 to become expulsive
enough to allow the removal of the tray without
damaging it. The anterior block-out must be made with
this same wax (Figure 3) and then the cast is ready to
receive a thin layer of separating film. Manipulate the
acrylic resin (15 cc of auto-polymerizing acrylic material
colorless ponder Jet, saturated by auto-polymer acrylic
resin liquid Jet in a glass recipient), wait for the plastic
phase and dispose the material over the cast with a
spatula nº 36 and the forefinger wet in monomer, in a
manner to get an uniform thickness of ± 2 mm. A
handle string measuring 1 X 0.5 X 1 cm (largeness X
thickness X width) is adapted over the anterior region,
in the median line, in a 60° inclination to the vestibule
side (Figure 4). Once the polymerization process is
over, the tray is cut by freesias for acrylic and polished
by abrasive strips nº 120 held by mandrel for air turbine
hand piece.
Firstly, place the tray into patient’s mouth and
carefully adjust, searching for eventual points that might
injure the mucosa, visualized as ischemic areas, which
might even disable the individual tray correct fitting.
After the necessary adjusts, the acrylic tray must receive
a layer of adhesive all over its inner portion and 0.5 cm
on the outer surface, in order to enable the adhesion of
the impression material to the tray. The impression using
silicone rubber is carried out in three steps: the first
serves to adjust the tray to the ridge; the second, to
conclude the impression making itself; and the third, to
reproduce the flabby tissue by injection.
Functional Impression: 1) ten centimeters of the base
paste (condensation silicone rubber) must be
manipulated with the same quantity of the catalyst paste
(activator paste for condensation silicone) until an even
state is achieved. Dispose the material inside the tray
and take it into the mouth. Maintaining two fingers
(forefinger and medium) on the premolar region, a
bilateral firm and uniform pressure allows draining. The
tray must be kept in place and, a few moments before
the cure (clinically, once the material is no longer
attached to the gloves), but where it still can be modeled,
initiate the lips’ cheeks’ traction in order to reproduce its
peripheral seal. After cure, remove the impression from
the mouth and make the necessary resin wearing using
burs in the areas without silicone, stating the tray
overextension (Figure 5); 2) brush a new adhesive layer
on the frayed points and, using a sharp instrument,
remove the material corresponding to the anterior region,
including the wax block-out (Figure 6). Carefully proceed
with two perforations using steel aspheric bur nº 8 for air
turbine hand piece, one on the vestibule side of the
anterior area in order to allow the injection of the material,
and another one on the lingual to allow draining,
decreasing the pressure over the flabby tissue2,6,7,9,13. Both
of them must be tapped with utility wax and the tray must
be once again carried with ten centimeters of each paste
of the impression rubber material, repeating the
Nakamae AEM, Tamaki R, Gomes FAP, Guarnieri T de C, Furuyama RJ, Nishyama RA New functional impression technique by method of injecting
silicone rubber material, proposed for edentate maxillas presenting anterior flabby tissue. Rev Inst Ciênc Saúde 2005 abr-jun; 23(2):157-61.
159
Figure 1. Anatomic impression making
Figure 2. Delimitation of denture coverage and soft tissue
Figure 3. Wax block-out in region corresponding to anterior soft tissue
Figure 4. Individual tray in acrylic resin with anterior wax block-out
Figure 5. First layer of condensation silicone rubber material
Figure 6. Ready to carry out second layer of impression making
Nakamae AEM, Tamaki R, Gomes FAP, Guarnieri T de C, Furuyama RJ, Nishyama RA New functional impression technique by method of injecting
silicone rubber material, proposed for edentate maxillas presenting anterior flabby tissue. Rev Inst Ciênc Saúde 2005 abr-jun; 23(2):157-61.
160
Figure 7. Injection of condensation silicone rubber material through
palatine hole of individual tray
procedures described for the first impression making.
Remove both the anterior area material and the wax of
the perforations and correctly fit the tray over the ridge
under some pressure in order to let the flabby tissue
become more turgid, and 3) with the help of a plastic
impression syringe, inject five centimeters of the silicone
through the palatine hole until it overflows through the
vestibule one (Figure 7). In this step, the silicone rubber
material injected reproduces the flabby tissue, which
becomes more turgid under the compression of the
circa-adjacent tissues. This turgidity/fulfillment arises
from the blood flow pressure into the flabby tissue
(anterior area). This impression is produced by keeping
the anterior area into a tray chamber, feasible due to a
wax block-out over this area (Figure 8).
Figure 8. Functional impression making technique throughout injection
of silicone rubber material concluded
Conclusion
This technique does not incur in risks either for the
patients or for the staff. The difficulties are the
complexity and the skills required to be played. Another
negative aspect to be pointed out is the longer time
spent, and the consequent increased costs.
The technique’s most important contribution is the
anteroposterior retention of the upper denture, enabled
by the fact that the flabby tissue is reproduced in the
way it will be physiologically used. The tissue turgidity
has been ignored over the time, making the cases
involving anterior flabby tissue a main challenge for the
prosthodontists up to now.
References
1. Bolouri A, McKinney TW. Two-stage impression
making for complete dentures over loose mobile
supporting tissues. Compend Cont Educ Dent
1989; 10(4): 196-200.
2. Collet HA. Final impressions for complete
dentures. J Prosthet Dent 1970; 23(3): 250-64.
3. Frank RP. Analysis of pressures produced during
maxillary edentulous impression procedures.
J Prosthet Dent 1969; 4: 400-13.
4. Frank RP. Controlling pressures during complete
denture impressions. Dent CIin North Am 1970;
14: 453-70.
5. Hobkirk JA. A colour atlas of complete dentures.
Netherlands: Wolfe; 1985. p. 15-29.
6. Jamieson CH. A Complete denture impression
technique. J Prosthet Dent 1954; 4: 17-29.
7. Kawabe S. Kawabe’s complete dentures. St Louis:
Ishiyaku Euroamerica; 1992. p. 15-35.
8. Kelly E. Changes caused by a mandibular
removable partial denture opposing a maxillary
complete denture. J Prosthet Dent 1972; 27: 14050.
Nakamae AEM, Tamaki R, Gomes FAP, Guarnieri T de C, Furuyama RJ, Nishyama RA New functional impression technique by method of injecting
silicone rubber material, proposed for edentate maxillas presenting anterior flabby tissue. Rev Inst Ciênc Saúde 2005 abr-jun; 23(2):157-61.
161
9. Klein IE., Broner AS. Complete denture secondary
impression technique to minimize distortion of
ridge and border tissues. J Prosthet Dent 1985;
54(5):660-4.
10. Thiel CP, Evans DB, Burnett RR. Combination
syndrome associated with a mandibular implantsupported overdenture: a clinical report.
J Prosthet Dent 1996; 75: 107-13.
11. Tucker KM. Relining complete dentures with the
use of a functional impression. J Prosthet Dent
1966; 16: 1054-7.
12. Weng BX, Khlevnoy V. Pressure control for denture
impressions. Oral Health 1995; 85(11):21-7.
13. Wolff JL. Dual impression technique for complete
dentures. Dent Survey 1975; 51(2): 24-8.
Received in 16/9/2004
Accepted in 13/12/2004
Nakamae AEM, Tamaki R, Gomes FAP, Guarnieri T de C, Furuyama RJ, Nishyama RA New functional impression technique by method of injecting
silicone rubber material, proposed for edentate maxillas presenting anterior flabby tissue. Rev Inst Ciênc Saúde 2005 abr-jun; 23(2):157-61.
Baixar