An Overview of Some
Microcontrollers/Microprocessors
for Embedded Systems
1
Some Microcontrollers/Microprocessors to be
Addressed
================ In B.Sc. Course ========
8051 Family (MCS-51) (Intel and Others)
PIC (Arizona Microchip)
============ in M. Sc. Course ===========
X86 (Intel, AMD computers)
ARM Family (32-bit RISC from Accorn)
TMS320XX DSP Family (Texas Instruments)
2
MCS-51 Family
3
The 8051 8-bit Microprocessor/
Microcontroller Family (MCS-51)
(Intel, Philips, Atmel, Siemens, AMD, etc)
8051, 8751, 8031, 8052, 8752, 8032, Atmel
89ATC2051 (20 pins), Philips 80C552 (with
A/D converter and PWM), 8051XA (16 bits)
4
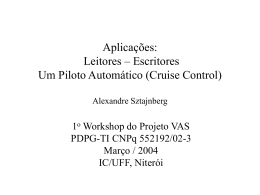
8051 (old chip) Block Diagram
External Interrupts
Interrupt
Control
Timer 1
Timer 2
4k
ROM
128 bytes
RAM
Bus
Control
4 I/O Ports
CPU
OSC
P0 P2 P1
Addr/Data
P3
Serial
TXD RXD
5
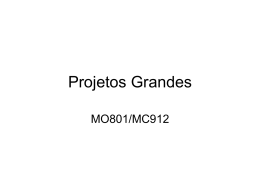
8051 Internal Block Diagram
6
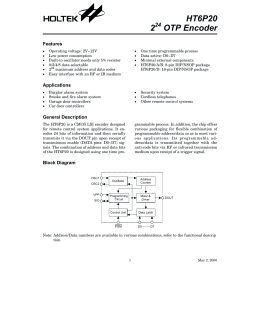
8051 I/O Pins for 40-Pin DIP Package
7
8051 Family (8051, 8052, 802051, etc)
The 8051 is a Single
Chip Computer or
microcontroller
Developed Initially by
Intel. It is one of the
most widely used
microcontroller chips in
the world.
IMPORTANT PINS:
Port 0 (acts as a multiplexed low byte address and
data bus for large external memory design).
Port 1 – 8-bit R/W - General Purpose I/O
Port 2 (act as the high byte of the address bus for
large external memory design).
Port 3 – General Purpose I/O if not using any of the
internal peripherals (timers) or external interrupts.
Other Companies have
binary-compatible
microcontrollers with
additional features.
There are several versions
of the 8051 family. At the
lowest end there is a 20-pin
AT89C2051 microcontroller
chip from Atmel (cost : US$
3.00 !!!).
PSEN
(out): Program Store Enable, the read strobe to
external program memory (active low).
ALE (out): Address Latch Enable, to latch address
outputs at Port0 and Port2
EA (in): External Access Enable, active low for
access external program memory locations 0 to 4K
UART pins for serial I/O on Port 3
XTAL1 & XTAL2: Crystal inputs for internal
oscillator.
8
Basic 8051 Characteristics
4K bytes of internal ROM
128 bytes of internal RAM:
• four register banks (0 - 3),
each containing R0 - R7 8-bit
registers.
• 16 bytes of bit addressable
area.
• 80 bytes of general purpose
memory.
Four 8-bit I/O ports (P0 - P3).
Two 16-bit timers/counters
One serial receiver/ transmitter
(UART) interface.
One instruction cycle = 12 clock
cycles (1us per instruction at 12
MHz clock)
Five (2 external and 3 internal)
interrupt sources.
Expandable to 64K external
code (program) memory
space.
Expandable to 64K external
data memory space.
Boolean instructions work
with one bit at a time.
4 s for either an 8-bit multiply
or divide instruction. (Assume
a 12 MHz clock signal).
On chip oscillator to generate
clock.
One cycle 8-bit Multiply and
Divide Instructions – Very
Limited use
9
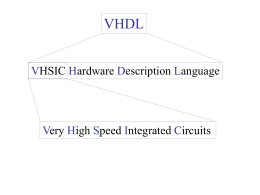
I/O Port (P0 - P3) Structure (Cont.)
One of the most useful features of the 8051 is
that it contains four I/O ports (P0 - P3).
• All ports are bidirectional (they can take inputs and can
provide output signals).
• Each port has an 8-bit latch, an output driver and an input
buffer (see next slide example of Port 3 pin)
• All ports have multiple functions (except P1).
• On RESET all the ports associated with latches are set to 1’s.
• The bit latch is represented as a D type flip-flop.
• When a bit latch is to be used as an input, a “1” must be
written to the corresponding latch by the program to
configure it as an input.
• An instruction can read the status of the latch (read latch
signal) and a different instruction can read the status of the
input pin signal (read pin signal).
10
Port P3
8051 Port 3 Bit Latches and I/O Buffers
11
Port P0
Acts as a multiplexed data bus:
•
•
•
•
•
Tristate bus with strong pull-ups.
8-bit instruction bus, strobed by PSEN.
Low byte of address bus, strobed by ALE.
8-bit data bus, strobed by WR and RD.
Port 0 may not be used as general purpose I/O
when being used as the address/data bus.
3.2 mA outputs (about 8 LSTTL
loads).
12
Port P1
This is an I/O port only (it does not have
other functions like timer or interrupt)
Input:
• 1 is written to the latch on RESET or by a program, the
pins are floating on high impedance.
• Any external device can alter the state which can be read
by reading the latches.
Output:
• Directly 0 to 0 or 1 to 1, whatever, it will appear on the
corresponding pins.
All bit latches have a fixed internal pullup
resistor.
1.6 mA outputs (about 4 LSTTL loads).
13
Port P2 and P3
Port P2 operates similarly to port P1,
and with an alternate function as high
byte of address bus for external
program and data memory accesses.
• Port 2 may not be used as general purpose I/O
when being used as the address bus.
Port P3 operates similarly to port P1,
but it also provides the alternate
functions (see next slide).
14
Port 3 Alternate Functions
15
Read-Modify-Write Feature
Some instructions that read a port read the latch
and others read the pin.
The instructions that read the latch rather than
the pin are the ones that read a value, possibly
change it, and then rewrite it to the latch. These
are called “read-modify-write” instructions.
The read-modify-write instructions are directed
to the latch rather than the pin. The objective is
to avoid a possible misinterpretation of the
voltage level at the pin (you can´t read and
modify an externally provided input signal if you
don´t have control over it)
16
Read-Modify-Write Instructions
The instructions listed below are read-modify-write
instructions.
ANL
ORL
XRL
JBC
CPL
INC
DEC
DJNZ
MOV PX.Y, C
CLR PX.Y
SET PX.Y
(logical AND, e.g. ANL P1, A)
(logical OR, e.g. ORL P2, A)
(logical EX-OR, e.g. XRL P3, A)
(jump if bit = 1 and clear bit, e.g. JBC P1.1, LABEL)
(complement bit, e.g. CPL P3.0)
(increment, e.g. INC P2)
(decrement, e.g. DEC P2)
(decrement and jump if not zero, e.g. DJNZ P3, LABEL)
(move carry bit to bit Y of Port X)
(clear bit Y of Port X)
(set bit Y of Port X)
• When the destination operand is a port, or a port bit,
these instructions read the latch rather than the pin.
• If only examine P1.0, then read the pin e.g. MOV C, P1.0
17
Memory Organization
Code/Data Space
Notable Features
Space for code/program is
separate from data
Max of 64K of code and 64K
of data space, using external
components
How does the hardware know
when it is an internal or
external access to ROM or
RAM? – Use different
instructions for each case !!
MOV – Internal RAM
MOVC – ROM/EPROM
MOVX – External RAM
Registers & I/O ports
are memory mapped.
Stack resides in
internal RAM
Parts of the RAM are
bit-wise accessible.
18
Register Banks
4 banks of registers (R0 to R7)
The idea of ‘register banks’ permits fast and effective
‘context switching’ whereby separate sections of software
use a private set of registers independent of other sections
of software.
Why? What does this mean? What uses does this
have?
19
An Accumulator Architecture: the 8051
8051 is an accumulator architecture (not a
“pure” one)
There’s one register, the accumulator (ACCU),
that is both source and destination register of
most operations
ADD
A,ADDRESSB
; A = A + Mem[ADDRESSB]
Registers are 8 bits wide
• Special instructions
add with carry
subtract with borrow
Despite their age, 8051-like chips are still often
used in calculators, digital clocks, VCRs, etc.
20
8051 Registers and PSW
ACC - accumulator
B - used in multiply and divide
PSW - Program Status Word
SP - Stack Pointer
PC Program Counter - not user accessible
IP, IE (Interrupt Priority and Interrupt Enable)
DPH and DPL (Data Pointer High and Low)
PCON – Power Control Register
SBUFFER and SCON – Serial Buffer and Serial Control Reg
TH0, TL0, TH1, TL1 – (Timer High and Low 0 and 1)
TCON and TMOD – Timer Control Reg and Timer Mode Reg
PSW:
CY AC F0 RS1 RS0 OV - P
0
0
1
1
0 - 00h to 07h
1 - 08h to 0Fh
0 - 10h to 17h
1 - 18h to 1Fh
CY - Carry
AC – Aux. Carry (cy from b2 to b3 - BCD)
F0 – General Use Flag – no specific func
RS0,RS1 - Bank Select (4 banks or sets)
OV - Overflow
- User defined flag
P - Parity
21
8051 Special Function Registers
and Bit-Addressable Memory
Bit-Addressable Memory
Special Function Registers
Registers appear in
internal memory space
• Working registers
• Port data registers
• Peripheral control registers
Addresses 80 - FF
16 Special Function
Registers are bit
addressable.
Byte addresses 80, 88,
90, … F8
•
• Above internal Data
memory
Bit addresses 80 - FF
16 bytes of internal Data
memory are bit
addressable.
Byte addresses 20 to 2F
•
Bit address 00 - 7F
22
8051 Programmer’s Model
Program Memory(64K)
7
0
7
FFFF
1000
0
FFFF
60 K
External
• All instructions
• Constant Data
64 K
External
OR
(Using MOVC)
0FFF
4K
0000 Internal
0000
if EA = HI
if EA = LO
Data Memory(64K)
FF
80
7F
SFRs
AND FFFF
64 K
External
RAM
(Using MOVX)
@R
@DPTR
00
Internal
Direct
Direct , Register,
Reg. Indirect
0000
23
8051 Internal RAM
Address
00
08
10
18
20
28
30
38
40
48
50
58
60
68
70
78
Register Set 0
Register Set 1
Register Set 2
Register Set 3
Bit Addressable
RAM
+
stack
Which set of 8 registers is being used depends on 2 bits in the
Program Status Word (PSW)
24
8051 Special Function Registers (SFRs)
80
88
90
98
a0
a8
b0
b8
c0
c8
d0
d8
e0
e8
f0
f8
P0
TCON
P1
SCON
P2
IE
P3
IP
SP
TMOD
DPL
TL0
DPH
PL1
PCON
TH0
TH1
SBUF
PSW
ACC
B
Address
25
8051 Programmer’s Model
7F
SFRs
Scratch Pad Area
RAM
A8
Interrupt Enable Ctr 1
FF
A0
* P2
Port 2
F0
*B
Serial Data Buffer
Serial Control
E0
* ACC
D0
* PSW
B8
* IP
B0
* P3
99
98
30
Bit #00
Bit Addressable RAM 20.0
20
18
10
08
00
Bank 3
Bank 2
Bank 1
Bank 0
R7
R0
R7
R0
R7
R0
R7
R0
7F OR
2F.7
Select Bank
with
PSW.4 , .3 =
RS1, RS0
SFRs
* IE
SBUF
* SCON
90
* P1
Port 1
8D
8C
8B
8A
89
88
87
TH1
TH0
TL1
TL0
TMOD
* TCEN
PCON
timer 1 High
timer 0 High
timer 1 Low
timer 0 Low
timer/counter Mode
timer/counter control
Power Control
83
82
81
80
DPH
DPL
SP
* P0
Data pointer DPTR
Stack pointer
Port 0
* = Bit Addressable
26
8051 Assembly Code Example
Dat
Wait
Myword
Start:
ORG 440h
; Define Origin (ORG) for Data
DB 0FFh
; Define Byte (DB) in Program Memory
EQU 35
; Associate Label to Constant (equate)
DW 1234h
; Define Word (DW) in Program Memory
ORG 0
; Define Origin (ORG) for Program
MOV A,#2Ch ; Acc
2C
INC R2
; R2
R2+1
SETB P0.7
; Port 0 Bit 7
1
ADD A,Wait
;A
Acc + M(35)
DEC @R0
; M(R0)
M(R0) - 1
LJUMP Finished ; PC
Finished
Finished :
General Format
Label:
Opcode dest,src ; Comments
27
8051 Addressing Modes (1)
Immediate - # Label or Number
MOV R6,#14
; R6
MOV A, #CAh
; Acc
MOV DPTR,#loc
; DPTR
14 10
CA 16
value of symbol “loc”
Direct - Label or Number
MOV PSW,R5
; M(PSW)
R5
MOV A,045h
; Acc
M(45 16)
Register - Rn
MOV R1,A
MOV B,R3
; R1
;B
Acc
R3
28
8051 Addressing Modes (2)
Register Indirect - @R0, @R1, @DPTR
MOV @R0,#250
; M(R0)
250 10
MOV
A,@R1
;A
M(R1)
MOVX @DPTR,A ; External data M(DPTR)
Register Indirect Indexed - @A+DPTR, @A+PC
MOVC A,@A+DPTR ; A
ROM(A+DPTR)
MOVC A,@A+PC
;A
ROM(A+PC)
JMP
@A+DPTR ; PC
(A+DPTR)
Bit - bit number or label.bit or bit label
MOV C,IE.0
; cy
bit 0 of IE reg (EX0)
MOV C,EX0
; same
SETB 07Fh
; Bit 7F
1
SETB
2F.7
A
; same
29
Subroutines
8051 stack grows from low addresses to high addresses
SFR SP (address 81H) points to top of stack, i.e., if you
push a value onto the stack, it will be stored at address
SP+1
Be careful: SP is initialized to 07H, alternate register
banks 1, 2, and user bit vars occupy internal RAM
addresses 08H-2FH
Special instructions:
• PUSH op
• POP op
• op must be specified using direct addressing!
30
Parameter passing
Options for parameter passing:
• In internal memory
• In registers. Not really useful, because registers are part of (and
thus as fast as) internal memory
• On stack. Also not really useful because push and pop
instructions allow only direct addressing. Necessary for
implementing recursive functions (but because stack is at most
128 bytes, recursion depth must be limited).
• In external memory. Disadvantages: (1) slow, (2) can only be
accessed via DPTR register
31
Interrupt Sources in 8051 Family (non vectored)
External Interrupt INT0 (B2h Address) – External pin that has to be
enabled (and also have its priority set) via software. Deviation address:
0003h
External Interrupt INT1 (B3h Address) – Another external pin similar to
INT0. Deviaton address: 0013h
NOTE: INT0 and INT1 are pins of port P3 – more precisely P3.2 and P3.3.
Internal Interrupt TIMER/COUNTER 0 – It is generated by TIMER_0 that is
an internal peripheral. Deviation address: 000Bh
Internal Interrupt TIMER/COUNTER 1 – It is generated by TIMER_1 that is
an internal peripheral. Deviation address: 001Bh
Serial Communication Interrupt – Generated by the internal serial
communications controller. Deviation address: 0023h
32
Interrupt Control Bits
Enable Interrupt (IE – address A8h)
IE
BIT DDRESS
EA AF -
-
ES
AC
ET1
AB
EX1
AA
ET0
A9
EX0
A8
EX0 – External Interrupt INT0
ET0 - Interrupt from TIMER/COUNTER_0
EX1 - External Interrupt INT1
ET1 – Interrupt from TIMER/COUNTER_1
ES - Interrupt from Serial Controller
EA - Enable All, that is, enable each individual enable to operate
Interrupt Priority (IP – address B8h)
IE
BIT DDRESS
-
PX0 =0 – Low Priority;
PT0 =0 – Low Priority;
PX1 =0 – Low Priority;
PT1 =0 – Low Priority;
PS =0 – Low Priority;
-
-
PS
BC
PT1
BB
PX1
BA
PT0
B9
PX0
B8
PX0= 1 – High Priority – Highest priority within group
PT0= 1 – High Priority
PX1= 1 – High Priority
PT1= 1 – High Priority
PS = 1 – High Priority – Lowest priority within group
33
Interrupt Control Bits (cont)
Timer Control – TCON (address 88h) - (part of this register is used to
control level interrupts or edge generated interrupts)
IT0, IT1 = 0 = Level
IE0, IE1 = 0 = Level, else (=1) Negative Edge
TCON
BIT DDRESS
*
*
*
*
*
*
*
*
IE1
8B
IT1
8A
IE0
89
IT0
88
TF1 – Timer 1 overflow flag. Cleared by processor upon vectoring to the interrupt
service routine.
TR1 – Timer 1 control bit. If TR1=1, timer 1 runs. If TR1=0, timer 1 stops
TF0 – Timer 0 overflow flag. Similar to TF1
TR0 – Timer 0 control bit. If TR0=1, timer 0 runs. If TR0=0, timer 0 stops
IE1 – External Interrupt 1 edge flag. Set when a valid falling edge is detected at pin
P3.3. Cleared by hardware when the interrupt is serviced.
IT1 – Interrupt 1 type control bit. If IT1=1, interrupt 1 is triggered by a falling edge on
P3.3. If IT1=0, interrupt 1 is triggered by a low logic level on P3.3.
IE0 – External Interrupt 0 edge flag. Set when a valid falling edge is detected at pin
P3.2. Cleared by hardware when the interrupt is serviced.
IT0 – Interrupt 0 type control bit. If IT0=1, interrupt 0 is triggered by a falling edge on
P3.2. If IT0 = 0, interrupt 0 is triggered by a low logic level on P3.2.
34
Interrupt Control Bits (cont)
Timer Mode Register – TMOD (not bit addressable)
•
Specifies the Operation Mode of a Timer
TMOD
GATE C/T M1
Timer One
M0
GATE
C/T
M1
M0
Timer Zero
GATE – If GATE = 1, timer x will run only when TRx=1 and INTx = 1. If GATE=0, timer
x will run whenever TRx=1.
C/T – Timer mode select. If C/T=1, timer x runs in counter mode taking its input from
Tx pin. If C/T=0, timer x runs in timer mode taking its input from the system clock.
M1 – Mode selector bit 1. MSB of selector.
M0 – Mode selector bit 0. LSB of selector.
35
Interrupt Control Bits (cont)
Timer 2 Control Register – T2CON
T2CON
TF2 EXF2 RCLK TCLK EXEN2 TR2 C/T2
CP/RL2
TF2 – Timer 2 overflow flag. Will not be set if RCLK=1 or TCLK=1.
EXF2 – Timer 2 external flag. EXF2 is set when a falling edge is detected on T2Ex and EXEN2=1.
This causes an interrupt, if the timer 2 is enabled.
RCLK – Receive clock flag. When RCLK=1, the UART (if in mode 1 or 3) will use the timer 2
overflow frequency for the receive clock.
TCLK – Transmit clock flag – When TCLK=1, the UART (if in mode 1 or 3) will use the timer 2
overflow frequency for the receive clock.
EXEN2 – External enable flag – If EXEN2=1, a capture or reload will be caused by a falling edge
on T2EX. If EXEN2=0, external events on T2EX are ignored.
TR2 – Timer run control bit – If TR2=1, the timer will run. If TR2=0, the timer will stop.
C/T2 – Timer mode select – If C/T2=1, timer 2 will act as an external event counter. If C/T2=0, timer
2 will count processor clock cycles.
CP/RL2 – Capture/Reload flag – If CP/RL2=1, detection of a falling edge on T2EX causes a capture
if EXEN2=1. If CP/RL2=0, detection of a falling edge on T2EX or an overflow causes a timer
reload if EXEN=1.
36
Interrupts on MCS-51 Family
At which Moment Are Interrupts Sampled by the Microcontroller ?
•
Every S5P2 clock cycle of every machine cycle – See figure below
One Machine Cycle
S1
S2
S3
S5P1
S5P2
S4
S6P1
S5
S6
S6P2
• Once Sampled, an Interrupt will be accepted if:
• There isn´t another interrupt of same or higher priority being executed
• If the next machine cycle is the last cycle of an instruction
• If in the next cycle there is no RETI or any access to the interrupt registers IE
and IP.
• If the above conditions are followed, interrupt is accepted. In the following two
cycles the uP saves the PC in the Stack and loads the PC with the interrupt address.
37
Basic Structure of a Program with Interrupts:
org
ljmp
org
nop
reti
org
nop
reti
org
nop
reti
org
nop
reti
org
nop
reti
BEGIN:
----end
0000h
BEGIN
0003h
000Bh
; beginning after RESET
; Go to BEGIN. Instructions below written in MEM
; INT0 interrupt address
; If this int is used substitute nop and reti by
; a long jump, the routine and an reti at the end.
; TIMER_0 interrupt address
0013h
; INT1 interrupt address
001Bh
; TIMER_1 interrupt address
0023h
; SERIAL interrupt address (Receive + Transmit)
; Begin of MAIN PROGRAM
;
; Program END
38
Example: Changing P1.0 and P1.1 Output Values
on Timer_0 and Timer_1 Interrupts
org
0000h
; Microcontroller RESET
ljmp
BEGIN
; Goto BEGIN
;---------------------------------------------------------------------------------------------------org
000Bh
; TIMER_0 interrupt address
cpl
P1.0
; Toggles output level of pin P1.0
mov
TH0, #3Ch
; Load THIGH of TIMER_0 with initial value
mov
TL0, #0AFh
; Load TLOW of TIMER_0 with initial value
reti
; Return from Interrupt for TIMER_0
;--------------------------------------------------------------------------------------------------org
001Bh
; TIMER_1 interrupt address
cpl
P1.1
; Toggles output level of pin P1.1
reti
; Return from Interrupt for TIMER_1
;--------------------------------------------------------------------------------------------------BEGIN:
; Begin of MAIN PROGRAM
mov
TMOD, #21h
; Prog TIMER_0 - Mode1 / Timer_1 – Mode 2 (auto reload)
mov
TH0, #3Ch
; Load THIGH of TIMER_0 initial value – part HIGH
mov
TL0,#0AFh
; Load TLOW of TIMER_0 initial value – part LOW
mov
TH1,#0CDh
; Load THIGH of TIMER_1 initial value – part HIGH
mov
TL1,#0CDh
; Load TLOW of TIMER_1 initial value – part LOW
mov
IE, #8Ah
; Programs Interrupt of both timers
mov
IP, #08h
; Gives more priority to TIMER_1
setb
TR1
; Turns TIMER_1 on
setb
TR0
; Turns TIMER_0 on
------; Other program instructions
------end
; Program END
39
Contagem de Tempo no 8051
(Função que espera acabar o tempo)
#include <atmel/At89C4051.h>
#include <stdio.h>
# define CLOCK (12.000000) /* cristal de 12 MHz */
/* Entradas */
#define P_Iniciar
#define P_Tampa_Aberta
------
P3_3
P3_2
/* INT1 */
/* INT 0 */
/* Saidas */
#define LED_Molho
P1_1
----/* Prototipos de funcoes */
void delay_ms (int tempo);
void HabilitaIntTampaAberta (void);
Void DesabilitaIntTampaAberta (void);
----Void main (void)
/* corpo principal */
{
---delay_ms (1000);
----}
void delay_ms (int tempo)
{
/*Timer0 no modo 1 (16 bits) */
TMOD = 0x21;
while (tempo);
/* FICA PRESO NA FUNÇÃO */
{
/* Para que a contagem seja correta, deve-se:
(1) carregar o valor 65535-tempo, com tempo em us,
que se quer contar= 65535-1000= 0xFC17) */
TL0 = 0x17;
TH0 = 0xFC;
/* (2) Setar o flag de overflow p/ zero */
TF0 = 0;
/* (3) Ligar o Timer */
TR0 = 1;
/* (4) Contar (fica esperando overflow) */
while (!TF0); /* fica preso até TF0 =0 */
/* (5) Desligar o timer pois deu OVF */
TR0 = 0;
/* (6) Na reentrada do loop setar tudo novamente. Se
isso nao for feito o timer comecaria a contar de
zero. Mesmo que recarregassemos novamente o
valor em TH e TL, mas nao o desligassemos e
ligassemos novamente, o timer nao iria funcionar de
forma correta. */
tempo--;
}
}
40
Uso de Contador e Interrupção para contar
Tempo
Antes de Mais nada verificar se o clock do contador e o número de bits do contador
permitem contar o tempo desejado numa única contagem. Exemplo: clock de 1 MHz
(T=1us) e contador de 16 bits. Posso contar um tempo de 1 segundo?
1 us x 65536 = 65,536 ms. Portanto nessas condições nao consigo contar 1 segundo. Tenho
que contar várias vezes 65,536 ms, ou melhor, tenho que contar 16 vezes o valor total do
contador (16 x 65,536 1s).
Há contadores que contam de um valor até zero (down counter) ou de um valor carregado
até dar overflow (up counter).
Se não for por interrupção, carrego o contador de hardware com o valor desejado (o
qual é incrementado por um clock), libero o contador e fico esperando no programa
principal, ou numa rotina específica, o flag que indica o fim da contagem virar. Isto
é ruim pois a UCP fica presa na tarefa.
Se for por interrupção, alguns possíveis passos são:
Liberar a interrupção do contador utilizado e Iniciar Semáforos de Fim_Contador = FALSE e
Fim_Tempo = FALSE.
Instanciar a função de inicialização, a qual recebe o parametro tempo, e que carrega o
contador com o valor adequado. Fazer semáforo Fim_Contador = FALSE.
Liberar o início da contagem do contador e sair da função
Na rotina que trata interrupção do contador faço Fim_Contador = TRUE.
No programa principal fico testando (entre outras coisas) o semáforo Fim_Contador. Se for
FALSE vou fazer outras coisas. Se for TRUE, incremento um contador de loops. Se atingi o
número de loops desejado faço semáforo Fim_Tempo = TRUE e vou em frente. Se não atingi
o número de loops desejado chamo novamente a função de inicialização do contador.
Ao final inibo a interrupção do contador.
41
Lendo de Chaves
Sem Debouncing :
-------void main (void)
{
unsigned char Port1_value;
P1 = 0xFF;
while(1)
{
Port1_value = P1;
P2 = Port1_value;
}
/* variável que guardará o que vou ler */
/* Configura porta P1 para poder ler os Pinos de entrada */
/* Para ler de uma porta, o latch correspond. Deve ser 1 */
/* Atribui à variável o valor dos pinos de entrada */
/* Copia valor para P2 */
}
42
Implementando Debouncing
de Chaves ou Botões
Para realizar o Debouncing :
1.
Ler o pino da porta que interessa
2.
Se for detetado um estado de chave apertada, esperamos 20ms
(dependendo do tipo de chave) e então lemos a porta de novo
3.
Se a segunda leitura confirmar a primeira leitura, assumimos que a chave
foi realmente apertada e possivelmente setamos uma variável indicando
chave apertada.
43
Implementando Debouncing
de Chaves ou Botões (sem Interrupção e sem Timer) - 1
/* Programa le (e faz debounce) de chave em P1^0
e se apertada escreve na saida P3
*/
#include <Reg52.h>
Sbit switch_pin = P1^0;
/* chave em P1.0 */
#define Output_port P3
#define SWITCH_NOT_PRESSED (bit) 0
#define SWITCH_PRESSED (bit) 1
// Function Prototypes
void Switch_Init (void);
Bit Switch_Get_Input (const unsigned char
Debounce_Period;
Void Display_Switch_Status_Init (void);
Void Display_Switch_Status_Update (const bit);
Void Delay_Loop_Wait (const unsigned int
DELAY_MS);
/* ================================== */
Void main (void) // MAIN PROGRAM
{
bit Sw_state;
Switch_Init ();
Display_Switch_Status_Init();
while (1)
{
Sw_state = Switch_Get_Input (30); /* 30 ms */
Display_Switch_Status_Update (Sw_state);
}
}
Void Switch_Init (void);
{
switch_pin = 1; // Use this pin as INPUT
}
//---------------------------------------------------------bit Switch_Get_Input (const unsigned char
Debounce_Period)
{
bit Return_value = SWITCH_NOT_PRESSED;
if (Switch_pin == 0)
{
Delay_Loop_Wait (Debounce_Period);
if (Switch_pin == 0)
{
Return_value = SWITCH_PRESSED;
}
}
return Return_value;
}
// -------------------------------------------------------------Void Display_Switch_Status_Init (void)
{
Output_port = 0xF0;
}
44
Implementando Debouncing
de Chaves ou Botões (sem Interrupção e sem Timer) - 2
void Display_Switch_Status_Update (const bit
SWITCH_STATUS)
{
if (SWITCH_STATUS == SWITCH_PRESSED)
{
Output_Port = 0x0F;
}
else
{
Output_Port = 0xF0;
}
}
//-----------------------------------------------------------------// Delay duration varies with parameter and is
// “Roughly” the delay in ms on 12 MHz 8051
// (12 ciclos do oscilador)
// Adjust timing for application and processor
Void Delay_Loop_Wait (const unsigned int
DELAY_MS)
{
unsigned int x, y;
for (x = 0; x <= DELAY_MS; x++)
{
for (y = 0; y <= 120; y++);
}
}
45
Exercício
-
Voces tem 2 chaves de entrada (uma faz incrementar os leds e a outra faz
decrementar) e 8 leds de saida num Atmel AT89C4051. As chaves sao lidas
por loop de status (caso A) ou geram interrupções(caso B).
-
CASO A
-
-
Sem debouncing, ir incrementando um contador cada vez que a tecla for
apertada e mostrando em 8 leds (8 bits – vai de 0 a 255) .
-
Com debouncing, sem interrupção, fazer a mesma coisa. Observar a diferença
no comportamento.
CASO B:
-
-
Por interrupção das chaves (uma por transição e a outra por nível) e com
debouncing nas duas, implementar o mesmo exemplo acima, incrementando o
contador nos LEDs ao apertar uma chave e decrementando-o ao apertar outra.
OBSERVAÇÃO: Fazer inicialmente a simulação no Keil e no
ISIS/Proteus e depois num protoboard, gravando o AT89C4051.
Pensem como podem simular “bouncing” nas teclas ideais do
simulador.
46
Download