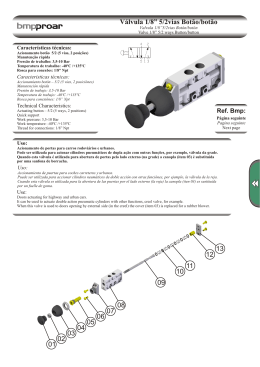
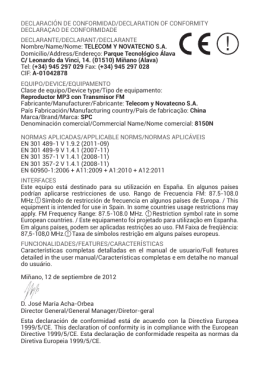
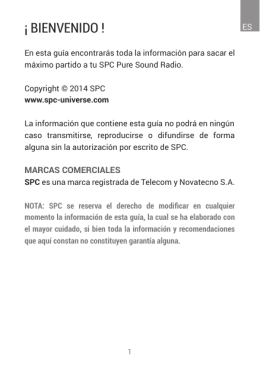
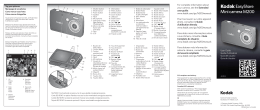
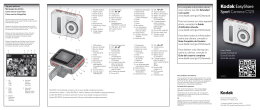
R
MANUAL DE INSTRUCCIONES
RADIO PORTÁTIL (9BD)
RD-920D
FM/AM/SW1-7 HIGH SENSITIVITY
DIGITAL DISPLAY RADIO WITH CLOCK
RD-920D
ESTIMADO CLIENTE
Con el fin de que obtenga el mayor desempeño de su producto, por favor lea este manual de
instrucciones cuidadosamente antes de comenzar a utilizarlo, y guárdelo para su futura referencia.
Si necesita soporte adicional, no dude en escribir a: [email protected]
LÍNEAS DE SERVICIO AL CLIENTE PREMIER
Venezuela:
Panamá:
Sitio Web:
E-mail:
0800 – ELECTRIC (353-2874)
507 300-5185
www.premiermundo.com
[email protected]
NOTA
Nos reservemos el derecho de modificar las especificaciones, características y/u operación de esta
unidad sin previo aviso, con el fin de continuar las mejoras y desarrollo del mismo.
DESCRIPCIÓN DE LA RADIO
1. ANTENA TELESCÓPICA
2. PANTALLA DIGITAL
3. SOPORTE
4. INDICADOR DE SINTONÍA
5. INDICADOR AM
6. INDICADOR FM
7. SINTONIZADOR
8. BOTÓN AM
9. BOTÓN FM
10. ENCENDIDO
11. AJUSTAR EL RELOJ
12. AJUSTAR LAS HORAS
13. HORA DE ENCENDIDO
14. SELECTOR DE BANDA
15. TEMPORIZADOR
16. AJUSTAR LOS MINUTOS
17. COMPARTIMIENTO DE LAS BATERÍAS
18. CORREA DE MANO
19. CONECTOR DE ENERGÍA EXTERNA
20. CONECTOR DE AUDÍFONOS
21. VOLUMEN
Pagina 1
PANTALLA LCD
1. HORA AM O BANDA AM
2. INDICADOR BANDA FM
3. INDICADOR HORA PM
4. FUNCIÓN HORA DE ENCENDIDO ACTIVADA
5. TEMPORIZADOR ACTIVADO
6. INDICADOR DE FRECUENCIA U HORA
7. INDICADOR UNIDAD DE BANDA AM
8. INDICADOR UNIDAD DE BANDA FM O SW
ENERGÍA
INSTALACIÓN DE LA BATERÍAS
1. Esta radio usa dos baterías tamaño “AA” de 1.5V. Coloque
un par de baterías nuevas en el compartimiento, haciendo
coincidir las marcas de polaridad.
2. Si el sonido se oye distorsionado o el volumen es débil,
remplace ambas baterías a la vez.
ATENCIÓN:
• No use baterías nuevas y viejas o distintos tipos de baterías al mismo tiempo.
• Para evitar el derrame del electrolito de las baterías o el riesgo de una explosión, no cargue,
caliente o desmantele las baterías.
• Si no va a usar la radio por mucho tiempo, quite las baterías del compartimiento para evitar que
estas se derramen y se corroan los componentes de la radio.
USO DE ENERGÍA EXTERNA
Use un adaptador externo de corriente de 3V, 300mZ para conectar la radio a la red eléctrica. Verifique
la polaridad positiva y negativa del conector
.
USO DE LA RADIO
ENCENDIDO
Coloque el interruptor de ENCENDIDO (10) en la posición “ON” para encender la radio.
Coloque el interruptor de ENCENDIDO (10) en la posición “OFF” para apagar la radio. La hora
aparecerá en la pantalla.
SELECCIÓN DE BANDA
Presione el botón FM (9) y encienda la radio para recibir radioemisoras FM. El indicador FM (6) se
encenderá.
Presione el botón AM (8) para encender la radio. Deslice el selectro de banda (14) para elegir la banda
AM o SW1-7. El indicador AM (5) se encenderá.
Pagina 2
SINTONIZAR RADIOEMISORAS
Una vez que haya seleccionado la banda, gire el SINTONIZADOR (7) y vea la frecuencia en la pantalla
digital LCD para encontrar una radioemisora.
El INDICADOR DE SINTONÍA (4) se encenderá cuando haya sintonizado una radioemisora con señal lo
suficientemente potente.
VOLUMEN
Una vez sintonizada la radioemisora, gire el VOLUMEN (21) para ajustarlo al nivel que desee.
USO DE AUDÍFONOS
Para no incomodar a los demás, use unos audífonos que deben ser conectados en el CONECTOR
PARA AUDÍFONOS (20). La bocina quedará desactivada mientras los audífonos estén conectados.
SOPORTE
El soporte es útil para asentar la radio.
AJUSTAR EL RELOJ
1. Luego de haber colocado las baterías, en la función reloj, la pantalla LCD
mostrará “12:00”.
2. Mantenga presionado el botón AJUSTAR EL RELOJ (11), simultáneamente
presione el botón AJUSTAR LA HORA (12) para cambiar la hora y el botón
AJUSTAR LOS MINUTOS (16) para cambiar los minutos.
3. Para ver el reloj durante el funcionamiento de la radio, coloque el selector de
ENCENDIDO en la posición “OFF”. La hora aparecerá en la pantalla.
4. La radio usa el sistema horario de 12 horas. El icono AM indica horas de la
mañana y el icono PM horas de la tarde.
AJUSTE DEL TEMPORIZADOR
Una vez que halla ajustado la hora correcta, puede configurar la hora de encendido
de la radio.
1. Estando en la función reloj, Presione el botón TEMPORIZADOR (13). El icono
y el indicador de horas de la mañana aparecerá en la pantalla. Presione el
botón AJUSTAR LA HORA (12) para cambiar la hora y el botón AJUSTAR LOS
MINUTOS (16) para cambiar los minutos y ajustar la hora en la que desee que la
radio se encienda.
2. Durante el funcionamiento de la radio, presione el botón TEMPORIZADOR (13).
El icono aparecerá en la pantalla y el icono
empezará a parpadear.
Pagina 3
FUNCIÓN HORA DE ENCENDIDO
1. Una vez ajustado el temporizador, mantenga la radio en la función reloj.
2. Presione el botón FUNCIÓN HORA DE ENCENDIDO (15) una vez. El icono
aparecerá en la pantalla y la función quedará activada. Cuando la hora
programada llegue, la radio se encenderá automáticamente en la misma
radioemisora que haya sintonizado por última vez.
3. Use esta función para encender la radio. El botón de ENCENDIDO (10) no
funcionará. Para apagar la radio presione el botón TEMPORIZADOR (15) para
quitar el icono de la pantalla, seguidamente podrá apagar la radio.
USO DE LA ANTENA
1. La recepción de la banda AM se lleva a cabo por medio de una
antena magnética interna. Para mejorar la recepción en esta banda, gire
la radio en varias direcciones.
2. Cuando esté sintonizando radioemisoras FM, extienda la antena
telescópica y cambie la longitud y orientación de la misma para mejorar la
recepción.
3. Para la recepción de radioemisoras SW, extienda la antena telescópica y
manténgala en posición vertical.
PROBLEMAS Y SOLUCIONES
1. Las bandas AM y FM son vulnerables a la interferencia de televisores, focos fluorescentes, lámparas
de mesa siliconadas, computadoras y motores. Para evitar este problema, use la radio lejos de los
equipos mencionados.
2. La señal puede verse afectada por el rebote de la señal en los edificios circundantes. Para evitar este
problema, sitúe la radio cerca de una ventana.
3. La señal de las bandas SW y FM pueden verse afectadas por la cercanía de otras emisoras. Para
mejorar la recepción cambie la longitud de la antena telescópica y varíe el ángulo.
Pagina 4
4. Puede usar la antena flexible, conectando un extremo en la antena fija y dejando colgar el otro
extremo por la ventana.
5. La pantalla digital de la radio puede ser afectada por la temperatura, humedad y vibraciones,
causando que la señal se recorra. Si esto sucede al usar la función de hora de encendido, ajuste la
frecuencia a la posición correcta.
6. Si la temperatura ambiente es igual o menor a los -10º C el cristal líquido de la pantalla podría
derramarse. Evite usar la radio a esa temperatura.
ESPECIFICACIONES TÉCNICAS
1. Rango de Frecuencia
FM
87 - 108
AM 515 – 1606
SW1 5.95 – 6.20
SW2 7.10 – 7.30
SW3 9.50 – 9.90
SW4 11.65 – 12.05
SW5 13.60 – 13.80
SW6 15.10 – 15.60
SW7 17.50 – 17.90
MHz
KHz
MHz
MHz
MHz
MHz
MHz
MHz
MHz
2. Sensitividad
FM
≤20µV
AM
≤6mV/m
SW
≤30µV
3. Selectividad simple de señal: ≤6dB
4. Energía:
Baterías
Energía Externa:
5. Bocina:
6. Audífonos:
7. Dimensiones
8. Peso:
DC 3V
2 x 1.5V tamaño “AA”
300mA
Ø 57mm/4ohM/0.25W
Ø 3.5mm 32ohM
117 x 76 x 33mm
164g (sin baterías)
Pagina 5
DIAGRAMA DEL CIRCUITO
Pagina 6
MANUAL DE INSTRUÇÕES
RÁDIO PORTÁTIL (9BD)
RD-920D
ESTIMADO CLIENTE
Com o fim que você obtenha o maior desempenho do seu produto, por favor leia esse manual de
instruções cuidadosamente antes de começar a utilizá-lo, e guarde-o para futuras referencias.
Se precisar suporte adicional, não duvide em escrever ao correio: [email protected]
LINHAS DE SERVIÇO AO CLIENTE PREMIER
Venezuela:
0800 – ELECTRIC (353-2874)
Colômbia:
01-900-331-PEJC (7352)
Panamá:
300-5185
Sitio Web:
www.premiermundo.com
E-mail:
[email protected]
NOTA
Reservamo-nos o direito de modificar as especificações, características e operações de este produto
sem prévio aviso, com o fim de continuar as melhoras e desenvolvimentos do mesmo.
DESCRIÇÃO DA RÁDIO
1.ANTENA TELESCÓPICA
2.TELA DIGITAL
3.SUPORTE
4.INDICADOR DE SINTONIA
5.INDICADOR AM
6.INDICADOR FM
7.SINTONIZADOR
8.BOTÃO AM
9.BOTÃO FM
10. LIGADO
11. AJUSTAR O RELÓGIO
12. AJUSTAR A HORA
13. HORA DE LIGADO
14. SELETOR DE BANDA
15. TEMPORIZADOR
16. AJUSTAR OS MINUTOS
17. COMPARTIMENTO DAS BATERIAS
18. CORREIA DE MÃO
19. CONECTOR DE ENERGIA EXTERNA
20. CONECTOR DE FONE DE OUVIDO
21. VOLUME
Pagina 1
TELA LCD
1.
2.
3.
4.
5.
6.
7.
8.
HORA AM OU BANDA AM
INDICADOR BANDA FM
INDICADOR HORA PM
FUNÇÃO HORA DE LIGADO ATIVADA
TEMPORZADOR ATIVADO
INDICADOR DE FREQUÊNCIA OU HORA
INDICADOR DE UNIDADE DE BANDA AM
INDICADOR DE UNIDADE DE BANDA FM
OU SW
ENERGIA
INSTALAÇÃO DAS BATERIAS
• Esse rádio utiliza baterias de tamanho “AA” de 1.5W, coloque
um par de baterias novas no compartimento, tendo em conta
polaridade delas.
• Si o som escuta-se destorcido ou o volume é fraco, troque as
duas baterias ao mesmo tempo.
a
ATENÇÃO:
• Não utilize baterias novas com antigas, ou diferentes tipos de baterias à vez.
• Para evitar o derramamento de restos da bateria ou o risco de uma explosão, não carregue,
esquente ou desmantele as baterias.
• Se não vai utilizar a rádio por muito tempo, retire as baterias do compartimento para evitar que elas
se estraguem e corroam as partes metálicas do compartimento da rádio.
USO DE ENERGIA EXTERNA
Utilize um adaptador externo DC 3W 300Mz para utilizar uma fonte de energia externa. Revise o polo
negativo e o polo positivo do conector
USO DA RÁDIO
LIGADO
Coloque o interruptor de LIGADO (10) até a posição ON para ligar a rádio
Para desligar a rádio deslize o interruptor de LIGADO (10) até a posição OFF. Quando a rádio estiver
desligada, a tela vai mostrar a hora.
SELEÇÃO DE BANDA
Aperte o botão FM (9) e ligue a rádio para receber sinal de emissoras FM. O indicador FM (6) vai se
acender.
Aperte o botão AM (8) para ligar a rádio. Deslize o seletor de banda (14) para escolher a banda AM ou
SW1-7. O indicador AM (5) vai se acender.
SINTONIZAR EMISSORAS
Quando tiver selecionada a banda desejada, gire o SINTONIZADOR (7) e olhe a frequência na tela
Pagina 2
digital para achar a emissora desejada.
O INDICADOR DE SINTONIA (4) vai se acender quando tenha sintonizado uma emissora com sinal
com boa potência.
VOLUME
Utilize o controle de VOLUME (21) para ajustar o nível enquanto a rádio estiver funcionando.
USO DE FONE DE OUVIDOS
Para não incomodar as outras pessoas, utilize os fones de ouvido que devem ser conectados no
CONECTOR DE FONE DE OUVIDO (20). O alto falante vai ficar desativado enquanto os fones de
ouvido estiverem conectados.
SUPORTE
Utilize o suporte para colocar comodamente a rádio.
AJUSTAR O RELÓGIO
1. Depois de colocar as baterias, na função relógio, a tela LCD vai mostrar
“12:00”
2. Mantenha apertado o botão AJUSTAR O RELÓGIO (11), ao mesmo tempo
aperte o botão AJUSTAR A HORA (12) para alterar a hora e o botão
AJUSTAR OS MINUTOS (16) para alterar os minutos.
3. Para conseguir olhar o relógio durante o funcionamento da rádio, coloque o
seletor de LIGADO na posição OFF. A hora vai aparecer na tela.
4. A rádio utiliza o sistema horário de 12 horas. O ícone AM indica horas da
manhã e o ícone PM indica horas da tarde.
AJUSTAR O TEMPORIZADOR
Quando haja ajustado a hora correta, pode configurar a hora de ligado da rádio.
1. Quando estiver na função relógio, aperte o botão TEMPORIZADOR (13). O
ícone e o indicador de hora da manhã vão aparecer na tela. Aperte o
botão AJUSTAR A HORA (12) para alterar a hora e o botão AJUSTAR OS
MINUTOS (16) para alterar os minutos e ajustar a hora na que deseje que a
rádio se ligue.
2. Durante o funcionamento da rádio, aperte o botão TEMPORIZADOR (13). O
ícone vai aparecer na tela e o ícone
vai começar a piscar.
FUNÇÃO HORA DE LIGADO
1. Quando tiver ajustado o temporizador, mantenha a rádio na função
relógio.
2. Aperte o botão FUNÇÃO HORA DE LIGADO (15) uma vez. O ícone
vai aparecer na tela e a função vai ficar ativa. Quando chegar a hora
programada, a rádio vai liga-se automaticamente na mesma emissora
que tenha sintonizado a última vez.
3. Utilize essa função para ligar a rádio. O botão de LIGAR (10) não vai
funcionar. Para desligar a rádio aperte o botão TEMPORIZADOR (15)
para tirar o ícone na tela e daí vai conseguir desligar a rádio.
Pagina 3
USO DA ANTENA
1. A recepção da banda AM funciona a traves de uma antena magnética
no interior da rádio. Para melhorar a recepção na banda AM, gire a
rádio em várias direções.
2. Quando estiver sintonizando emissoras FM, desdobre a antena
telescópica e mude o comprimento e a orientação dela para melhorar a
recepção.
3. Quando estiver sintonizando emissoras SW, desdobre a antena
telescópica e mantenha em posição vertical.
PROBLEMAS E SOLUÇÕES
1. As bandas AM e FM são vulneráveis à interferência de televisores, focos fluorescentes,
lâmpadas de mesa, computadores e motores. Para evitar esse problema, utilize a rádio longe
dos aparelhos anteriores.
2. O sinal da rádio pode ser afetado pela recepção dos sinais de outros prédios pertos. Para evitar
esse problema, coloque a rádio perto de uma janela.
3. O sinal das bandas SW e FM podem ser afetadas pela cercania de outras emissoras. Para
melhorar a recepção troque o comprimento da antena telescópica e varie o ângulo.
4. Pode utilizar a antena flexível, conectando um extremo na antena fixa e deixando pendurando o
outro extremo pela janela.
5. A tela digital da rádio pode ser afetada pela temperatura, humidade e vibrações, causando que o
sinal se modifique. Se isso acontece, quando utilizar a função de hora de ligado, ajuste a
frequência na posição correta.
6. Se a temperatura ambiente é igual ou menor ao -10° C o cristal líquido da tela poderia derramase. Evite utilizar a rádio nessa temperatura.
Pagina 4
ESPECIFICAÇÕES
1. Faixa de frequência
FM
87 – 108
AM
515 – 1605
SW1
5.95 – 6.20
SW2
7.10 – 7.30
SW3
9.50 – 9.90
SW4
11.65 – 12.05
SW5
13.60 – 13.80
SW6
15.10 – 15.60
SW7
17.50 – 17.90
MHz
KHz
MHz
MHz
MHz
MHz
MHz
MHz
MHz
2. Sensitividade
FM
≤20µV
AM
≤6mV/m
SW
≤30 µV
3. Seletividade simples de sinal: ≥ 6 dB
4. Energia:
DC 3V
Baterias:
2 x 1.5W tamanho “AA”
Energia externa:
300 mA
5.
6.
7.
8.
Alto falante:
Fone de Ouvido
Dimensões
Peso:
Ф 57mm/4 Ω/0.25W
Ф 3.5mm 32 Ω
117 x 76 x 33 mm
164g (sem baterias)
Pagina 5
Pagina 6
R
FM/AM/SW1-7 HIGH SENSITIVITY
DIGITAL DISPLAY RADIO WITH CLOCK
RD-920D
APPEARANCE DIAGRAM & FUNCTION INDICATION
1. Telescopic antenna
2. D isplay screen
3. S upporting rack
4. Tune light
5. AM indicato r
6. FM indicato r
7. Tuner
8. AM button
9. FM button
10. Power switch
11. Time set button
12. Hour adjustmen t butt on
13. Timing tur n on button
14. Band switch
15. Timing switch button
16. Minute adjustment bu tton
17. Battery slot
18. Hand belt
19. External power socke t
20. Earp hone jack
21. Volume control
1
2
3
4
5
6
7
21
20
19
8
9
18
10
17
16 15 14 13 12 11
LCD EXPLANATION
1
2
3
4
5
AM FM PM
6
7
8
1. AM time or AM band indication
2. FM band indication
3. P M time indicatio n
4. Timing turn on indication
5. Timing turn on time set indication
6. Frequency or time indication
7. AM frequen cy unit indication
8. S W or FM frequency unit indication
POWER
Installing batter ies
1.Th e radio use s two AA1.5V batteries, ple ase put the new
batteries in the bat tery slot according to the polarity.
2.If the sound i s distortion or the volume is faint, please
change the batteries in t ime.
Attention:
1.Do not use new and old or different type batte ries together.
2.In order to pr event the leakag e of the electrolysis liquid or danger of explosion, do not charge, heat o r
resolve the batteries.
3.If you do not use the radio for a long time, please take out the batteries, lest the leakage of the battery
corrodes the parts in the radio.
R6 CS I Z A
EA 1 V
. N O1
5
. 04
R6 CS Z
I EAA1 5
. V N O1
. 04
Use External Power
Please use output DC 3V 300mA regulating external direct current power, check the positive and negative of
the plug
.
RECEPTION OPERATION
Power Switch
When you move the Power switch(10)to the position of ON, the radio begin s to w ork.
When you move the Power switch (10) to t he position of OFF, the radi o is turned off, the time is d isplayed in
the displa y screen.
Select Band
Turn on the radio, pre ss the FM button (9) to receive F M station progr am, meanwhile t he FM indicator (6) wi ll
light up. Press the AM button (8), move the Band switch (14) to select AM, S W1-7 station pr ogram, meanwh ile
the A M indicator (5) will light up.
Search Station
After the band i s selected, turn the Tuner ( 7) and watch the station frequency on LCD search your desi red
stati on program.
The Tuning Indicator(4) will light up, w hen you receive the correct stat ion and the station signal is sufficiently
strong.
Volume Control
When the radio works, turn the Volume control (21) to adjust to desired volume.
Use Earphone
In order not to affect others, please inser t the earphones in the Earphone jack ( 20) (t he speaker inside the
radio is deact ive), you can listen to the ra dio by earphones.
Supporting Rack
It is convenient for you to place the radio.
CLOCK SETTING
1. After inst alling batteries, i n the state of clock, the "12:00" appears on the LCD.
2. Keep the Time set button (11)pressed, meanwh ile press the Hour adjustme nt
butt on(12)to adjust hour, press the Minute adjustment butt on (16) to adjust
minute, set the clock time.
3. If you want to see the time in the state of work, set the power switch t o the
position of OFF, the time appears on the display screen.
4. The 12 hours system is used in the radio. The AM on the d isplay screen
indicates morning time, P M indicates afternoon time.
TIME SETTING
After you comp lete to set the electronic clock time corre ctly, you can set
the ti ming turn on time:
1. In t he state of clock, press the Timing turn on button (13) pressed, the symbol
of "
" and morning time appear on the display screen. Press the Hour
adj ustment button (12) to adjust hour, and press the Minute adjustme nt button
(16) to adjust minute, adjust to your desir ed time to t urn on the radio.
2. When the radio wor ks, press t he timing turn on button, the timin g tur n on t ime
displays on th e display screen, and the symbol of "
" t winkles.
TIMING FUNCTION
1. After the timing t urn on time is set, keep the radio in the state of clock.
2. Press the Timing switch but ton (15) once, the symbol of "
" di splays on
the display screen, the timing tur n on functio n begins to work. When the
turn on time reaches, the radio will automate to be turned on and receive
FM band program.
3. U se the timing turn on funct ion to turn on the radio, the Power swi tch(10)does not funct ion. Press t he
Timing switch button(15)to cance l the symbol of "
", then you can tu rn off the radio.
4. U se the timing turn on funct ion to turn on the radio, after one hour s listening, the radio will automa te to
be turned off.
USE ANTENNA
1. R eceiving AM by using the i ntern al magnetic antenna, and you ca n get the best reception by rotating the
directi on of the radio. (Figur e1)
2. When you receive FM station, please pull out the telescopic antenna to get the best reception by
changing its length and angle.(Figure2)
3. When you receive SW station, please pull out the telescopic antenna and keep it vertical, to get better
reception. (Figure 3)
FM
SW
AM
(1)
(2)
(3)
COMMON PROBLEMS & HANDLE
1. The AM and SW are strongly jammed by the TV set, fluorescent lamp, silicon controlled table lamp, computer and motor and so on. When you use the radio, please keep the radio aw ay from the above-mentioned
electrical equipment.
2. Reinforcing bar structure inside the multi-storied building and high building will screen the broadcast signal,
receiving near the window will improve reception effect.
3. The SW and FM broadcast will be strongly jammed by the nearby "BB" station signal, you can improve
reception effect by adjusting the length of the antenna and the angle of the radio.
4. You can use the soft antenna, one end is stuck to the antenna, the other end is put outside the window, it
will improve SW and FM receivin g effect.
5. The digit display radio is affected by the temperature, humidity and vibration and son on, the digit frequency
will maybe deviate. So in using time turn on function, if the frequency deviates, please adjust to receive the
correct station.
6. When the temperature is under -10 ℃ in winter, it will cause the leakage of LCD, in general, please avoid
using the radio under low temperature.
TECHNICAL INDEX
MHz
KHz
MHz
MHz
MHz
MHz
MHz
MHz
MHz
2. Sensitivity
FM ≤ 20 V
AM ≤ 6mV/m
SW ≤ 30 V
3. Single-signal Selectivity
6dB
4. Power: DC 3V
Battery
two AA1.5V batt eries
External Power
3V 3 00mA
5. Speaker: Φ57mm/4 Ω/0. 25W
6. Earphone: Φ3.5mm32Ω
7. Unit Size: 117 x76x33mm
8. Weight:
164g (wit hout battery)
≤
1. Frequency Range
FM 87-108
AM 515-1605
SW1 5.95-6.20
SW2 7.10-7.30
SW3 9.50-9.90
SW4 11.65-12.05
SW5 13.60-13.80
SW6 15.10-15.60
SW7 17.50-17.90
Download